

 DCEmu Homebrew Emulation & Theme Park News
-
DCEmu Reviews Latest News
by Published on February 2nd, 2011 00:25- Categories:
- Nintendo Wii News,
- DCEmu Reviews
Team Symbiote Wii-BOSS Modchip
Manufacturer: Team Symbiote
Site: N/A
Price: $40.00-$45.00
Overview : Almost all other conventional and homebrew modchips consist of two parts where the code is held, of which only the smaller EEPROM section of the chip can be changed easily. This EEPROM part of the code is very useful for small pre defined simple on or off selectable 1s and 0s and possibly a very small additional feature section. For example: Speed setting your chip or enabling multi-zone. However, if you want to update the entire chip, you need to physically remove the chip from the Wii, put it on a programmer, reprogram it, and then reinstall the chip into the Wii. This is not something you want to be doing constantly keep up with new optimized modchip codes for the Nintendo Wii.
Features :
- The Wii-Boss is designed as a quick solder chip with an external ribbon cable that can be left inside the machine, taped down on the back of the Wii, or even hidden inside the memory card bay. This chip can be fully programmed inside the machine with any code that supports the 12F629 PIC Microchip.
- The Wii-Boss is also designed to allow external booting off the ribbon cable, therefore protecting the user against ever having to pull the Wii apart ever again if their requirements for a particular style of modchip change. External adapters to make competitor modchips and PC applications like DVD-Tool boot externally have already been designed and will be produced soon after the initial release of the premier product for a very minimal charge. These will likely be included in future kits at no extra charge.
- The Wii-boss even comes packaged with its own RS-232 port external programmer. Software for the programmer is open source and therefore also provided free. The programmer is based on an open source project and therefore could be modded, theoretically, to be used as a standard RS-232 PIC programmer.
- Contains provision for 2 LED's. LED's are a great look, but also good to use to check to see if your chip is installed correctly without needing to check it with a import or backup game.
Quality/Usability : This review is based on a North American (NTSC-US) Wii. All games tested during this review, we own the original games. This modchip is only compatible with Wii's that have a DMS, D2A or D2B chipset. This will NOT work on a D2C chipset.
Installation : You can find installation manual at Wii-BOSS' installation page. The installation page contains images on how to install the Wii-BOSS as well as to Nintendo Wii's with the 3-legs cut off the chip.
Like all other modchips that requiring soldering, you must dismantle the Wii. The Wii-BOSS also allows you to either install via quick solder or wire method (the latter method is preferred as you can remove the chip easily). Once you have dismantled the Wii, you must locate the points outlined in their installation guide. These points is where you will connect the soldering between the Wii and the Wii-BOSS. When soldering, you must remember to stay within the points and not to use too much solder or you may risk shorting out the chip as well as the Wii.
Once soldered, connect the ribbon cable to the Wii-BOSS. Once connected, you must fold the cable a certain way so that it fits in between the Wii components. Folding the cable may take some trial and error in order to fit correctly in place. If folded correctly, the ribbon cable will now be exiting through the USB port of the Wii once it has been put back together. When the Wii is put back together, connect the Wii-BOSS programmer to the ribbon cable and installation is complete.
The Wii-BOSS is similar to that of the WiiFree Easy Connect in terms of look and installation. But the Wii-BOSS allows you to use any open source modchip of your choice. At the time of this review, Wii-BOSS supports the following codes (in no particular order):
- Wii-Free last stable release ver2.45
- YAOSM last stable release ver1.8
- Wiinja last stable release ver2.0 (deluxe currently not available)
- Open-Wii last stable release ver1.3
- Wii-skas last stable release unknown
- MaxBoot last stable release ver1.0 (redirection code for external booting)
We were able to try Open-Wii, Wii-Free and YAOSM. All worked flawlessly and without a problem.
Compatibility issues is dependent on the open source modchip itself. We did not have any problem booting Wii games with any of the above mentioned open sources.
Conclusion : Overall, the Wii-BOSS handled itself pretty well. The included tri-wing screwdriver was durable. The packaging of the Wii-BOSS was very professional unlike some other modchips where they came in either ESD bags or in small bubblewraps. It would have been nice if it included a blank 12F629 PIC chip. Those thinking of purchasing the Wii-BOSS, I suggest picking up one or two 12F629 PIC chips first or you'll be left holding a Wii-BOSS. Reason I mentioned to get one or two is because if you are using Wii-Free and ...by Published on February 2nd, 2011 00:25- Categories:
- Nintendo Wii News,
- DCEmu Reviews

Shinobii Blue Sphere Charging Dock
Manufacturer: Shinobii
Site: Buy from Shinobii / Buy from Amazon
Price: 39.99 / $39.99
Overview : The BLUE SPHERE Charging Dock from Shinobii allows you to charge up to 4 Wii Remotes at the same time. It comes with 4 Powerful NiMH battery packs where each one provides up to 20 hours of play time and is perfectly designed to fit the Wii Remote.
The BLUE SPHERE Charging Dock features 3 top LED lights that indicates the charging status in three steps: 33%, 66% and 100%. BLUE SPHERE is powered by the official Wii AC adapter and includes a pass-through powercord which is simply connected between the Wii AC adapter and console.
The BLUE SPHERE Charging Dock is fully functional even with the Wii console powered off.
Features :
- Charge up to 4 Wii Remotes at the same time
- Top LED lights that indicates charging status in 3 steps
- Includes 4 rechargeable 1200mAh NiMH battery packs
- Powered by the official Wii AC adapter
- Connected with a pass-through powercord
- Fully functional even with the Wii powered off
Quality/Usability : At first glance, the Blue Sphere Charging Dock looks like an obese flying saucer from an alien space ship. The Blue Sphere charges up to 4 Wii Remotes simultaneously. To charge your controllers, the Blue Sphere does not use a separate power adapter but rather gets its power from the Wii itself using a pass-through plug. With this, the Wii does not have to be ON. It can be in standby/sleep mode and it will still charge your controllers.
Rather than have one LED that has 2 colors (one for charging and one for when its done), Shinobii has included three LEDs for each port. Each LED represents how much it has charged. First LED is 33%, second LED is 66% and the third LED is 100%. Included in the package are four NiMH battery packs which replaces the batteries and battery cover on the remote. The batteries are said to provide up to 20 hours of gaming on a full charge. I don't play for 20 hours straight but with playing games here and there, I would say its about right.
Like the blue light in the disc slot of the Wii, the Blue Sphere Charging Dock also has a blue ring around the dock that lights up blue when plugged in. However, when this is plugged in, the color makes reading the charging LEDs harder to read. However, Shinobii has informed me that on the final product the three top led bulbs will be transparent (not blue) when light is OFF so you can tell more easily if light is turned ON (blue).
Conclusion : Overall, the Blue Sphere Charging Dock is a solidly built charging dock for the Nintendo Wii. The look is appealing and different from some of the other docks I have seen and reviewed. It takes a bit of fiddling to get the contacts to touch in order to charge but is not a big hassle. If you have a rubber skin whether it be aftermarket or from Nintendo, you will either need to remove it or lift the bottom half so that the controller fits into the dock.
Images via comments ...by Published on February 2nd, 2011 00:25- Categories:
- Nintendo Wii News,
- DCEmu Reviews

2.4Ghz Wireless Nunchuk Controller
Manufacturer: N/A
Site: Buy from BudgetGadgets
Price: $17.78; add $1.35 if you want packaging (use coupon code TM5OFF8 and get 5% off site wide)
Overview : This product is a 2.4G wireless controller for Wii Nunchuck with high frequency and coordinates with Wii Remotes (Remote Control) to use on Wii console, which makes it more convenient and fast when operating. It is designed with built-in rechargeable lithium ion batteries, and can save trouble of replacing batteries. It is compatible with Motion Plus.
Specs:
- Size: 82g or 2.89oz
- Cable Length: 1020mm or 40.16in
- Bluetooth Controller Work Voltage: DC 3.3v
- Effective Distance: 5m
- Frequency: 2.4G
Quality/Usability : Having to use the wired Nunchuk controller can get a bit annoying when you're playing a game that requires swinging and moving of both arms. Either the Nunchuk wire gets in the way and you get tangled up or you get slapped with it. Nintendo should of made the Nunchuk wireless but where they fail, other 3rd party manfacturers will pick up the slack. The 2.4Ghz Wireless Nunchuk Controller was from BudgetGadgets and came with no packaging. It comes with Nunchuk, receiver, wrist strap, USB cable and manual. You may or may not receive packaging with any item you purchase from them. Even if you wanted packaging, you would have to pay an additional cost. I'll get into this more in the Conclusion at the bottom.
Shape and size is identical to that of the Nintendo Nunchuk...minus the wire. The blue backing of the Nunchuk has a rubber texture to allow better grip. On the bottom left side of the wireless Nunchuk is a switch. This lets you turn it ON and turn OFF for when you're using it and to save battery when you're not. The very bottom is a little port to insert the USB plug for when you need to charge it. The bottom front is a small LED indicator to let you know when its pairing (blinking) and when its paired (steady blue).
The receiver has a small LED indicator at the bottom of the Nunchuk. When the Nunchuk is plugged in and charging, the LED is red. When the Nunchuk is done charging, the LED will turn off. After about 2 hours or so of charging, the controller is ready to be put to use. A blue LED is lit to let you know when its pairing and when its paired with the Nunchuk. The receiver connects to the bottom of the Wii Remote Controller. If you have a Wii Motion Plus adapter, the receiver would connect to the bottom of the Wii Motion Plus. The size of the receiver is fairly long, so it will get in the way if you bend your wrist. To remove the receiver, simply pull it out. There is no clips holding it in place like the plug on the wired Nunchuk controller but the receiver is held in place securely. I was able to get a good 12-14 hours of gameplay before the Nunchuk needed to be recharged. However since the receiver is running off the Wii Remote, it drains the battery even quicker. So if you're still using regular alkaline battery, I suggest getting rechargeable battery packs.
Conclusion : Overall, the 2.4Ghz Wireless Nunchuk Controller is what the Nunchuk should of been from the start. The reception was great (than again, your arms arent going to be that far apart) and the accuracy is very good. Since it draws power from the Wii Remote, expect the battery life of the Wii Remote to be shorter. I was able to get a good amount of play time before the Nunchuk had to be recharged. It would have been nice if there was also an indicator stating when the battery is running low.
For the price of $18 (no packaging) or $20 (with packaging), its a bit pricey. For the same amount, you can get a Nyko Kama which has a small length receiver and longer battery life but uses (2) AAA batteries.
Now, back to BudgetGadgets packaging issue. Under their FAQ, this is what is stated about packaging:
For some of the products we offer the 'Package' option. By default, the package is not selected so that we can save shipping cost thus we can offer lower price to our dear customers like you. If you choose the 'No Package' option, we will NOT ship the package to you.
And, to avoid potential quality issue, we always test each item when we get them from suppliers, and then we test them again before we ship them, thus sometimes we need to open the packages. And some items come without the package when we get them from supplier, so sometimes you will also get the item without the package, but all items we sell are in BRAND NEW condition, please don't worry about that.
For those items that gives you the 'Package' option, I dont know if its worth it or not to pay extra when it should be included. Than again, its going to get thrown away when you receive it and bust open the package but I would like the satisfaction that it was from a sealed package and I'm the one that opened it. I can see how BudgetGadgets is offering free shipping by cutting back on including packaging. However, other online stores include the packaging ...by Published on February 2nd, 2011 00:25- Categories:
- Nintendo Wii News,
- DCEmu Reviews

Joybox PlayStation Controller Adapter
Manufacturer: N/A
Site: Buy from Goldenshop
Price: $9.00
Overview : Use your most beloved PlayStation controller on your GameCube/Wii.
Features :
- High quality 3rd party product.
- Convert the PSX/PSX2 controller to be used on the GameCube or Wii console.
- Supports rumble function.
- Supports all the buttons.
Quality/Usability : I know I'm probably not the one that enjoys and loves the way the PlayStation controller feels in our hands. Some may not like the feel of the GameCube controller whether it be design or button layout but now, there is an option to let you use your beloved PlayStation controller instead.
We tested the Joybox PlayStation Controller Adapter. Nothing fancy. Just a simple piece of adapter that plugs into the GameCube controller port and a female PlayStation adapter to plug your PlayStation controller. The best part about the Joybox is the compatibility with the PlayStation 2 controller. Yes, the Dual Shock feedback even works. Here is a layout of the buttons compared between the GameCube and PlayStation controllers:
GameCube---PlayStation
D-pad--------------D-pad
A--------------X
B--------------Square
Y--------------Triangle
X--------------Circle
Z--------------R1/L1
R--------------R2
L--------------L2
C-Stick--------------Right Analog
You wont be able to configure the button setups but I dont know why you would want to considering the PlayStation controller layout is almost the same as the GameCubes. For some games, the "Z" button on the GameCube is the R1 on the PlayStation but depending on the game, it can also be L1. So you get to use both R1 or L1.
Regarding the feedback, I noticed that for some games, it was strong as if I was playing a PlayStation game but with some, the rumble feedback wasnt as strong but you can still feel it.
Conclusion : Overall, the Joybox PlayStation Controller Adapter works well for those who want to play GameCube games with their PlayStation controllers. A nice feature is the ability to allow rumble feedback when using a Dual Shock controller. The price of $9 for this adapter is fairly cheap. The layout of the buttons is similar to that of the GameCube controller. If you dont have an extra GameCube controller for that extra multiplayer fun but have a PlayStation controller, this will come in handy.
Images via comments ...by Published on February 2nd, 2011 00:25- Categories:
- Nintendo Wii News,
- DCEmu Reviews

Wii 5-in-1 Laser Pointer Gun
Manufacturer: PEGA
Site: Buy from Goldenshop
Price: $14.00
Overview : Improve your shooting skills with this 5-in-1 laser pointer gun.
Features
- High quality 3rd party product.
- Easy to install.
- Natural Nunchuk trigger combined with the functional innovation of the Wii Remote.
- Ergonomically balanced and weighted gun, comfortable for 1 handed or 2 handed gamplay.
- Maintains Wii Innovation Motion.
- Secure and easy installation. Extended grip for the directional control of the rear nunchuk analog joystick.
- Full access to all buttons and digital pad.
- Can be used as handgun only.
- Can be used as tommy gun.
- Comes with laser targeting - operated by 2 AAA size batteries.
- The Nunchuk can be separated easily.
- The folding angle of the Nunchuk can be adjusted.
Quality/Usability : All these light gun are just plastic shells so you can fit your Wii remote and Nunchuk into them. There are different kinds of light gun attachment whether they are shaped differently or colored differently. But these 3rd party peripheral manufacturers will add anything to their products to attract potential buyers. This time, PEGA has included a laser pointer underneath the gun.
Honestly, the moment I saw this attachment, I knew there was going to be a lot of faults with this. There are two attachments. One is for the Wii remote and the other is the attachment for the Nunchuk.
The top of the main base has a cover. This allows you to insert the Wii Remote control and secure it in place. The tabs that keeps this cover secure feels so cheap and flimsy. Every time I open it or close it, I'm afraid that I may break it. On both sides of the gun is a small opening. This allows you to put the Nunchuk cable through so you can connect to the Wii Remote. So if you're a lefty, you'll have the cable coming out from the right side and if you're a righty, you'll have to cable coming out from the left side.
The front bottom of the gun houses a laser pointer. Yes, the same laser pointer that you use for presentations or annoying people. Underneath the laser is a battery compartment. This battery compartment houses two (2) AAA batteries to power the laser pointer. The trigger itself though feels sturdy and reaches the B button on the Wii Remote. I personally wished it was close to the B button so I dont have to pull so far. Underneath the trigger is a small button. Pressing this button will turn on the laser pointer. The laser pointer fails horribly. It works..as in it points but not where you would think it would point. Instead of pointing straight, its pointed way off to the right. If you're sitting fairly away from the screen, the pointer will be pointed to the right of you. The further away you are, the more way off it will be. See attached images for picture of what I mean.
The Nunchuk attachment holder was poorly constructed as well. The Nunchuk holder is detachable but when its on the base, its not held securely or clipped in place. So you can easily slide it off. This is bad if you're in an intense gun battle and moving your hands around. When the Nunchuk holder is on the base, you are allowed to adjust the position of it by pushing it up. This only works when you hold the gun below your waist but even this feels uncomfortable. If it adjusted down than it would of been better. If you have your right hand on the trigger and your left hand on the Nunchuk, your left hand will be touching your right wrist.
Conclusion : Overall, the Wii 5-in-1 Laser Pointer Gun is one light gun shell you do not want to bother with. The only good things about the accessory is the laser pointer. It actually works and it feels comfortable, if you hold the gun on the left hand and Nunchuk on your right. You can also detach the Nunchuk holder and just hold the Nunchuk controller in your hands. Everything about the 5-in-1 Laser Pointer Gun is poorly constructed.
Images via comments ...by Published on February 2nd, 2011 00:25- Categories:
- Nintendo Wii News,
- DCEmu Reviews
Wii LAN Network Adapter
Review by: cowdisease
Provided by: DCEmu Reviews
Manufacturer: N/A
Site: Buy from GameInfinity
Price: $19.95
Overview : Youve got a Nintendo Wii. You have a broadband internet connection on your PC. Youve heard about all the fun things you can do online with your console. Yet when it comes to connecting your Wii to the net, you dont know where to start. With our amazing new LAN Adapter for the Nintendo Wii, you can create a wired high-speed internet connection for your console. Just plug the Adapter into your Wii's USB port, and then connect it to your PCs DSL or Cable modem or your router using a network cable. Its as simple as that! It's USB 2.0, taking advantage of the latest, fastest USB protocols.
Because Wii LAN Adapter uses a cable connection, it always offers high-speed, reliable data transfer speeds. Its ideal for places where wireless connectivity isn't possible, perhaps because of thick walls or interference from other products, and it's faster than any WiFi connection. At last, you can enjoy uninterrupted online gaming!
Features:
- Creates a high-speed LAN Internet connection for your Nintendo Wii
- No wireless network required
- Connects to your existing PC connection or DSL modem
- USB 2.0 connection supports the Wii at full speed
Quality/Usability : I applauded Nintendo when they announced that their newest console, the Wii, would come equipped with wireless networking capabilities directly out of the box. Hooray! I thought, I wont have to pay an obscene amount of money to get an overpriced wireless adapter to connect my Wii to my stunning wireless network! Instead, Nintendo did it backwards, leaving out the usual wired Ethernet port, so if you are one of the many people who have not yet set up their home with a wireless network (or if you are like me and dont like dealing with the hassle of wireless network security and dropped connections) then you have to buy this regularly priced wired adapter.
It will cost you $24.99 plus shipping and handling to rectify this omission if you buy through Nintendos online store, a price that is comparable to other PC-only USB LAN adapters on the market. The package is as bare-bones as it can be, containing simply the one-piece adapter, a single folded instruction sheet, and a small CD containing PC drivers.
Hooking your Wii up is as simple as the pictures on the back of the box suggest. Simply plug the USB end of the adapter into one of the two slots in the rear of your Wii, plug your Ethernet cable into the adapter, and turn your Wii on. The only remaining step is to go into your Wiis settings and change the connection settings to wired from the default wireless option. The one-page instruction sheet has clear, illustrated instructions that will walk you through this simple process, and after a short automated test your Wii will be connected to the internet. The length of the entire process from opening the box to being connected depends mostly on how good you are at opening boxes.
The USB cable on the adapter is about five inches long, just long enough to rest flat on any surface if you have the Wii oriented vertically. The body is about an inch thick and three inches long, so it is not as compact as some of the other adapters of this type on the market, so while it can be used for your laptop it is not ideally suited for portability. It is the same color and shape as the Wiis power brick so it is aesthetically consistent with the rest of the Wii gear. When plugged in two unlabeled, red LEDs indicate that it is functioning.
The PC setup is also fairly simple, as you can plug and go. However if your computer does not automatically install your adapter properly you will have to deal with the driver disc. When the disc is inserted it simply opens an explorer window that shows the various files containing the different drivers. There are no auto-prompts here, but once you select the proper drivers the install is quick and automatic. The disc supports a wide variety of operating systems: Linux, Windows Vista and XP in 32 and 64 bit, CE, ME, 98, and Mac OSX 10, and works flawlessly.
Conclusion : Overall, if you need or want to wire your Wii to the internet the adapter is reasonably priced, quick and easy to use, even if it is a little bulky. If you want to get over your resentment at Nintendo leaving out a basic component that will cost you thirty dollars, go get yourself some ice cream.
Images via comments ...by Published on February 2nd, 2011 00:25- Categories:
- Nintendo Wii News,
- DCEmu Reviews
VDIGI VD-W3 Wii HDMI Upscaler
Manufacturer: VDIGI Electronics
Site: Buy from VDIGI Electronics
Price: USD$59.00 (WAS $75)
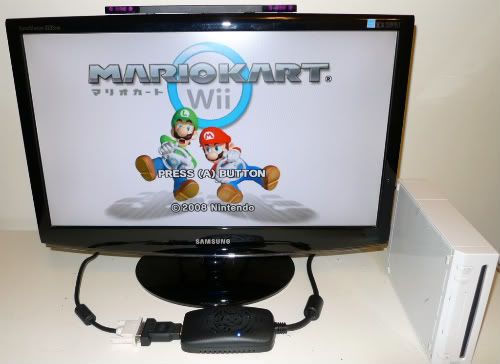
Overview : This is the world first dedicated Wii HDMI Upscaler, it can support connection though HDMI or DVI, and enjoy resolution up to 1080p or monitor resolution 1680x1050.
Features :
Powerful Video Signal conversion
- Crystal shape image, Outstanding picture quality.
- Full HD (1080p) output.
- True 10-Bits high definition video scaler engine.
- AV grade scaler engine.
User Friendly
- No external power required.
- Easy to setup.
- LED status indication.
Wide Range Video support
- Support TV (HDMI) and PC Monitor (DVI).
- HDMI-Audio and Analog audio out.
- Various HDTV video out.
- Native resolution for LCD monitor.
Specs :
- Input: Wii AV Connector x 1, USB Type A Plug x 1.
- Output: HDMI x1 , 3.5mm Stereo Audio Jack.
- Video lag time: 8 ms
- Video In Supported: EDTV(480i/576i), SDTV(480p/576p)
- Video Out Supported : 480p, 720p, 1080i, 1080p, 1280x1024, 1440x900, 1680x1050 (at refresh rate 59.94Hz)
- Audio Out: HDMI audio, Analog audio.
- Bi-Color LED: Blue and Red.
- Operating Temperature: 5°C to 60°C (41°F to 140°F)
- Dimensions (approximate): 12cm (L) x 7cm (W) x 2.5cm (H)
- Mass (approximate): ~180g
Quality/Usability : This review was tested on a 32" Samsung 720p HDTV (HDMI) and a 24" Dell Widescreen 1080p Monitor (DVI).
Let me start off by saying that the VD-W3 is a upscaler. Those expecting the VD-W3 to render images to high quality, this is not the product. VD-W3 will upscale the Wii's 480p signal and can independently scale SD images horizontally and vertically to achieve a quality picture for video display up to 1080p resolutions. The VD-W3 provides an HDMI connection, which is an alternatives to AV or component connections. This will also allow you to display your Wii on a monitor using DVI with audio output.
Upscalers are not new...at least not on the market. They were usually primarily used for DVD players but this is the FIRST solely dedicated for the Nintendo Wii. Upscalers basically output smoother and cleaner images on your display.
Connecting the VD-W3 is not complicated at all. The VD-W3 simply replaces the standard AV/Component plug and has a USB cord attached to it. This USB cord is what will power the VD-W3. No extra socket or power cord needed. This is great because I have daisy chained surge protectors in order to have enough sockets. On the other end of the VD-W3 is a port to insert your HDMI cable. If you do not have a HDMI TV or monitor, you will need to use a HDMI-to-DVI adapter and use a DVI cable. Do note that using a DVI cable does not transmit sound, so you will need to insert a 3.5mm cable from an external speaker.
The bottom of the VD-W3 contains a bunch of dip-switches and a RESET button. Different combinations of the dip-switches will change resolution (480p, 720p, 1080i, 1080p and screen 1280x1024, 1440x990 and 1680x1050) as well as adjusting image (NORMAL or ENHANCED) and choosing between HDMI or DVI setup. There is an option for MODE 1 and MODE 2. There was no mention of this in the paper menu that was included but was told by VDIGI representative that this is for zooming in and out. If you have a black border, this would zoom in which will remove the black border. I did not have any black borders, so I was unable to confirm. If you have made a change in the dip-switches, the screen should automatically refresh within a couple of seconds. If it does not, you can press the RESET button and it will refresh the screen.
Comparing Component output and VD-W3's, I noticed that with the component cable, the display was brighter. With the VD-W3, the display was dimmer. As stated, this will upscale the Wii's 480p signal. There was some slight improvements that was noticeable but nothing jaw-dropping. Certain areas you would see that jaggies present in component was slightly improved and cleaner looking on the VD-W3. In some areas, jaggies was still noticeable but not as bad. DO NOT expect this to be a complete Wii HD.
With the less than a handful of GameCube games that are left in my collection, the VD-W3 had a little trouble with menus, in-game loading and intros. Images either froze or were slightly distorted. This can be resolved by playing around with the dip-switches on the bottom of the VD-W3. However, this can get annoying and bothersome.
The following images are from VDIGI using a HDMI capture card. VDIGI used AverMedia Capture HD capture card, directly captured from the VD-W3 HDMI output, this provide the best pictures on how it should be look like. For this capture card, it only allows them to capture up to 1080i HDMI/DVI output, so they cannot capture 1080p picture for your reference. This will provide a much more accurate view rather than taking a picture of a screen with a camera. Left hand side is 480p and Right hand side is 1080i, Click for the below pictures to display the bigger image (~500KB to 1MB in each file size, longer download time may needed)


Conclusion : Overall, the VDIGI VD-W3 Wii HDMI Upscaler is a nice product but had some flaws. The brightness of output is dimmer than that of my component cable and the improvement is visible but nothing drastic. Within a week of VD-W3's release, VDIGI has read a lot of comments after our newspost was posted and most of the comments were about the price. After serious thoughts about the comments from potential buyers and for the Wii market need, VDIGI has dropped the price from $75 to $59! VDIGI's VD-W3 is the first Wii HDMI dedicated upscaler on the market and there is no comparable product to compare price. It's difficult to set a starting price but VDIGI used the upscaler price standard to define the VD-W3 as the same grade as most of the common AV upscalers.
I do agree that the $75 price tag was a bit steep but I am glad (as well as many others) that VDIGI lowered the price to something more affordable.
If you dont have additional HDMI cables, you may want to purchase VDIGI's 1.5m/5ft HDMI cable (Male to Male 1.3b 28AWG with Ferrite Cores) for an additional $8. If you purchased it separately, it would be $16.
If you are using a DVI cable for your monitor, VDIGI Electronics sells a Female DVI to Male HDMI Converter for an additional $5 with purchase of VD-W3 or $10 by itself. Purchasing both the 1.5m/5ft HDMI cable and converter with VD-W3, its $12.00. Its not a bad price for the combo but its either one or the other. You cant use both.
VDIGI is open to comments, suggestions and will do suitable adjustment to respond to feedbacks.
Images via commentsby Published on February 2nd, 2011 00:24- Categories:
- Nintendo Wii News,
- DCEmu Reviews
WiiKey Modchip (DMS/D2A/D2B)
Manufacturer: WiiKey
Site: Buy from Mod-Chip
Price: $30.00-$40.00
Overview : The amazing WiiKey Mod Chip for the Nintendo Wii has arrived! The WiiKey is possibly the easiest modchip to install on any system. A quicksolder pattern on the PCB board removes the need for wires. All you need to do us solder onto the designated parts and the installation is complete.
Not only is the WiiKey easy to install, but this ModChip also has amazing features including Stealth Mode, the ability to play both WII and Gamecube backups, GameCube homebrew and imports. The WiiKey also has an optional LED to let you know when the Mod Chip is ON or OFF.
Features :
- Direct boot of wii backups
- Direct boot of GC backups
- Direct boot of homebrew in GC mode
- Supports all currently available console/drive versions
- Supports D2B chipsets
- Sophisticated (true) update mechanism via DVD (future proof, expect cool features to come)
- Direct boot of different NTSC region Wii games/backups on US and JAP consoles
- Partial support for NTSC region Wii games/backups on PAL consoles
- Boots different region GC games/backups (partially without swapping)
- Supports multi-disc games for BOTH Wii and Gamecube
- Supports DVD-R / true DVD+R and +RW support (no bitsetting required!)
- Improved readsettings for recordable media
- Built-in audio fix
- Supports fullsize 4GB discs for gamecube homebrew
- Stealth mode
- 512 byte EEPROM to store configuration
- Quicksolder interface - no wires required
- Unique disc backup application via sdcard
- Compact design, best quality components, rock solid high speed controller
- Professional ESD packing
- Recovery mode - Can recover from a bad flash
Quality/Usability : WiiKey is probably one of the most well known modchips for the Wii. Its so popular that there is even a clone of it. To prevent confusion, WiiKey tried to think of ways to inform buyers that what they are buying is legit and the real deal. Their solution was a hologram sticker. But this didnt stop some buyers as the clones also worked the same as the real WiiKey.
This review is based on a North American (NTSC-US) Wii. All games tested during this review, we own the original games. This modchip is only compatible with Wii's that have a DMS, D2A or D2B chipset. This will NOT work on a D2C chipset.
Installation : You can find installation manual at WiiKey's Resource page. The Resource page also includes setup discs, recovery disc and the much anticipated firmware update disc which I will get to later.
In order to install the CycloWiz onto your Wii, you must take it apart. Here is a tutorial on how to dismantle your Wii. You can also find other tutorials or even videos on the web.
Like all other modchips that requiring soldering, you must dismantle the Wii. The WiiKey also allows you to either install via quick solder or wire method (the latter method is preferred as you can remove the chip easily). Once you have dismantled the Wii, you must locate the points outlined in their installation manual. These points are where you will connect the soldering between the Wii and the WiiKey. When soldering, you must remember to stay within the points and not to use too much solder or you may risk shorting out the chip as well as the Wii.
After installing the WiiKey, you must run the WiiKey configuration disc which can be download from WiiKey.
Wii Compatibility : After running the configuration disc, its time to test out games. With some modchips that we reviewed, there were some games that gave the DRE (Disc Read Error), but taking that same disc and trying it on the WiiKey worked and booted up perfectly. But there were some that didnt work.
Homebrew Compatibility : Unfortunately, I wasnt able to try the homebrew out.
Conclusion : Overall, WiiKey modchip came through and worked. The ability to load games had a higher success rate than majority of the Wii modchips on the market. Not to mention, its one of, if not the smallest Wii modchip on the market!
1.9b Firmware Upgrade Disc
Now, remember when I talked about the WiiKey update disc? Well, WiiKey was suppose to release this upgrade a long long long time ago but kept delaying it. They would give a release date and would delay it for whatever reason. This would annoy and piss of WiiKey users and even other gaming sites for the lack of actually following through on their word and releasing. Some speculated that WiiKey was a flake or lying. Some even thought they were trying to combat the clones and trying to figure out how to get the upgrade disc to only work on genuine chips and possibly brick Wii's that have clones installed..but of course, all this was a rumor.
There was a leak of the supposed upgrade disc but it was a beta. Eventually, after further testing, WiiKey decided to make it an official release as it was stable enough and worked as it should. The following is what was added to 1.9b
- audiofix fixed
- dual layer support (no bitsetting required)
- improved
by Published on February 2nd, 2011 00:24- Categories:
- Nintendo Wii News,
- DCEmu Reviews

The Shaft Wii Arcade Style Joystick
Manufacturer: Overline Gaming
Site: Buy from Overline Gaming / Buy from Amazon
Price: $39.95
Overview : Designed by gamers, for the ultimate gameplay experience, The Shaft for Nintendo Wii is the ONLY Arcade Style Joystick that works with both digital and analog games. The Shaft, our classic arcade-style joystick brings a new dimension of game play to the Nintendo Wii Virtual Console. The Shaft will work with all of the Virtual Console games for NES, SNES, N64, Genesis, TurboGrafix16, and Wii titles that support the Classic Controller.
Test your arcade fighting skills in digital controlled games like Super Street Fighter 2, or test your racing skills in analog controlled games like Super Mario Kart. The Shaft is also compatible with GameCube and Wii titles that support the Classic Controller, giving you the arcade advantage in these games including the recent hit: Super Smash Bros Brawl.
Turbo Mode is available to give players a unique advantage in those classic hard-to-beat games! Each button can be individually programmed to turbo for the most customized gameplay experience available. The Shaft is extremely durable with a high-impact polycarbonate case and a steel joystick core. The Shaft has a classic arcade feel and measures 11 inches x 6 inches.
Features
- A Customizable Turbo Function allows you to program individual buttons to be Turbo while leaving others to work as normal.
- Full 360 Degree range of motion that works with both digital and analog stick games.
- 8 Locking points for Awesome response in Fighting Games.
- 10-Year Warranty.
Quality/Usability : The Shaft Wii Arcade Style Joystick first made headlines back in late 2007. Since than, it has been flying under the radar with no release news. Upon emailing Overline Gaming in regards to availability of product, it wasnt released yet even though it was a couple months since its scheduled release. But alas, its finally available!
Nintendo's Virtual Console games are growing everyday and those gamers who want to relive their childhood of sitting in front of an arcade cabinet and constantly feeding the machine with quarters would like an arcade stick to simulate that feeling. Overline Gaming hopes to fulfill those dreams by releasing The Shaft.
The Shaft tries to replicate the arcade cabinet feel by putting a round ball on top of a stick with six large buttons. Top three buttons are Y, X and L, while the bottom three buttons are B, A and R. The middle also has three buttons; TURBO, SELECT/Z and START. However, this arrangement is uncomfortable if you want to play some Wii games. Accessing the Z button feels awkward and out of place.
Unlike the Wiimote, Classic Controller or Nunchuk, The Shaft is not wireless nor does it connect directly to the Wiimote like the Classic Controller or Nunchuk. Instead, its a wired controller and connects to the Gamecube controller port on top of the Wii. This is great since you dont have to worry about batteries dying on your in the middle of gameplay but you need to sit near the Nintendo Wii. The cord on The Shaft is approximately 6 feet long. I know some gamers have their Wii on top of a shelf so some will need to sit right under the TV.
Having played Super Smash Bros Brawl, the Z button felt really out of place. Having to try and play SSBB with the awkward button arrangement on The Shaft, I can feel that the stick felt rather cheap. The quality of the stick was not on par to that of Hori's Fighting Stick. Arcade sticks always have that clicky feel but The Shaft doesnt even have that. The buttons feels unresponsive and doesnt give that arcade joystick feel. But I was able to set turbo to each individual button.
Conclusion : Overall, the The Shaft Wii Arcade Style Joystick is barely at the level of an arcade stick. The short cord with the use of Gamecube plug, awkward placement of the Z button and poor unresponsive buttons didnt help The Shaft. The price of $39.95 is overpriced for the quality of The Shaft. If it didnt feel so cheap, better placement of buttons, two additional buttons or even using HAPP or similar quality joystick buttons, this may be worth it.
Images via comments ...by Published on February 2nd, 2011 00:24- Categories:
- Nintendo Wii News,
- DCEmu Reviews

D2Pro Wii Modchip
Manufacturer: WiiKey
Site: Buy from ConsoleSource
Price: $39.95
Overview : Sporting a high speed Actel FPGA running at 350 MHz, this chip is capable of what is known as Intelligent Code Modification(ICM). With ICM this device monitors the Wii's internal communication and patches it when necessary to enable you to unlock the Wii's full potential.
The D2Pro installs with only 15 wires instead of the 30+ wires required by previous Wii Mod Chips. In addition to a simplified installation the D2Pro is fully software upgradeable to ensure future compatibility.
Features :
- Compatible with DVD+-R, DVD+-RW and Dual-layer DVD (movies and GCOS)
- Direct boot of Wii original and backup games from the same region
- Direct boot of Gamecube original and backup games from the same region
- Direct boot of different NTSC region Wii and GC games on USA and JAP consoles
- Partial region free support on Wii and GC original and backup games with different videomode (ie PAL<->USA, JAPAN)
- Improved read settings for recordable media
- Supports running GC games at Wii disk speed
- GC Audiostreaming Fix
- Supports full-size DVD and DVD9 discs for GC homebrew
- Supports GC multigame discs
- Supports Wii and GC multidisc games
- Does not modify RAM, making it virtually undetectable for the Wii
- Full command set emulation
Quality/Usability : The D2Pro is Team WiiKey's third mochip. After releasing WiiKey for DMS, D2A and D2B chipsets, they released D2Ckey for the much harder to mod D2C chipset which required 31 wires. Soon after Infectus released their Argon, WiiKey released the D2Pro which only required less than half of the amount of wires as D2Ckey (12-15 wires).
Unlike traditional modchips, D2Pro is upgradeable through an external programmer also known as D2prog. No more having burning discs just to upgrade. As Argon is the first to have less wires for D2C and uses an external programmer, D2Pro follows it. Its normal as thats how it always is whether it be in the gaming industry or any of your household products.
D2Pro comes in a small anti-static bag. For a limited time offer, if you order from ConsoleSource, it comes with a free Tri-Wing screwdriver. If you already have one, no biggie..you'll just have a spare. But if you dont already have one, you'll need this. As mentioned above, you'll need an external programmer to update the D2Pro for when WiiKey releases any new updates. Unfortunately, its not included. Its not even sold on ConsoleSource. Some other sites either include the external programmer or sell it separately.
The D2Pro is the same size as the D2Ckey. This time, there its in a different colored PCB board (red), has a ribbon cable clasp and uses a Actel chip.
As its still hard to find a Nintendo Wii on store shelves, a friend volunteered his Nintendo Wii that he was lucky enough to find in a store. As I'm not as technical when it comes to soldering, I had a friend of ours who works on electronics for a living, help perform this risky mod. REMEMBER, this is only for the experienced and not the weak at heart (noobs). But if you have the experience or want to try it out, you can download the latest diagrams on D2Pro's website.
You can find instructions on how to dismantle/disassemble your Nintendo Wii by doing a Google search. There are numerous text guides and even videos.
Wii Compatibility : Having tested a couple of Nintendo GameCube and Nintendo Wii games, I must say, D2Pro performed very well. We tried both original and backups for the hell of it. D2Pro loaded and booted all games without a problem. We tried Ikaruga which needed a audiosteam fix and it had no problem loading both game and sound. We did not have problems playing with any region free games.
Homebrew Compatibility : Having tried to boot GCOS and a few emulators, D2Pro had no problem running them.
Conclusion : Overall, the D2Pro Wii Modchip worked just like its predecessor, D2Ckey but with less wires. When D2Pro was first released, the external programmer (D2prog) was not included or released at the same time. In order to upgrade the D2Pro, you'll need this external adapter which is available now. If you're going to upgrade, you'll also have to reopen your Nintendo Wii in order to install the ribbon cable. From what I can tell, the ribbon cable is not included with the D2prog so you'll either have to find one on your own or hope that a retailer will include it.
Team WiiKey has also released a new D2Pro that can be installed with only 9 wires but we did the normal 15 wire install. If you dont want to buy a whole new D2Pro, you can purchase a SPI flash update module which is soldered onto the corner of the D2Pro.
Those looking for a cleaner and easier installation may want to take a look at the Wii-Clip.
Please note that none of the "upgrade" products listed in this site are endorsed by Nintendo, Sony and/or Microsoft. DCEmu Reviews and DCEmu Network does not condone piracy. The primary functions ...
- Search DCEmu
- Advert 3
 News Categories


- Links of Interest
 Sony Consoles News


- Nintendo Consoles News


- Sega Consoles News


- Apple & Android News
- Xbox Consoles News


- Open Source Consoles News
 DCEmu News Archive
- Advert
- Retro Consoles News


- PC News

- Latest DCEmu News


- DCEmu Network Sites
-
 Menu
Menu  Forum Stats
- What is the DCEmu Homebrew & Gaming Network
Catherine: Full Bodys English translation for the Vita