

 DCEmu Homebrew Emulation & Theme Park News
Raspberry Pi
by Published on May 5th, 2018 09:35
The awesome multi system supporting emulator has a new release, heres what systems this release is for starting with PC, Apple Mac, Android, IOS, Playstation 3, Playstation Portable, PSVita, Xbox Original, Gamecube, Wii, Wii U, Nintendo 3DS and Raspberry PI:
RetroArch 1.7.3 has just been released! Grab it here. This latest version has also been uploaded to the Google Play Store. If youd like to show your support, consider donating to the team. Check here in order to learn more.
RetroArch now has a WIMP GUI, powered by the powerful multimedia framework Qt! This feature is available currently for Windows and Linux. macOS users will have to wait a while longer for this feature to arrive to their platform.
The WIMP GUI works as a companion to the main RetroArch window. You bring it into view by pressing the F5 key on your keyboard. From there, you can do many tasks:
- Select a game from any playlist
- Browse the file system or any attached media storage device and load a game.
- Scan directories for content and generate system playlists.
- Associate cores to an entire playlist or associate only one entry of a playlist to a specific core
Some things wed like to note:
- This has been the combined work of bparker and Tatsuya79 that have worked tirelessly on this for a month. We are aware of several features that wed like to implement, such as playlist editing, grid view layouts, etc.
- We are open to feedback on the GUI.
- You will likely not see this WIMP GUI on Android or iOS (or any game console for that fact) anytime soon. WIMP interfaces dont lend themselves well to devices that rely on touchscreen or gamepad-based controls.
- (For Linux users) The Qt GUI should definitely work on X11. If youd like to run it on Wayland, make sure you have the appropriate packages installed for Qt5 in your package manager. Be aware that Qt 5 cannot gracefully fail right now in case a platform module/plugin is missing from your system. This means that if you invoke the companion UI by pressing F5 on Wayland, and for whatever reason the platform module that Qt relies on in order to work on Wayland is not there, there is no way for RetroArch to gracefully fail there and just not show the companion UI. There will be a crash instead. Unfortunately we have talked to some Qt developers and they see no other way around this for now. The same situation applies for DRM/KMS right now. If we can find a better solution to this, we will certainly return to it.
- (For mac Users) You will have to wait a bit longer for this to arrive to the Mac port unfortunately. Hopefully that wait is not too long.
- We would like to still improve initial bootup times for the companion UI. Right now, on first initial startup, it can take anywhere from 5 to 10 seconds (depending on your harddrive and its performance), but on subsequent boots should only take 2 seconds or less for first startup. Hopefully by resorting to Link Time Code Generation and other avenues we can shave off some more seconds off this boot time.
OFFICIAL SITE: --> https://www.libretro.com/index.php/r...-7-3-released/
via http://www.maxconsole.com/threads/re...eleased.46926/ ...by Published on January 1st, 2017 20:09- Categories:
- Retro Consoles/Translation News,
- Raspberry Pi
Ive been sat at home this Xmas, getting drunk as you do, eating way too much and watching a load of crap films on TV, but whilst going through Facebook one day I noticed what must have been a sponsored link to a site called Pixelarcades, having never seen it before and im trying to get back into the good old days of newsposting I had a good looksy.
Now I am really glad I did, the guys at Pixelarcades are from what I can see replacing the guts of the games consoles with I presume a raspberry pi board and some type of flash drive or hard drive and bundling it with roms and emulators.
Theres probably more to it than I know but if you want a PSX, Snes, N64, Dreamcast etc maxed out with games this is an awesome way to go about it, if you live in the UK you can even get your console converted and at the moment they are even buying consoles to be retro fitted.
They also sell pinball tables and arcade systems if you have the cash to buy them, some look like one off versions too. Cant fault them at all for the balls to do this, check them out here -> http://pixelarcades.co.uk/ and give me your comments. ...by Published on September 1st, 2013 00:50- Categories:
- Raspberry Pi
Ive just done yet another revamping of a site and this time its our Raspberry Pi site, our site features as much news about the Raspberry pi as possible, if you havent checked out our site yet then head on over, we have 17 months of news on there.Check out the new look site here --> http://raspberry-pi.dcemu.co.uk/ ...by Published on April 7th, 2013 17:28- Categories:
- Raspberry Pi
via http://rpix86.patrickaalto.com/rblog.html
Okay, after working on rpix86 for the whole of my vacation week, I feel that I have managed to get quite a lot of work done on it. It was nice to be able to focus on it for a full week, especially as I had a good list of interesting new features that I wanted to implement. I am going to explain the new features and other fixes with a bit more detail this time, so let's get on with it.
1. EGA palette handling fix
In the previous 0.04 version I made some minor performance enhancements to the 16-color graphics modes palette handling. The change was so minor that I did not even think to run my small test.com x86 program that simply loops through all the supported graphics modes and prints some characters and lines with different colors. If I had run it, I would have noticed immediately that my small fix actually broke the 16-color palette handling! Sorry about this, I think in the future I need to always run this test program before the release, and it might be a good idea to always have the previous version available for download in addition to the just released version. So if the latest version breaks something, you can try running the previous one. In any case, now the palette problems are fixed in this version.
2. Hardware mouse cursor emulation
The next major feature is the addition of a hardware mouse cursor. Perhaps "hardware" is somewhat of a wrong term as back in the VGA days the cursor was usually drawn by the mouse driver instead of actual hardware, but I use the term to make a distinction between a (software) mouse cursor that the game itself draws, and a (hardware) mouse cursor that gets drawn simply by calling the int 33h mouse function "Show mouse cursor". My test.com tester program uses the hardware mouse cursor in all the different graphics modes, so it was a good test bench also for this work.
I wanted to see if I can use actual hardware (the OpenGL ES engine) in Raspberry Pi to draw the mouse cursor, my problem was just that I am still really unfamiliar with the OpenGL ES techniques and only barely understand how the vertex and fragment shaders work. However, I thought that attempting to make a mouse cursor for rpix86 would be a good learning experience, and thus I began working on it. I started with a simple OpenGL ES triangle tutorial, trying to get a white triangle visible on top of the actual background texture showing the PC screen. After I got that working, I began enhancing it by adding a texture to contain the actual mouse cursor shape. It took me some googling to get the alpha channel working properly, and then a lot of trial and error to get everything showing in the correct orientation. After some more studying I realized that I could perhaps have the vertex shader do all the position and scaling adjustments so that I don't need to do that in code. I was pretty happy with the end result, the vertex shader now shows the mouse cursor in the correct location and takes into account the current mouse cursor shape hot spot locations etc.
The current vertex shader code looks like the following, in case you are interested. The mouse cursor size is based on a 640x400 screen size, and it will then get proportionally larger when zooming the PC screen to larger displays.
static const char* mouse_vertex_shader = "attribute vec2 a_position; \n" "attribute vec2 a_texcoord; \n" "varying mediump vec2 v_texcoord; \n" "uniform ivec2 u_mouse_xy; // Mouse (x,y) position \n" "uniform ivec2 u_max_xy; // Max mouse coords (screen size) \n" "uniform ivec2 u_hot_xy; // Mouse hot spot position \n" "void main() \n" "{ \n" " // Adjust the mouse coordinates by the screen size. \n" " float x = float(u_mouse_xy.x)/float(u_max_xy.x)*2.0 - 1.0; \n" " float y = float(u_mouse_xy.y)/float(u_max_xy.y)*2.0 - 1.0; \n" " // Adjust the mouse hot spot position by the cursor size. \n" " x = x - float(u_hot_xy.x - 16)/640.0; \n" " y = y - float(u_hot_xy.y - 16)/400.0; \n" " // Adjust the vertex position by the mouse position. \n" " vec2 p = vec2(a_position.x + x, a_position.y - y); \n" " v_texcoord = a_texcoord; \n" " gl_Position = vec4( p, 0.1, 1.0 ); \n" "} \n";I also need to have code that converts the mouse cursor shape (given to the mouse driver using int 33h commands) to a texture. That conversion (which happens very rarely) is done with the following code. The name of the routine is from the DSx86 version where I used a hardware sprite to draw the mouse.
static u32 mouseTexture[16][16]; // RGBA valuesvoid CursorToSprite(u16 *mask){ // Convert from input 16 bits per 16 rows screen and cursor masks // to 16x16 matrix of RGBA values. int x, y; for (y = 0; y < 16; y++) { for (x=0; x < 16; x++) { if (mask[y+16]&(1<<(15-x))) // cursor pixel set = white mouseTexture[x][y] = 0xFFFFFFFF; else if (mask[y]&(1<<(15-x))) // screen pixel set = transparent mouseTexture[x][y] = 0; else // Both pixels clear = black mouseTexture[x][y] = 0xFF000000; } }}3. Overscan adjustment support
I had also received reports that rpix86 does not handle screen overscan properly. Especially when using a PAL TV output, part of the rpix86 DOS screen is in the overscan area and thus not visible. This of course makes using rpix86 pretty difficult. I had assumed that setting the overscan values in the /boot/config.txt would affect all software, but it seems to affect only the console and X Window screens.
I decided to add support for reading the /boot/config.txt overscan values, and in addition I thought it might be a good idea to have command line parameters to allow still further overscan adjustment. Thus I added the following new command line parameters to this version of rpix86:
-olLEFT where LEFT is the amount of overscan on the left border. If not given, defaults to /boot/config.txt overscan_left value. -orRIGHT where RIGHT is the amount of overscan on the right border. If not given, defaults to /boot/config.txt overscan_right value. -otTOP where TOP is the amount of overscan on the top border. If not given, defaults to /boot/config.txt overscan_top value. -obBOTTOM where BOTTOM is the amount of overscan on the bottom border. If not given, defaults to /boot/config.txt overscan_bottom value.The current values are written to stdout (if they differ from zero) when rpix86 starts, so you can check that the correct values get used, and change them when starting rpix86 if necessary.4. Support for running rpix86 in X Window environment
I also have been wanting to try adding support for running rpix86 inside the X Window graphical environment for some time now. Since many people run their Raspberry Pi "headless" without any screen or input devices connected, it would be nice if also those users could run rpix86. Of course rpix86 will run much slower when in the X Window environment, but there is a lot of old DOS software that is not performance critical and thus would run fine.
I started by googling for general information about coding for the X Window system (which was yet another completely new area for me). I found an interesting forum thread started by teh_orp, and example code in github by a forum member shirro. As the thread and code are both a bit dated already, I am not sure if this is the best way to do this, but I decided to give this approach a try. It looked like it did not require many changes to my existing OpenGL ES code, so I began adding the required changes. After a few hours of work I already had rpix86 showing up in a window (the picture was upside down, but that just needed some adjustments to the code).
I used a WinVNC connection from my Windows XP development PC to my Raspberry Pi to test this. At this point the keyboard and mouse reading still used the /dev/event files, and I knew I had to change them to use the X Window event system when running in X Window, otherwise it would not work via WinVNC and similar remote desktop connections.
I had coded touchpad mouse support into DSx86, which works by detecting the touch position on the screen and then converting these coordinates to the mouse position. I tested how the X Window mouse coordinates behave, and it looked like I can use this system pretty much as-is. The X Window mouse movement events give coordinates in pixels relative to the left top corner of the window, just like the mouse coordinates should work. This will work fine as long as the game does not use its own scaling system, which sadly many games do. Such games will most likely not be usable from within the X Window environment (thus I consider the X Window support in rpix86 to still be in the "experimental" state).
Adding keyboard support also introduced new problems. I could not find proper keycodes from the key press and key release events. Running rpix86 via VNC, and from the X window started from the console, had different keycodes for the same keys, so I knew that I can not use the keycode directly. After mapping the keycode to a KeySym value the result was (mostly) similar, but the problem was that I have a Finnish keyboard layout and rpix86 expects to get raw US keycodes, which it can then give the KEYB DOS program to convert. I haven't yet found a proper way to get the raw keycode (unaffected by the keyboard language) from the KeySym that the X Window returns. Thus some keys might not work or give incorrect keys when running rpix86 in X Window environment. It might help if you set the X Window keyboard mapping to US with a command setxkbmap us in the LXTerminal window before starting rpix86.
5. Option to run rpix86 without audio
When testing rpix86 in X Window via VNC, I realized that it might be somewhat useless to run the audio emulation if your Raspberry Pi is completely headless, with no I/O capability besides the ethernet connection. So I added a new command line option, -a2, which skips the audio emulation thread startup and thus plays no audio. This option will make rpix86 run around 10% faster, perhaps even more if a game uses both AdLib and SoundBlaster audio.
6. Added support for running "Chess Genius 3" DOS version
After releasing version 0.04 I got a rpix86dbg.log crash log from running Chess Genius 3 by Richard Lang DOS version in rpix86. From the log I could see that the game uses jpo (Jump if Parity Odd) opcode. This is a problem in rpix86, as my CPU emulation core does not support the Parity flag natively. Whenever a game uses either JPO or JPE (Jump if Parity Even) opcodes, rpix86 will quit with an error log unless I have coded specific support for this situation.
The game-specific support for Parity flag in rpix86 works by examining the previous opcodes whenever the JPO/JPE opcode is encountered. The specific code snippet in Chess Genius 3 had the following opcodes:
1AF0:3980 A818 test al,181AF0:3982 7505 jne 3989 ($+5)1AF0:3984 31BFB001 xor [bx+01B0],di1AF0:3988 C3 ret1AF0:3989 7B0D jpo 3998 ($+d)That is, the game tests the AL register for value 0x18, and if either of those two bits are set, it jumps to address 0x3989 where it tests whether the parity is odd (meaning that only one of those bits are set), in which case it jumps to address 0x3998. To support this in rpix86, I need to know what was the operation that was supposed to set the parity flag, calculate the result of this operation, determine the resulting parity flag value, and then either jump or not jump depending on the result. The problem is that I don't keep track of which opcodes have been executed and in what order before encountering the JPO/JPE opcodes.In the above situation it is not very difficult to determine the correct parity flag value. I can test that the opcode bytes before the JPO opcode are those 0xA8, 0x18, 0x75, 0x05, 0x31, 0xBF, 0xB0, 0x01, 0xC3, in which case I know the correct parity flag can be calculated by anding the AL register with 0x18, and counting the number of resulting bits. There is by the way a neat ARM ASM trick for calculating the parity of a register, created by FluBBa.
The problem in the case of Chess Genius 3 was that this was not the only location where it used JPO/JPE opcodes. Every time I fixed one location and tried to run the game in rpix86, it soon stopped in the next location and so on. After adding about a dozen or so special cases, I noticed that the code segment seems to stay the same, so I decided to disassemble this whole code segment and look for JPO and JPE opcodes from the disassembled result.
I found out that the game had 36 different locations in the code where it used the JPE opcode, and 35 places with JPO opcode, used in a variety of ways. There were even a couple of pretty difficult problems, for example in this code:
1AF0:58C6 A809 test al,091AF0:58C8 B004 mov al,041AF0:58CA 7A02 jpe 58CE ($+2)The code tests the AL value, then stores something else into AL, and then jumps based on the parity result of the test. When rpix86 encounters the JPE opcode, it has no way of knowing what AL value was used in the test, because the value had already been overwritten! I needed to add code to store the TEST AL,imm8 opcode (0xA8) result into memory, in order to use this later in the JPE opcode. This will marginally slow down the handling of that opcode, but luckily that is not the most commonly used opcode, and simply writing a byte to memory (into stack area, actually) should not slow anything down noticeably.I have been letting the game run a match (computer versus computer) for a long time and it does not seem to encounter any problems, so hopefully the game will now work properly in this 0.05 version.
7. Other JPE/JPO opcode support fixes
When adding the JPO/JPE opcode support for Chess Genius 3, I noticed that I had not ported the existing special support properly from DSx86 version to the rpix86 version. I fixed the problems in the existing support, which affected all the following games. If you have encountered weird problems in these games, they might work better in this version. Some of the names only show the executable name, as those are based on DSx86 crash logs so I have not known the actual game name:
- Amazing Spiderman
- Batman Returns
- Bubble Ghost
- BUBBOB
- CALGAMES
- F29 Retaliator
- GWBASIC
- Micro Machines 3
- STARGATE
- Super Solvers: Challenge of the Ancient Empires
- The Incredible Machine
- TOUTRUN
- Turbo Science
8. Help request
If you are graphically inclined, I could use your help with rpix86. I would like to have a rpix86-specific favicon for these web pages, and I think that rpix86 could also have its own icon, which could be used when running it in X Window environment. Also, the "box art" image that I have in the Raspberry Pi store for rpix86 is pretty horrible. If you have an idea for an icon, and/or interest in creating one, please let me know! If/when I decide to use your icon/image, I will certainly credit you on these pages.
Download Via Comments ...by Published on March 23rd, 2013 22:13- Categories:
- Raspberry Pi
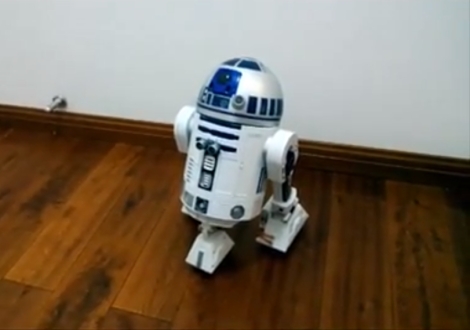
Ah R2D2. Probably one of the most recognized little robots on the planet. There have to be a hundred different toys of R2 out there, but one of the more impressive is the 30th Anniversary Interactive edition. Complete with all kinds of bells and whistles, its about as realistic as they come. One Star Wars fan found himself in possession of a broken Interactive R2, and with his girlfriends birthday coming up, decided to do a little droid surgery to create the ultimate gift.
Giving Anakin a run for his money, all the controls for this R2 unit were custom built. A Raspberry Pi running Rasbian acts as the brain. Facial recognition was implemented usingOpenCV. Voice commands in either English or Chinese were made possible byPocketSphinx. Some of the other features he included are: message recording and playback, ultrasonic distance detection, motion detection, wifi, and a rechargeable battery. Many of those features were included in the original toy, but since this unit was broken, had to be rebuilt from scratch.
In the end, it must have impressed his girlfriend shes now his wife. Good work Jedi.
http://hackaday.com/2013/03/23/hacke...-raspberry-pi/ ...by Published on March 4th, 2013 22:36- Categories:
- Raspberry Pi

The Raspberry Pi has been on sale for just over a year. Key distributor RS Components wants to celebrate the tiny computer's first birthday with more than just a greeting card, though. It's producing a limited edition Model B, the Blue Pi, with a blue circuit board and a suitably-hued case. The mini PC is guaranteed to stand out in any hobbyist project, provided it's not hidden in a box. There's only one catch: you can't buy one. RSC is donating a batch to good causes, and only 1,000 are up for grabs in giveaways running between now and June. Those who make a convincing argument for Blue Pi ownership will accordingly be part of an exclusive club -- and the envy of any Raspberry Pi owner who's been bored with plain green.
http://www.engadget.com/2013/03/04/r...-edition-blue/ ...by Published on March 2nd, 2013 22:16- Categories:
- Raspberry Pi
The Raspberry Pi turned one yesterday. Raspberry Pi was first launched on 29 February 2012 in the UK and it was received with a huge amount of enthusiasm by students and researchers alike. The Pi has had quite an eventful year, with researchers building a Raspberry Pi cluster; release of an official turbo mode patch; a 512 MB RAM upgrade; the launch of a Pi Store; sales of over a million units; and release of the Minecraft Pocket Edition.
http://tech.slashdot.org/story/13/03...y-pi-turns-one ...by Published on December 17th, 2012 21:45- Categories:
- Raspberry Pi
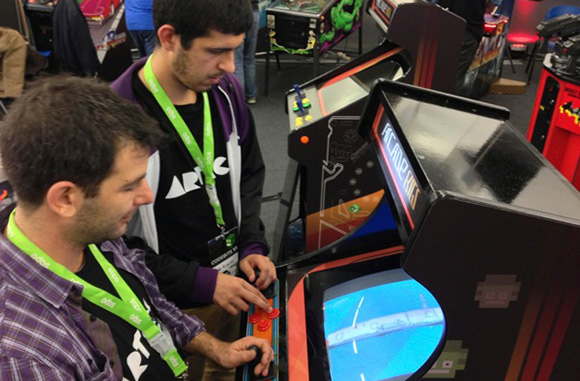
Along with the growing popularity of the Raspberry Pi, weve also seen a related uptick in MAME arcade cabinet builds. Putting this $35 computer in an arcade cabinet makes a lot of sense, but connecting it to one of the monitors found in old arcade cabinets is a bit of a pain. Luckily, [Celso] figured out how to connect a Raspi to one of these 15kHz RGB monitors, making for a much more accurate emulation of old arcade classics.
The Raspi only has two video outputs an HDMI port and an RCA composite jack. The old arcade CRTs have an RGB input, so directly connecting a Raspi to one of these CRTs is a no-go.
The solution comes from two converters: one to convert the HDMI output to VGA, and another video downscaler that takes the 31kHz VGA signal and translates it into a 15kHz RGB signal. [Celso] settled on the GBS-8100 video converter, a rather uncommon piece of kit that can fortunately be found on a few Chinese eBay auctions.
After connecting the old arcade cabinet power supply to the Pi, hooking up an audio amp, and converting the controls to USB, [Celso] has a very accurate MAME machine.
http://hackaday.com/2012/12/17/using...-raspberry-pi/ ...by Published on December 12th, 2012 22:52- Categories:
- Raspberry Pi
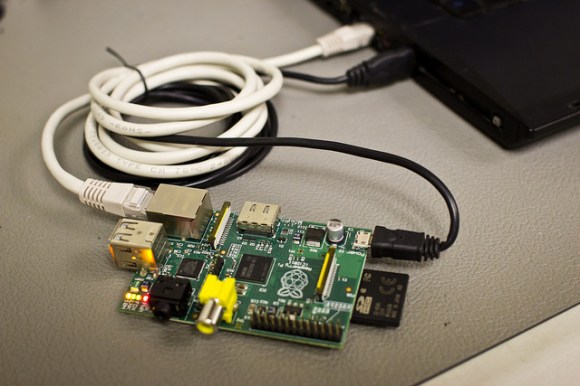
If youre lacking useful equipment for your Raspberry Pi hacking adventure, such as an HDMI monitor or power supply, this handy write-up will show you how to continue your hacking. All youll need is a laptop, the Raspberry Pi itself, an SD card, and an Ethernet and micro-USB cable. As noted in the article, its not really recommended to power the Pi off of USB only, so this could potentially be a source of problems.
This hack begins by installing Linux on an SD card per this setup page, then using a Virtual Network Computing [VNC] setup to work with your Raspberry Pi. There are a few steps in between being able to do this, like setting up network sharing, and sleuthing out the IP address of the new processor, but everything is explained in detail for Mac and Linux. Windows users will have to do a bit of sleuthing of their own, but if you have some more information on this process, wed love to hear about it in the comments!
http://hackaday.com/2012/12/12/raspb...ommando-style/ ...by Published on December 11th, 2012 23:52- Categories:
- Raspberry Pi

[DarkTherapy] wrote in to tell us about his garage door opener that works with Siri and a Raspberry Pi. Its pretty hard to find a picture that tells the story of the hack, but here you can see the PCB inside the housing of the garage door opener. He patched the grey wires into the terminal block. On the other end they connect to a relay which makes the connection.
On the control side of that mechanical relay is a Raspberry Pi board. This seems like overkill but remember the low cost of the RPi and the ability to communicate over a network thanks to the WiFi dongle it uses. We think its less outrageous than strapping an Android phone to the opener. To make the RPi work with Siri he chose the SiriProxy package. Weve seen this software before but dont remember it being used with the Raspberry Pi.
There is certainly room to extend the functionality of a system like this one. It would be trivial to add a combination lock like this one we build using an AVR chip. It would also be nice to see a sensor used to confirm the door is closed. Even if you dont need to control your garage this is a great reference project to get the RPi to take commands from your iOS devices.
http://hackaday.com/2012/12/11/garag...-raspberry-pi/ ...- Search DCEmu
- Advert 3
 News Categories

- Links of Interest
 Sony Consoles News


- Nintendo Consoles News


- Sega Consoles News


- Apple & Android News
- Xbox Consoles News


- Open Source Consoles News
 DCEmu News Archive
- Advert
- Retro Consoles News


- PC News

- Latest DCEmu News


- DCEmu Network Sites
-
 Menu
Menu  Forum Stats
- What is the DCEmu Homebrew & Gaming Network
Catherine: Full Bodys English translation for the Vita