

 DCEmu Homebrew Emulation & Theme Park News
PS3 News
by Published on January 1st, 2011 15:56- Categories:
- PS3 News,
- DCEmu Reviews

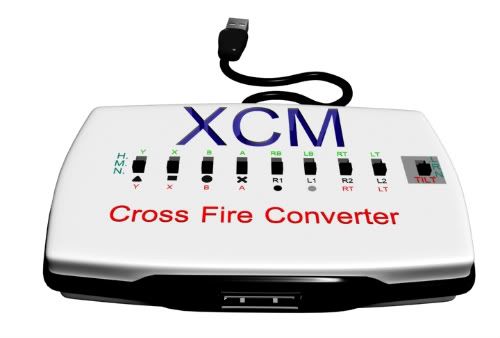
XCM Cross Battle Adapter
Manufacturer: XCM
Site: Buy from Play-Asia / Buy from Divineo US / Buy from Divineo China / Buy from Divineo France
Price: $50.00
Overview: Finally a way to enjoy your favorite PlayStation 3 games using your wired Xbox 360 controller! This unit allows you to connect any wired Xbox 360 controller to your PlayStation 3 with ease. Just plug and play! With built in Rapid Fire / Turbo modes for each button controlled independently.
Features:- Compatible with ALL PlayStation consoles and models.
- Requires the wired Xbox 360 controller.
- Built in Rapid Fire / Turbo for each button with independant controls.
- Easy to Use - Just Plug and Play!
On to the games
Racing - WipeOut HD
The controls for Wipeout HD felt suitable and I was able to get 2nd place in my first play through. The only issue I had was that the analog sticks were not quite as accurate as on the Dual Shock 3, so taken corners can be a problem. Using the left and right shoulder buttons allowed me to compensate however.
Fighting - Super Street Fighter 2 Turbo HD Remix
This is a game where the DS3 excels, and the Xbox 360 controller lags behind. Admittedly, although Im not very good at executing the moves, I was even worse trying to pull off moves using the analog and dpad controls on the 360 controller. Stick with the DS3 for playing games which require a lot of precision button presses.
First Person Shooters - Call of Duty 4: Modern Warfare / Resistance 2
Because Call of Duty only has preset button layouts, I wasnt able to feel fully comfortable with the controls, although I was still able to get first place in an online match. Resistance 2 on the other hand felt very natural, allowing me to map the buttons to my needs. This is the type of FPS that will work best for anyone who loves the feel of the 360 controller and the very reason why the XCM Cross Battle Adaptor was created.
Conclusion: For those who love the feel of the 360 controller, the XCM Cross Battle Adaptor is the perfect accessory for their gaming needs.
Pros- It works
- Plug-N-Play
- Added Rapid Fire / Turbo option that works great for certain fighting games
- Allows you to play FPSs the way they were intended
- No rumble
- Only works with wired controllers
- Games that require the use of sixaxis won't work
- Some games only have presets, so you will have to cope with the button layout the developers give you
by Published on January 1st, 2011 15:56- Categories:
- PS3 News,
- DCEmu Reviews
XCM XFPS Fire Light Gun
Manufacturer: XCM
Site: Buy from Play-Asia / Buy from Divineo China / Buy from ConsoleSource / Buy from GoldenShop / Buy from Amazon.com
Price: $89.99


Overview : XFPS Fire Light Gun brings first person shooters to a whole new experience. With the XFPS Storm, you can snipe your foes with precision aiming using this unique light gun. No more keyboard, no more mouse and having to rest your wrist with point and click. Simply point and shoot.
The Fire will support CRT, LCD, Plasma, DLP as well as Projector. It supports every gun shooting game on the PlayStation 3.
Compatible with different versions of PS3/Slim consoles.
Quality/Usability : Everyone loves the good ole point and shoot like Duck Hunt for the Nintendo Entertainment System (NES). Yes, there is Time Crisis but the gun only works for that specific game. What about first person shooters such as Tom Clancy's Ghost Recon, Call of Duty, Battlefield and many others? XCM plans to fill that void by releasing a peripheral gun that lets you aim, move and shoot. Its simply a gun and a controller in one.
The Fire Light Gun feels comfortable in the hands and is light enough to be held in one hand. Attached to the side is a smaller grip that can be detached. Buttons can be found on the detachable grip and on the gun itself, on both sides. The right side of the gun contains the usual TRIANGLE, CIRCLE, SQUARE and X as well as a "S" button, ON/OFF switch for Turbo and L2 button. On the left side, there is a directional pad, PS home button, SELECT, START and R1 button. The front of the detachable grip has a L1 and IGNORE button. Both the gun and grip contain an analog stick that can be pressed in (R3/L3 respectively).
In order for the Fire Light Gun to be recognized, it requires a sensor bar to be connected to the PS3 or a USB port similar to that of the Wii. You will also need to connect the gun to a USB port as well. So you will need two USB ports in order to use the Fire Light Gun.
Whats great about this is that its all plug and play. The moment you plug it in, the gun is being tracked. You can even control the XMB with the gun but can get some getting use to and is a little sensitive. The analog stick on the grip moves your character while the analog stick on the gun controls the view. All the buttons are pretty much self explanatory as they perform the same functions as that of the controller. You can even program the SQUARE, TRIANGLE, CIRCLE, X, R1, R2, L1, L2, R3, L3, START, SELECT, directional pad and IGNORE buttons.
To program buttons say for instance, R1 to R2 on the XFPS Fire Light gun, press the "S" button on the Fire Light gun once. The LED indicator will light up and than press R2. The LED indicator will start blinking, now press the R1 and the LED indicator will turn off. This means the programming is complete. The R2 button will now function as the R1 but the R1 button has remained the same and unchanged (now two buttons act as R1). If you want to set the R2 button to the R1, you can follow the same steps even though the R2 button is already programmed to function as the R1 button. To revert back to previous function, press the "S" button once. The LED indicator will light up. Press the R1 button and the LED indicator will start blinking. Rather than press R2, press R1 again and the LED indicator will turn off. This can be done for other buttons.
To swap the analog sticks, press the "S" button and the LED indicator will light up. Push any direction on the RIGHT analog stick and the LED indicator will turn off. Now the function of both analog sticks has been swapped. If you want to set them back to their original function, just repeat the steps again. If you swapped a lot of buttons and dont want to go through each swapping, you can simply press and hold the "S" button for 3 seconds. The light on the LED indicator will blink quickly. This will indicate that all the buttons have returned to their original functions.
Since there is no software to configure the gun, near the eye sight on top of the gun, there is a dial that lets you increase and decrease the X and Y axis sensitivity.
For games with relatively simple control schemes, the game is fun. But with games that requires more buttons to access weapons, inventory list, etc., it requires some getting use to as to where the buttons are and the feel since you're probably use to the controller and its button layout. Accessing button on the gun can be a little hard especially when you have the nunchuk detached.
Conclusion : Overall, the XCM XFPS Fire Light Gun. The XCM XFPS Fire Light Gun is very very similar to the XCM XFPS Storm Light Gun for the PC. Only difference is the color and markings on the buttons. It may take some getting use to in regards to button layout and trying to access buttons is a little hard when you're hand is already holding a detached nunchuk. Its perfect for games that dont have many button presses but for those games require lots of button presses to access weapons or inventory lists, hope you're fast and dont need to access them during a gun battle.
You can also use the XFPS Fire Light Gun on the Xbox 360 by using the XCM Cross Fire Converter.
Images via commentsby Published on January 1st, 2011 15:56- Categories:
- PS3 News,
- DCEmu Reviews

PS Samurai PS3 JailBreak USB Modchip
Manufacturer: PS Samurai
Site: Buy from PS Samurai Distributors
Price: $25.00
Overview : Unlike others, PS SAMURAI uses its own, custom programming software for PC and MAC; has a recovery function, very useful after a bad flash; uses 32KB on-board flash (majority uses 16KB); delivered with no code inside which means it is 100% legal; device is rubbercoated and designed to enhance protection and grip and can be afford by ordinary people. THIS DOES NOT WORK ON FIRMWARES 3.42 OR ABOVE UNTIL A NEW EXPLOIT/METHOD IS FOUND!
Requirements :
- PS3 Console (fat or slim)
- Console (firmware) version 3.41 only
- Remove all discs from the drive
- Do not connect any devices to the console via USB
- IMPORTANT: The console must be completely switched off before using PS SAMURAI. For fat versions, use the switch at the rear. For slim versions, simply remove the power cable. This is extremely important for the process to work correctly when you start the console.
Features :
- USB Plug and Play solution that installs in seconds without any need to open up the PS3.
- Does not break your warranty seal.
- Compatible with all PS3 models*, both Fat and Slim.
- Supports all regions: USA, JAP, PAL and KOREA.
- Fully updatable via USB on your PC using an encrypted bootloader
- 32KB onboard flash (most competing products only have 16KB flash)
- Disables forced software updates and will never brick your console.
- Supports most games and homebrew applications.
- Easy-to-use software for backing up, managing, and playing games from external USB Hard Drive.
- Playing games from HDD is much more enjoyable, benefiting from greatly enhanced seek and loading times.
- Supports installing homebrew application on PS3 and external USB media.
- Optionally PS Samurai can be supplied with an open firmware which does not support backup loading. Users would then have to download a firmware update for PS Samurai to get full functionality.
* Currently not compatible with 3.42 firmware
Quality/Usability : The first thing that comes to mind when you look at PS Samurai (or atleast for me) is the infamous picture of the red dongle from PSJailbreak. I thought it was a mock-up image of PS Samurai's dongle but after receiving it, its not. PS Samurai comes in a small anti-static bag like majority of dongles that are being shipped out. The dongle is covered with a red rubber cover which not only protects the dongle but makes a great grip. The rubber cover can be easily slipped on and off. Removing the rubber cover exposes the metal casing. This casing itself looks exactly like the PSJailbreak, PS3Key and AVRKey. There is also no writing or logo on the housing. The dongle measures approximately 1.25" (length) x 0.50" (wide) without the rubber cap. Like the PS3Key and AVRKey, PS Samurai is running on ATMEL MEGA32U2 (ATMEGA32U2) and is upgradeable via USB port. The USB board also contains two leds; red and green. Red is for when the jailbreak is being performed and Green for when it is successful.
Instructions on How to Load PS Samurai firmware, HEX (.hex) Files, Import Payloads (.bin) or ERASE files :
Required files:
- Microsoft Visual C++ 2010 Redistributable Package (x86) (vcredist_x86.exe)
- PS Samurai Upgrader Software
- PSGroove HEX (.hex - Teensy) or Payloads (.bin)
Before you start, you MUST download Microsoft's Visual C++. Without this, PS Samurai's Upgrader software will not work and will give an error when you try and open it. Once you've downloaded C++, download PS Samurai's Upgrader software via link above. To get the PS Samurai into Update Mode, all you have to do is insert the dongle into the USB port on your computer. When it enters into update mode, no LED is lit up but when you open the software, it will tell you if the dongle is connected. You can also tell by the little pop-up notifications on Windows. I like how the PS Samurai Upgrader software is set up, however each time there is a new software file, you'll have to download the newest upgrader software for the latest updates. It would be convenient if there was an option to check for the latest software or files and download it over the software rather than go to their site and download the latest software. On the Upgrader software, you're able to load their own proprietary file (PSSAMURAI FIRMWARE), PSGroove HEX (.hex) files, Import payload (.bin) files or ERASE the files on the PS Samurai. So, if you want the latest updates, you can simply load the HEX files and than load PS Samurai files when it becomes available if you wanted to. To load the files, select the method you want to load your files whether it be PS Samurai's firmware, HEX files or importing payloads and select the file you want to load. Once selected, click on START and the software will begin to upgrade the dongle with the file you selected. Once completed, it will pop up with a message and click OK. Now, you're able to remove the dongle from the computer and into the PS3.
I had no problems loading and getting PS Samurai firmware ...by Published on January 1st, 2011 15:55- Categories:
- PS3 News,
- DCEmu Reviews
Wii Component Cable
Manufacturer: Dragonplus
Site: Buy from Brando
Price: $7.00
Overview : Component Video connection from PS3 to TV with component input
Features :
- Component-Video Connection from Playstation 3 to TV with component input
- Offers high quality signal
- Support 1080i/720p HDTV System
- Length: 1.8 Meters
Quality/Usability : Like any home consoles, they all come with composite cables. No one likes composite cables especially if you have a high-definition TV set. Eventually, as all home owners buy new TVs, future home consoles will have component cable included as everyone will/should have HDTV already.
With the price you paid for the PS3 whether its the 20GB or 60GB, you want your moneys worth (besides software support). Dragonplus has entered the market with their first PS3/PS2 Component/AV Cable. The cable not only works on your PS3 but your PS2 as well. The cable is compatible with 1080i/720p HDTVs.
The cable shows picture clarity and brighter colors for the PS3. better than the composite cables. Edges are not as blurred and the edges are more defined. The colors with the component cable are slightly brighter than they are with composite.
With the PS2 connected, there wasnt much improvement over the Official cables that came with the system. There might have been a slightly better picture clarity and brighter colors but I couldnt tell with the naked eye.
Conclusion : Overall, the PS3 Component Cable is a nice alternative for the PS2 but for the PS3, its an improvement over the composite cables. You'll definitely notice a difference in color and texture. This is a nice temporary solution until Sony comes out with one or a permanent one. Its up to you. For the price tag of $7, you cant go wrong. Although there is the HDMI option (if your TV supports it).
Images via comments ...by Published on January 1st, 2011 15:55- Categories:
- PS3 News,
- PS2 News,
- Nintendo Wii News,
- DCEmu Reviews

NEXiLUX Retractable Wireless Mini Guitar (Wii/PS2)
Manufacturer: NEXiLUX
Site: Buy from Divineo France (Black) / Buy from Divineo France (White)
Price: 49,90
Overview : You take the stage! Guitar Hero and Rock Band games : All-In-One! Mini size with detachable neck. Easy to carry or store.
Features:
- Fully compatible with PS2/PS3/Wii guitar hero and rockband
- All-New touch sensitive neck slider can be nailing intense solos when playing Guitar Hero World Tour and also be five touch sensitive fret buttons when playing other editions of Guitar Hero and Rock Band
- Retractable Guitar Neck is detachable from guitar body.
- Convenient to carry around store.
- Increased accuracy with more responsive fret buttons
- Jam effortlessly with an elongated strum bar
- Auto sleep mode helps improve battery life.
Quality/Usability : It sucks having to lug around a 1 piece guitar if you're going to a friend or family members house so NEXiLUX has released a retractable mini guitar. The base guitar strum bar, whammy bar, 5-way switch (Rock Band only), thumb stick, directional pad, SELECT/minus (-) and START/plus (+) button. The back of the base holds the Wii Remote with remote cover and a compartment for 3 AAA batteries and the bottom has a switch for to select between Wii Guitar Hero (WII GH), OFF and PS2/PS3/ Wii Rock Band (PS3/PS2/WII RB). The retractable neck has 5 touch sensitive slider buttons and 5 fret buttons. Also included is a wireless receiver for PS3 and PS2 usage.
Upon opening the package, I noticed that the Wii Remote cover had fallen out so I tried closing it and the latch broke off. It looked as if the PCB board inside was blocking the latch from clipping and it snapped off. This is probably a defect with the unit I received. I have not read or heard any other complaints about this.
All the buttons felt sturdy as well as the retractable guitar as well. Since the Wii Remote is in the back and covered, you would use the thumbstick to move the hand cursor. However, the thumbstick doesnt act as the "A" button, so you would need to reach for the back of the guitar and press the "A" button.
To play on Wii, simply connect Wii controller and turn on the Wii. To play PS2/PS3 Guitar Hero/Rock Band or Wii Rock Band, insert the receiver into one of the USB ports on the console. Turn the console ON. The receiver has four (4) BLUE game indicators located on the top and one (1) RED connection indicator located on the front of it. The red LED will illuminate indicating a proper connection has been made. If no connection has been made, the red LEDs will begin to flash indicating the receiver is searching for the Guitar controller.
Press the "Game Selection" button on the front side of the receiver to select the game you are going to play. Push the game selection button once, the indicator will be lighted on different positions. Push one by one until the proper game indicator LED is on.
Switch the guitar controller to the "PS3/PS2/WII RB" setting. The red LED will begin to flash indicating the guitar controller is searching for the receiver. Once the guitar controller and receiver have successfully synchronized, the LED on the guitar controller will turn off and the red connection indicators on the receiver will turn solid red.
The Features list is from NEXiLUX and it states that the touch sensitive buttons can be used for other editions of Guitar Hero but I was not able to get it to work with Guitar Hero: Legends of Rock for the Wii. The touch sensitive buttons is a sliding bar for Guitar Hero World Tour or as solo buttons for Rock Band. You will need to extend the neck of the guitar to expose the 5 fret buttons.
Conclusion : Overall, the NEXiLUX Retractable Wireless Mini Guitar (Wii/PS2) is a compact guitar but falls short. I may not be the best at Guitar Hero or Rock Band but comparing the scores between GH controllers that came with the game and NEXiLUX mini guitar, I did worse based on my scores. I was missing cords that I know I hit but seems to have a delayed response. The NEXiLUX comes with a drawstring pouch that holds the guitar for easy carrying and storage. Setup and connecting the guitar controller to console was fairly easy and with no problems.
Images via comments ...by Published on January 1st, 2011 15:55- Categories:
- PS3 News,
- DCEmu Reviews

XCM XFPS 4.0 Force
Manufacturer: XCM
Site: Buy from Play-Asia / Buy from Divineo US / Buy from Divineo China / Buy from Divineo France / Buy from ConsoleSource / Buy from GoldenShop / Buy from Amazon
Price: $90.00
Overview : Use a keyboard and mouse on your PS3 with the XFPS Force adapter. Compatible with all keyboards and mice, it is precise and efficient and will clearly give you the edge on many games, starting with FPS.
It is easy to map all PS3 controller keys/inputs to keyboard and mouse using your PC and XCM software. When used in conjunction with the soon to be released Magic Link the XPFS will allow a remote player can to co-play with you via internet connection. A PC is required to use the XFPS Force.
Features:
- Connect PS/2 or USB mouse & keyboard to your PS3
- Compatible with all mice and keyboards.
- Accuracy in aiming and fast response while playing shooting game.
- Easy to map all PS 3 controller keys to keyboard and mouse via PC by XCM software.
- When using with our new coming product (Magic link), the remote player can help you to pass the game level via the internet from his PC.
- 3 level of auto fire function.
- Must connect to PC (laptop or desktop).
Quality/Usability : Unlike XCM's previous XFPS like the XFPS Rateup, the new XFPS 4.0 Force requires a laptop or desktop if you are using a mouse and keyboard.
To connect a wired PS3 controller and enable turbo/rapid fire, plug the XFPS 4.0 Force to one of the USB ports on the console and have the PC-Controller switch on Controller. The XFPS logo will blink blue. Plug in your wired PS3 controller and the XFPS logo will stop blinking and will stay lit. When I meant "wired PS3 controller", I mean your wireless PS3 controller + USB cable. There are no actual wired PS3 controllers on the market. You can now use the turbo/rapid function. And since the PS3 controller is connected via USB cable, it also charges the battery.
Rapid Fire/Turbo switch has 3 settings, Normal (N) which is OFF, Medium (M) Speed Firing which gives 15 shots per second and High (H) Speed Firing which gives 30 shots per second.
Unlike the XCM XFPS 4.0 Speed for the Xbox 360, you do not need to connect the wired PS3 controller first before connecting mouse and keyboard. To connect a keyboard and mouse, simply plug the XFPS 4.0 Force to one of the USB ports on the console and have the switch set to PC-Controller. The XFPS logo will blink red. Plug the included USB cable into the bottom of the XCM and the other end to either you desktop or laptop USB port. Once connected, the XFPS logo will stop blinking red and will stay lit. Once connected, you can begin to configure your settings.
In order to use a keyboard and mouse as well as map/configure your settings, you'll need to download XCM's software. The latest software can be found here (whenever there is a new upgrade, you can find it here). Review was tested with version 1.50.
Once you downloaded the software, extract the file and you should see a XFPS folder or XFPS icon on desktop or within folder. Before running the software, make sure the XFPS is connected to the computer. If not, the software will give an error message stating that it "Can not find XFPS". Double click the XFPS icon and the program will display a picture of a PlayStation 3 (PS3) controller. To configure your keyboard and mouse, click on "TOOL" and "SETTINGS". Enter a name for the setting, than click "NEW" and than "MAP". From here, you can map whatever keys/buttons you want to correspond to the PS3 controller. Move the cursor to the box you want to remap and press the key you want to use. If you made a mistake, highlight the area, right click and click DELETE. Once you're done, click on "CONFIRM" in the MAP screen and click "CONFIRM" again in the SETTINGS screen. When you see the PS3 controller, you can click "FILE" and "START" or F12 to begin. Once you start, the mouse and keyboard now takes over the PlayStation 3 console. Even though the mouse and keyboard is connected to laptop or desktop, nothing will happen. To escape out of PS3 control, press F11 and you can now control computer with mouse and keyboard. This is perfect for when you want to go back to the settings and make any adjustments. Not only can you map your buttons but you can adjust the X and Y axis sensitivity as well as invert the X and Y axis.
In my testing, I've used onboard keyboard from a laptop and a cheap Dell wired USB mouse (for v1.41-1.44 software) that came with my computer and Microsoft IntelliMouse (for v1.50 software). I've also used a wireless Logitech keyboard and mouse combo and all have worked fine. My wireless mouse had a higher sensitivity so I had to lower the sensitivity on the XCM XFPS application. Which is the same setup as the XCM XFPS 4.0 Speed. I did not notice any lag or any jumps in movement. I know some people have complained about dead zones with XCM XFPS adapters when moving the mouse up and down or left to right but I did not experience any of the problems. I was to move my mouse to move the crosshair over my target ...by Published on January 1st, 2011 15:55- Categories:
- PS3 News,
- DCEmu Reviews
Yes, it would of been nice to include sequential paddle shifters on the back. Would of made driving experience a bit better. Originally Posted by Mc_Logical

you dont need a special chair. YOu can sit on your couch, edge of bed and clamp the wheel to a portable table. This is perfect if you're a casual gamer like me. Those who are hardcore racers will prefer racing setup/chair. ... Originally Posted by splodger15
by Published on January 1st, 2011 15:55- Categories:
- PS3 News,
- DCEmu Reviews

DecalGirl PlayStation 3 System Skin Kit
Manufacturer: DecalGirl
Site: Buy from DecalGirl
Price: $14.99 (system skin only); $4.00 each (controller skin purchased w/system skin); $4.99 each (controller skin only)
Overview : Say what you will about the new Playstation 3 - it sure is glossy black. Like it's little brother the PSP, the PS3 collects dust and fingerprints with a vengeance. Plus, your mega-purchase looks like every other console out there...
Enter the new line of full-color PS3 skins from DecalGirl, with all the features you've come to expect - no fading, no goo or residue, and a washable surface. They're thin enough to conform easily to the curves, yet thick enough to prevent scratching the OEM finish. And, they're right here at our facility in the USA.
Quality/Usability : What does the PlayStation Portable and the Sony PlayStation 3 have in common? No. Not because their made by Sony, have PlayStation in the name or both being black. They're both magnets for fingerprints. We all hate the finger marks that the Sony systems attracts as it looks nasty and horrible.
With the DecalGirl PlayStation 3 Skin Kit, not only will it prevent fingerprints, it will protect your expensive investment from scratches and spice up the looks of your console. DecalGirl is well-known for their high quality vinyl skins. Skins produced by DecalGirl are vibrant in color and durable. There are a lot of skins to choose from and there will be some that will catch your eyes. You can even match all your consoles such as DS, Wii, Xbox 360, etc. to have the same skin.
The PlayStation 3 kit includes a skin for you PlayStation 3 ($14.99) and a skin for your SIXAXIS/Dual Shock 3 controller ($4.00 each). You dont have to get the kit. If you just need controller skins, you can purchase them for $4.99 each (savings of $0.99 each when purchased with system skin).
The system skin comes on one sheet. On this sheet are 3 vinyl skins (top, memory card door, front panel). The controller skin comes also on one sheet. There are multiple pieces for top front of the controller. You can even use the smaller pieces to to cover the buttons if you choose to but its your decision.
To apply the console skin, I simply started by matching the corners of the skin to the corner of the PlayStation 3 for all three sections. Once matched, I did it to the other 2 corners and left the fourth corner alone. Considering the skins are fairly big, it should not be a problem applying the skin. There are a couple of ways to smooth out the skin. You can use a credit card or something similar, your fingers or a rag. I personally use my fingers first to set the skin in place and use a rag to flatten and smooth the skin out. I dont use a card because it has sharp edges/corners and if there is a small hard particle that got trapped underneath the skin, it can ruin the skin.
The controller skin, can be a little tricky especially when it comes left (d-pad/joystick) and right (buttons/joystick) side of the controller. Since the left and right side are circular, I started off the biggest circle (d-pad and buttons). Once I aligned majority of the section around the d-pad and buttons, I started from the other end (joysticks). From here, I can place the skin around the joystick. This will also allow me to adjust the skin if needed. Once applied successfully on both sides, I applied the middle. The middle is fairly easy and I only had to worry about the skin going around the PlayStation Home, SELECT and START buttons. Last but not least was right about the L1 and R1 trigger buttons.
The controller skin also includes d-pad and buttons. Its up to you whether or not you want to apply these or just leave the controller alone.
Although everything fit perfectly, there was a problem. Since the PlayStation 3 has a sensor on the power and eject buttons and the skin covering the sensor, this prevents the buttons from functioning. This may be a major drawback for some. Yes, you can use the controller to turn on and off your system and eject your Blu-Ray disc but you still have to get up to remove the disc from the slot. So while you're up, why not power on/off and eject your system? You're up already. To solve this problem, you can either not apply the skin which wouldnt look right or cut out that section only, leaving a empty hole. Although this works, this may make the skin look ugly.
Conclusion : Overall, the DecalGirl PlayStation 3 Skin Kit looks great just like all other DecalGirl skins. Everything fit perfectly on both the controller and system. But the only drawback was the ability to use the power on/off and eject button. To some it wouldnt matter but to others, it would. DecalGirl would probably be able to fix this by adding a metallic piece under the vinyl or have a cutout of the buttons? This may require additional work and a change in their printing process or template. Then again, with DecalGirl's creativity, they might be able to think of a way. ...by Published on January 1st, 2011 15:55- Categories:
- PS3 News,
- DCEmu Reviews
Wireless Magnetic Induction Charger
Manufacturer: DragonPro
Site: Buy from Goldenshop
Price: $22.00

Overview : Charge your PS3 wireless controller wirelessly with no wires with new magnetic induction technology. Charge 2 controllers at the same time.
Features :
- Specially designed multi-connection points - just put on to anywhere of the platform to charge.
- Quick charge function with any USB socket - e.g. PS3, computer, etc.
- Fully compatible with any PS3 wireless controller and PS3/Slim console.
- Easy to use - just plug in the charger cap and put onto the charger platform.
- Blue LED Light indicator for charging status
- 2 controllers (not included can be charged simultaneously)
Specification:
Ultra slim charger platform:
- Input: DC5V; max. 1.5A
- Output: 6.5V; max 800A
- Cable length: 80 cm
Charger cap:
- Input: 5V; max. 380A
- Charging hour: about 3 hrs
Package includes:
- Charger platform x 1 pc
- Charger cap accessories x 2 pcs
- 2-to-1 USB power charge cable x 1 pc
Quality/Usability : With wireless magnetic induction revolutionizing the way we charge our portable devices, who needs wires or wall chargers anymore? To charge a PS3 controller, you would need to connect it via USB cable to either your computer or PS3. Dragon has released a magnetic induction charger for the PS3 controller. Included is the charging platform, 2 charger caps and 2-to-1 USB cable.
To connect the charger caps, there are 2 ways to hold it in place. The first is just plugging it to the USB port and thats it. This allows quick removal if needed. The second way still requires you to insert it into the USB port but if you plan on keeping it on the controller and not removing it, there is a spring loaded clip on the inside of the charger cap. Simply pull this out and place it at the bottom of the controller. If you let go, it springs back into the charger cap. My only complaint about the cap is that its hard to pull out the clip. There is a groove to allow your fingers to pull it out but it wasnt big enough and if you have big fingers, you'll definitely have problems. I had to use a small object to help me pry it out. Once locked in, the charger cap is held in place pretty well. It does add about an inch to the back of your controller but is not in the way of your fingers. To remove, just pull the clip down, slide it back and pull it out of the USB port.
The charging platform is very thing and not bulk. The platform measures approximately 8 inches x 6 inches which just barely fits 2 controllers and has a blue LED status indicator and DC 5V input. To power the charging platform, you would connect a 2-to-1 USB cable. I do not know why there are 2 USB cables. I have tried plugging just one USB plug and the blue LED status indicator still lit up. Whether I have 1 or 2 USB plugs plugged in, it still charged the PS3 controller. Maybe the extra USB plug provides extra power? Even so, it takes about 3 hours to charge a fully depleted controller whether you're using one USB or both.
Once plugged in, the moment you place your controller on top of the platform, the LEDs on the controller begin to blink to show that its charging. No matter how you have the controller positioned, its still able to charge.
Whats great is that even though the charger cap uses a micro-USB, with a little bit of creativity, I was able to make my own PowerMat and use my micro-to-mini USB cable, connect it to the charger cap and be able to charge my Blackberry. However, placing the charger cap on the platform to charge the Blackberry caused my Blackberry to pop up with a message saying that the some USB hubs might not provide enough power and to plug my Blackberry into a power outlet and reconnect my device or to connect to another USB port such as a different computer, USB hub or travel charger. Even with the message, the charging status icon on my Blackberry still showed. Maybe it wouldnt charge as quick as it would if it was plugged into a more powerful USB port.

This adapter can be purchased for as cheap as $1.22USD+shipping at Amazon.com.
Conclusion : Overall, the Wireless Magnetic Induction Charger worked great and charged the PS3 controller without the hassle of wires. However, there were a few complaints. When the 2-to-1 USB cable was plugged in, the blue LED light sometimes wouldnt come on. If it did come on, it would slowly fade away as if there was power and than there wasnt. What is causing this to happen is the DC 5V port and the USB cable is poor connection. I had to push the plug in a certain direction so that there was power again. Unable to pull out the spring clip with out the assistance of long nails or a small item can be a hassle.
Images via commentsby Published on January 1st, 2011 15:46- Categories:
- PS3 News,
- DCEmu Reviews
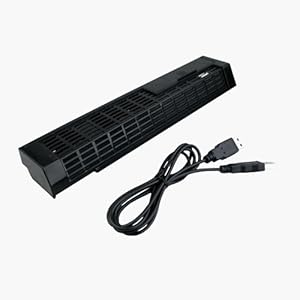
Joytech Fusion Cooling Fan
Manufacturer: Joytech
Site: Buy from Amazon
Price: $9.99
Overview : Play it cool with the Fusion Cooling Fan from JOYTECH. Designed exclusively for use with the PlayStation 3 console, the Fusion Cooling Fan prevents potentially dangerous overheating of console through powerful fan assisted technology. Discrete appearance and safe operation, ideal for long gameplay session!
Features :
- Heat Diffusion System draws heat away from console
- Silent-Running design for quiet operation during play
- Prevents potentially dangerous overheating during sustained use
Quality/Usability : Like the Xbox 360, the PlayStation 3 produces a good amount of heat. Luckily, you dont hear much of RROD (Red Ring of Death) type display when it fails on the PlayStation 3 but you never know. There can be many factors as to why consoles no longer work. It can be defective, dust or the most common, overheating.
I remember my original PlayStation was like that. I had to put the PS1 on its side. With these nex-gen consoles, they are more powerful and require more energy. With that, they produce more heat similar to that of PCs.
Like Nyko's Intercooler, Joytech decided to enter the cooling fan market by releasing the Fusion Cooling Fan. Unlike its competitor, the Fusion Cooling Fan only goes on the back of the PlayStation 3. There are three fans encased in a plastic housing. To the right, there is a plastic door that covers HDMI port, optical port, etc. and underneath is a USB port. The Fusion Cooling Fan does not cover the power plug or power switch.
Joytech claims the fan to be quiet but it was the same loudness as the PS3 if not slightly louder. Without the fan, the PS3 blew out hot air. With the Fusion Cooler Fan, the air was not as hot and was warm. Whats nice about the Fusion Cooler is that it runs off of the USB power. No additional batteries or external power.
Conclusion : Overall, the Joytech Fusion Cooling Fan did OK. Yes, air comes out from the back of the PlayStation 3 but air also comes out from the right side/top (depending on how you have the PS3 positioned). Like its competitor, Nyko Intercooler, it covered the back and side/top vent. Of course, it made it even more bulky. Price for the Fusion Cooling Fan is a bit on the expensive side. If currency exchange rate was done, it would be about $35USD. $20 would of been a more reasonable price. Since the PS3 does not have as much overheating problems that the Xbox 360 has, I would skip on the fans for the time being unless your PS3 is starting to act up and cause problems.
Images via comments ...- Search DCEmu
- Advert 3
 News Categories

- Links of Interest
 Sony Consoles News


- Nintendo Consoles News


- Sega Consoles News


- Apple & Android News
- Xbox Consoles News


- Open Source Consoles News
 DCEmu News Archive
- Advert
- Retro Consoles News


- PC News

- Latest DCEmu News


- DCEmu Network Sites
-
 Menu
Menu  Forum Stats
- What is the DCEmu Homebrew & Gaming Network
Catherine: Full Bodys English translation for the Vita