


 Reply With Quote
Nice guide!
Results 1 to 10 of 29
-
August 16th, 2006, 10:51 #1DCEmu Regular


- Join Date
- Jun 2006
- Posts
- 301
- Rep Power
- 71

 A Guide To The Custom F/W by Dark_AleX
The Ultimate Guide To Custom Firmware!
A Guide To The Custom F/W by Dark_AleX
The Ultimate Guide To Custom Firmware!
You will need to d/l this if you are using the online version of the guide, it includes all the files needed!
I hope this will help any so called "n00bs" on this forum and is helpful to anyone that needs it!
I would like to thank:1- Dark_AleX for making this possible!
2- Slasher for making many mods!
3- Zettablade for making the AIOmod.prx!
4- Harleyg for making the revamped Custom Firmware!
5- Myself for making this Guide!
WARNING: I am not responsible for any bricks that may occur, and remember anything that writes to the flash has a chance of bricking!
All the pictures seen are included in the ‘The Ultimate Guide To Custom Firmware Files’ according to the chapter you have seen them!
Ok, to start off I will be telling you about this so-called ‘custom’ f/w, what is it I hear you ask? Well basically it is not a completely customized f/w but a f/w with a few tweaks and moderations! How has he Dark_AleX done it? Well, as some have known for quite some time, 1.50 have not been able to load . prx’s for some reasons beyond me! But they have been able to make 1.50 load .elf files! What does that mean? Well, It means instead of loading a .prx file we load an .elf file which then loads a .prx, basically tricking the PSP into thinking everything is fine, carry on to load the XMB! But how does the recovery mode work? A question many people have been asking is that I have just stated! What happens is that when the PSP loads this .elf file it loads it after every other .prx has loaded, so it loads at the end enabling you to control what happens after that!
If you have any queries on this guide or want to give feedback please email me at: [email protected]
Chapters and their content:
Chapter 1: Installing the Custom F/W: This chapter tells you how to install the custom firmware.
Chapter 2: Editing the config file to do what you want it to do: This chapter tells you how to customize your Custom Firmware by editing the config file under ms0:/PSP/SYSTEM.
Chapter 3: Custom Firmware Mods/revamps: This includes harleyg’s amazing revamp of the Custom F/W by Dark_AleX!
Chapter 4: Removing the custom firmware: This is if you don’t want/like the Custom Firmware anymore and want it removed!
Chapter 5: Adding the option to remove the Custom Firmware to your recovery mode: For the original POC version by Dark_AleX
Chapter 1: Installing the Custom F/W!
This is relatively easy as long as you follow the instructions carefully! Most can do this with no help, If you can, then skip this chapter and move to the next!
We will start of with extracting the file named CHAP1, after this is extracted you will see a file named PSP, copy this file to your ms0! It will ask you to overwrite certain things, press YES! If you don’t you will not be able to carry on any further!
Now you have loaded the installation files you must turn your PSP on and got to Memory Stick under the Game directory in your XMB! There will be a file named Custom Firmware – Proof Of Concept
Picture:

Run it, it will then install the Custom Firmware. After it will restart the PSP.
After the PSP gets back to the XMB restart it by holding down the power button for TEN seconds, then turn it back on, immediately put your finger on the R button, If it boots to the XMB then you have not installed the Custom Firmware correctly, this is un-likely to happen. If a recovery mode screen appears that looks vaguely like this:

Then WELL DONE, you have conquered the first part of the custom firmware!
Chapter 2: Editing the config file to do what you want it to do!
OK, in this part, you may find it tricky to understand it with all the code everywhere but don’t fret, It isn’t as hard as it looks!
At first your config file will look like this:
EDITING THE CONFIG FILE:
To change the execution of normal pbp’s (no-kxploited) (1.00 pbp’s!):
When you first get the config file, this option/feature will already be activated, to de-activate it change this:

To this:

To change this feature to on after de-activating, change the second picture back to the first picture.
To change the hide the corrupt icons Feature in the GAME folder:
When you first get the config file it will look like this:

To activate, change the above config snippet to
to this:

To change this feature to off after activating, change the second picture back to the first picture.
To skip the SCE logo at startup (stops auto-loading of UMDS!):
When you first get the config file it will look like this, to activate, change this:

To this:

To change this feature to off after activating, change the second picture back to the first picture.
To specify a program to auto execute at startup:
When you first get the config file it will look like this, to activate, change this:

To this (for Devhook):

To this (for IRShell):

Of course you can direct this to any H/B app or game of your choice, as long as it is on your PSP and working! You will have to change the directory names to the names of your H/B directories. E.G.
# Specify a program to autoexecute at startup.
autoboot = "ms0:/PSP/GAME/_SCE_KETM/EBOOT.PBP";
NOTE: If you have installed both the AIOmod.prx AND the mp3plugin by slasher, then you will have to choose which one to have enabled in the config.txt in psp/system, by adding a # before the loadmoduleX (see CHAP2) , because having both the AIOmod.prx and the mp3plugin will cause the mp3plugin to NOT work
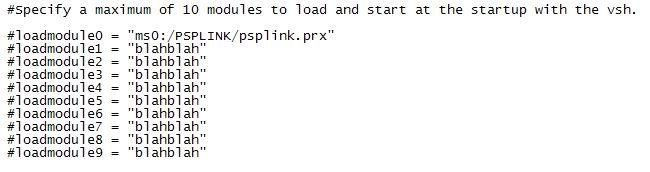
Loading a module (prx) to start with the vsh:
This will let you load prx’s along with the vsh at startup of the PSP!
This may include prx’s that are taken from other firmware’s or prx’s that are made by someone such as the AIOmod.prx, this mod is included in the guide, all you have to do is go to ‘The Ultimate Custom Firmware Guide Files!’ and then CHAP2 Files and then you will see a folder named ‘AIOmod (prx)’, There is also a config file for the AIOmod.prx, it is easy and simple and tells you what to do in the config file, so I don’t need to explain it!
Anyway, copy the prx (AIOmod.prx) and place it like this on your PSP’s mem stick:
Ms0:/Modules/AIOmod.prx
You will need to create the new directory named ‘Modules’
After placing the prx on the PSP, you will need to find the config , at first it will look like this:
But to activate the AIOmod.prx, change it to this:
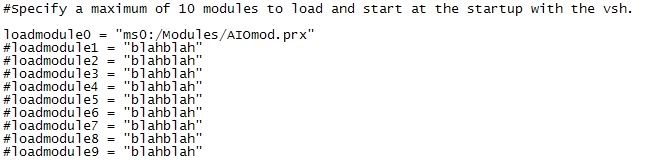
You will need to also copy the config file in the folder into the same directory as the AIOmod.prx!
For any other modules (prx) you will have add a new directory as shown:
E.G.
NOTE: every time you add a new module, you MUST remove the ‘#’ from the start of ‘loadmoduleX’
X = number after loadmodule.
NOTE: screenshot.prx is not included as it is in the AIOmod package!
Note: Having the AIOmod.prx installed at the same time as the MP3Plugin will render the mp3pugin useless (it will not work!) To fix this you must remove the AIOMod.prx as the MP3plugin will not work with any prx that access' the USB function!
That is the config part completed! Well Done!
Chapter 3: Custom Firmware Mods/revamps:
Included in this Chapter are:
1- Installing harleyg’s version of the custom firmware V2! I RECOMMEND TRYING THIS!
2- Installing MP3 Plugin by Slasher!
How to install Harleyg’s revamp:
I will do this in steps to make it easier for you (and me, LOL):
FOR CURRENT USERS OF THE CUSTOM F/W:
(In other words: If you have the POC Custom F/W already installed, do this):
Step 1: Copy the vshmain.prx and recovery.elf to the root of the mem stick, then boot the PSP in configuration and recovery mode. Go to the recovery/backup menu and flash the new recovery.elf and vshmain.prx. Reboot.
That is all you have to do for this revamp unless:
FOR NEW USERS OF THE CUSTOM F/W:
(In other words: if you haven’t got the original POC custom Firmware, do this):
Step 1: Copy the customfirmware and customfirmware% to PSP/GAME and the SYSTEM directory to PSP. Launch the "Harleygs custom firmware patch 0.2" eboot and press X when prompted. Reboot.
That is all, you now have harleyg’s revamp of the Custom Firmware POC installed with these new features:
>>Booting with "HOLD" on goes into configuration and recovery mode.
>>Booting with wlan switch down goes into devhook.
>>Booting with wlan switch up goes into XMB.
>>Booting while holding X will launch the autoboot eboot set in config.txt.
>>Boot manager inside the configuration and recovery mode can return to XMB and devhook.
>>A few more bug fixes.
ENJOY!
How to Install the MP3 Plugin by Slasher:
Step1: Place the mp3XMB folder(and all its contents) in the ROOT (ms0:/(here)). This is very important! It MUST be in the root. Then, just simply point the P.O.C. Custom Firmware to load the RUNMEmp3.prx. ex) loadmodule0 = "ms0:/mp3XMB/RUNMEmp3.prx".
As soon as you start your XMB, the module will be loaded.
Controls for this plugin are:
LTRIGG + LEFT = Switch song(to the left)
LTRIGG + RIGHT = Switch song(to the right)
LTRIGG + SQUARE = Stop current MP3
LTRIGG + CROSS = Pause/Unpause
Known Bugs for this plugin are:
- Make sure to stop your current song before loading up a homebrew or UMD, else crashes.
- When exiting out of USB mode, music may mess up. Just switch the current song to fix that.
Chapter 4: Removing the custom firmware:
If you don’t want the Custom Firmware installed anymore, do this:
FIRST WAY:
Step 1: Copy the file named PSP in the included file under ‘Custom Firmware Un-Installer’, copy this to your mem stick accepting any warnings of overwriting (it will not remove anything at all of your PSP)!
Step 2: Then run the Un-Flasher eboot from the XMB. Pic:

Step 3: It will then restart!
You have now removed the Custom Firmware - POC!
SECOND WAY (APLLIES TO USERS OF harleyg’s revamp):
Step 1: Go into recovery mode at startup of the PSP
Step 2: Select un-install from the menu.
Step 3: Restart the PSP manually by holding the power button down for 10 seconds!
You have now removed the Custom Firmware - harleyg’s revamp!
Chapter 5: Adding the option to remove the Custom Firmware to your recovery mode:
This is easy as pie:
Step 1: Copy the both files found in:
The Ultimate Custom Firmware Guide Files!/CHAP 5/Adding removal of the POC to recovery Mode
And copy them to the root of your mem stick!
Note: Accept any warnings about overwriting! (it will not delete anything of your PSP’s mem stick!)
Step 2: Run the eboot found in the XMB of your PSP.
WELL DONE, you have just added the option to remove the POC custom firmware through recovery mode!
THE END OF THE GUIDE!
I will be adding more as I go along.....
PLEASE TELL ME IF THERE IS A MISTAKE SO I CAN FIX IT! THANKS!
DOWNLOADABLE VERSION:
FILE: D/L VERSION OF THE GUIDE
-
August 16th, 2006, 11:06 #2DCEmu Regular

- Join Date
- Mar 2006
- Posts
- 299
- Rep Power
- 72

-
August 16th, 2006, 11:07 #3Registered User

- Join Date
- Dec 2005
- Posts
- 2,106
- Rep Power
- 0
Great guide,I'm sure beginners will find this most useful.
-
August 16th, 2006, 11:13 #4DCEmu Regular
- Join Date
- Jun 2006
- Posts
- 301
- Rep Power
- 71
thanks guys!
-
August 16th, 2006, 12:54 #5DCEmu Pro
- Join Date
- May 2006
- Posts
- 575
- Rep Power
- 73
Love it loads...
...your a star The EX!!!
-
August 16th, 2006, 13:10 #6DCEmu Regular
- Join Date
- Jun 2006
- Posts
- 301
- Rep Power
- 71
lol, thanks alot

-
August 16th, 2006, 13:17 #7DCEmu Newbie

- Join Date
- Aug 2006
- Location
- Orlando, FL
- Posts
- 35
- Rep Power
- 0

Good stuff, going to put the custom firmware back on my PSP later this afternoon.
-
August 16th, 2006, 13:21 #8DCEmu Regular
- Join Date
- Jun 2006
- Posts
- 301
- Rep Power
- 71
you should, It is really good!
-
August 16th, 2006, 15:45 #9DCEmu Regular

- Join Date
- Jan 2006
- Location
- Coleraine, NI (UK)
- Age
- 35
- Posts
- 353
- Rep Power
- 74


good guide.
I didn't need it, but useful for some. Well written, I have to say.
-
August 16th, 2006, 16:39 #10DCEmu Regular
- Join Date
- Jun 2006
- Posts
- 301
- Rep Power
- 71
yep, it took me a while to write, about 2 hours I think, and putting all the files in order and uploading them etc....
Thread Information
Users Browsing this Thread
There are currently 1 users browsing this thread. (0 members and 1 guests)

Bookmarks