

Results 1 to 1 of 1
-
September 26th, 2010, 14:29 #1Reviews Webmaster/Reviewer


- Join Date
- Oct 2005
- Location
- New York City, USA
- Posts
- 3,001
- Rep Power
- 50
 [GUIDE] PIC18F2550 PSGrooPic on PS3 Sixaxis Controller Mod


Yesterday, we posted the news on the Proof of Concept PSGroove ported to PlayStation 3 Sixaxis. Today, hasuky, from ElOtroLado who made the video (seen below), has posted the guide on how to modify your PS3 Sixaxis controller. Some soldering skills will be required. Also, it doesnt seem to be an actual port of the PSGroove. Its seems to be more of installing a PIC inside the PS3 controller and wiring it to the USB port. For the amount of work put into it, I personally prefer to just purchase a USB development kit. Hopefully, he can provide clearer pictures for us to see. Until than, enjoy.
Translated via Google:
This Mod is based on a pic 18F2550 PsgrooPic with Sixaxis PS3 controller adapted to take into account that will comply with 2 main functions:
Ps3 launch debug mode without losing any original settings and also be updatable.
Clarified, as any MOD is to make use of solder on the board of control, nothing complicated, only 8 of them.
Materials:
- 1 Control Sixaxis PS3 (in my case I have one of a Pack of 80g without vibrator, will also be worth for DUALSHOCK 3 but I have not tried).
- 1 Pic 18f2550 and to have a list to create a Picgroove in components as much as the programmer. In EOL there are many TUTORIALS on the matter, I personally I used the scheme of th0rin, in its version 1.2, that is to say, PSGroo 1.2.pdf can see tambiem it in this connection: hilo_tutorial-psgroopic-programador-casero-esquema-elsemi_1484968_s580 in an appointment of our companion calvo225, follows all the passages until having pic programmed. I recommend the Art2003 programmer with the WinPic800 program EYE: Pin 26 must go to mass if option LVP in the Config eyelash of the WinPIC800 were selected. If option LVP were not used, it is not necessary.
- Cable to do puestes (uses cable of data for them hard disk IDE of 80 very pratico wire and a single hair.
- Soldering iron, tin, scissors, graze FLUX, etc
Construction:
We already take pic previously programmed with the PSGrooPIC_wBTL_HEX_V1.5.hex file we doubled all the legs to him to be able to perfectly place it in a place of the control:
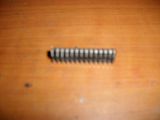
[Click on image to enlarge]
This it is the best place than I obtained pic enters perfect, to put it with the legs seeing towards outside
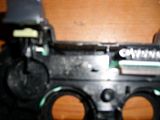
[Click on image to enlarge]
[Click on image to enlarge]
Seeing where it goes ours we removed pic, we cut it pieces of cable IDE but of 5 cm. and already do not come to weld the points: 1,8,9,10,13,14,15,16,19,20,25,26 one by each point. To remember that pic is seeing towards outside, points 15.16.19.20, 25 and 26 they are below pic and habria that to double them upwards, nothing complicated for the other points is but easy since they are in the part superior.
Now it is necessary to weld all the necessary components for the Pic:
2 10 Resistance of k.
1 Resistance 330 ohm.
1 470 Condenser of 220 or nf.
2 22 Condensers of pf.
1 Crystal of 8, 12, or 20 mhz.
1 Condenser 100 nf.
1 LED (any color, I have not placed it).
Puden to follow this scheme for easy interpretation
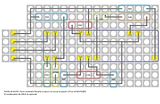
[Click on image to enlarge]
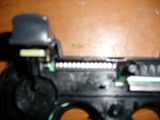
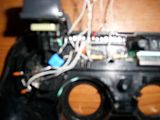
Utilizen cable pieces IDE to be able to connect them to pic, the subject of the Jumper and exits VCC, D+, D and GRN leave to cable sufficient about 10 cm more or less to have chest of drawers the installation if there is to cut cut. The LED that leaves not places it since I do not believe that it is necessary, now if they alquien wants to place it well, In this photo I show more or less as it must be before welding something, also can look for another form to place them for my was the best one than encontre:
[Click on image to enlarge]
CLARIFYING:
Before welding something to the order they deberan to try that pic works I correctly I connect to him to exits VCC, D+, D and GRN a connector usb and probe if took exploit, if everything goes well we come to the step to weld to the control, the points marked with colors are those that so go soldiers to the plate what without altering nothing.

[Click on image to enlarge]
One sees that in diagram it leaves as everything connected goes are simple welds, in the part of the JUMPER is necessary to remove the two lines and to place them in the button stick straight (THIS IS TO UPDATE the PIC FOR FUTURE UPDATES OF the PSGROOVE).
In the right part superior notese that is one extencion of button RESET have extended I it and added switche that goes adapted to the housing of the order I had to use a Dremel to be able to place it and to leave it outer (this it is but the important one of all so that when driving it annuls it to any funcionabilidad usb of the offer giving entered the Exploit). I recommend beings to cover everything to place insulators between cables, pic and the mini connector usb to guarantee the good operation.
Operation
- In order to be able to take the Xploit usb in the console and the control only places the cable, to have previously extinguished and ignited the console in the back button, soon to have tight button RESET and next to push button POWER next button EJET to activate way DEBUG, to hope until it leaves the logo the console, you can retire the control and push button PS (is the one of means of the control with the PS abbreviations, to look for games and sides the two folders that indicate that everything to come out well.
- In order to update the PIC it must have these programs installed in the PC:
- vcredist_x86.exe
- dotNetFx40_Full_setup.exe
After to install them you run the program:
3. HIDbootloader.exe
that he is the one in charge to program pic, usb in the control places the cable acontinuacion to have tight simultaneously in button RESET and the button of the left Stick (the button reset is for annulling to any activity usb in the control and stick analogical left abre step to activate the way to bootloader of pic) already to have fulfilled that coarse one to install the other end of the cable usb to the PC. Automatically the program would detect the device at issue. This same one becomes at the beginning of tuto before installing it in the control to program in .hex of exploit, in the interface of the program is very easy to interpret.
Note: to only do this when we have a new update for the Pic, we must take into account that already it has completes installed it updated and can play without inside having no disc (in some cases there are games deserves that it).
Good up to here everything by the moments, I hope that for something it serves east project since for my to be very encouraging it to have realised in spite of the bad criticisms that I have had thanks to all what they supported to me and to the equipment of Eol.
Greetings
Source: ElOtroLado Forums
Images via comments


 Reply With Quote
Thread Information
Users Browsing this Thread
There are currently 1 users browsing this thread. (0 members and 1 guests)
Similar Threads
-
Review: XCM Cross Fire Converter
By bandit in forum DCEmu Reviews & Games Reviews ForumReplies: 0Last Post: June 22nd, 2010, 03:45 -
My OEM Wireless Bluetooth controller SIXAXIS for PS3 review :)
By kkan in forum DCEmu Gaming & General Discussion ForumReplies: 0Last Post: August 3rd, 2009, 09:05 -
Revolution controller: insider interview
By wraggster in forum Nintendo News ForumReplies: 0Last Post: September 16th, 2005, 16:41

Bookmarks