

 DCEmu Homebrew Emulation & Theme Park News
-
DCEmu Featured News Articles
by Published on February 1st, 2011 23:50- Categories:
- Nintendo Wii News,
- DCEmu Reviews

Wii WeDock Controller Storage Case
Manufacturer: WeDock
Site: Buy from Brando
Price: $19.00
Overview : No right place to store your Wiimote and Nunchuck Controller? You just lying them somewhere?
This WeDock is the best solution for you. It can let you to store 2 sets of Wiimotes and Nunchucks. The one touch "Springbroad" design, let you can get the Wiimote easily.
Features
- 2 set of Wiimotes and Nunchuks storage space
- Innovative, compact and stylich design
- One touch "Springboard" design let you can get the Wiimote easily
Quality/Usability : We were the first to announced the release of WeDock and gamers had mixed feelings about it. Some thought it was cool, some thought it was OK and some thought it was useless. Now, we're the first yet again to bring you a full review!
The WeDock measures approximately 7" tall x 5" wide x 5½" deep. The look and feel matches the Nintendo Wii perfectly. The front of the case has a #1 and #2. Of course, this is to help you identify which one is controller 1 and controller 2. On the bottom left corner is "Wedock®" logo. The top of the WeDock is a cover that resembles the four gray lines on the Wiimote directional pad.
Opening the cover reveals four storage spaces. Two for Nunchuk (back) and two for Wiimote (front). The Nunchuk storage allows you to place either the cables first or it can be on top of the Nunchuk once placed in. The Nunchuk storage is even big enough to hold a Nunchuk with a silicon glove on it.
As mentioned above, the Wiimote storage features a "springboard" design. When you place your Wiimote into the storage space, the top of the Wiimote sticks out about ¾" (UP button on directional pad). Simply push the Wiimote down and it hide. If you need to take your Wiimote out, just push down and the Wiimote will pop up. The clicking can is a little loud. Just like the Nunchuk storage, the Wiimote storage also allows you to place your controller even with a controller glove on. No need to remove the glove. But you will need to take the wrist strap off the Wiimote inorder for the controller to fit. You can place the wrist strap either on top of the Wiimote controller or where the Nunchuk is. With 2 Nunchuks and 2 Wiimotes in place, the cover closes perfectly.
Conclusion : Overall, the Wii WeDock Controller Storage Case is a great storage to hold your controllers but its just a novelty. The size of the storage case is huge that you would not be able to carry it around comfortably. So its perfect to have in the house to protect the controllers from dust, liquid, pets or even your little siblings. Those who use controller gloves like me, do not have to worry about removing them but having to remove the wrist strap can get annoying. It would been even better if they had incorporated a recharging dock and battery. For the price of approximately $19.00, its a little expensive for case.
Images via comments
DIGG THIS
...by Published on February 1st, 2011 23:50- Categories:
- Nintendo Wii News,
- DCEmu Reviews

Wii Crystal Blue LED Cooler Stand
Manufacturer: N/A
Site: Buy from Brando / Buy from DealExtreme
Price: $19.00
Overview : Look!!! It is not only a ordinary stand, but also a Wii cooler. It has a built-in high velocity fan to reduce your console temperature, prolonging it's life. The cool blue LED light design added style to your Wii console.
Features
- Built in High Velocity Fan. Reduce your console temperature, prolonging the life of your Wii Console
- Cool Blue LED Light adds style to your gaming setup
- You can turn off the LED and the fan by the ON/OFF switch
- USB Power
- Clear, Soft color stylize your Wii
- Provides Safety, support, and added stability
Quality/Usability : The Wii Crystal Cooler Stand adds a whole new look to your Nintendo Wii. The stand has a built-in fan to cool down your Wii as well as blue LEDs to light up the stand.
The Wii fits into the stand perfectly just as if it was the original gray stand. On both sides of the stand hear the back are two blue LEDs that illuminate the whole stand. Inside the stand near the back is a small 5v fan that helps cool down your Nintendo Wii. On the backend of the stand, is a switch to either turn on the lights only, turn on both the lights and fan or to just turn it off completely as well as the port to plug the supplied USB cable. The stand is powered via USB and is connected to one of the USB ports on your Nintendo Wii.
The fan is quite but doesnt push much air. Bad thing about the fan is that it pushes cool air into the Nintendo Wii rather than pushing out the hot air. Pushing the air into the Wii can also push in dust particles. On the bottom of the stand is another opening for the air to pass through the fan. The opening between the bottom of the stand to the surface it is sitting on is not much (thickness of a USD Quarter).
Conclusion : Overall, the Wii Crystal Blue LED Cooler Stand is a nice substitute for a stand. The blue LEDs on the stand can get very bright in a dark room and may become an annoyance after awhile but at the same time, gives it that cool factor. Honestly, the point of the fan is pointless. So as long you keep your Nintendo Wii in a well ventilated environment, there is no need for a fan. Not to mention, it blows air into the system rather than out. The price tag of $19.00 is a bit pricey as well.
Images via comments
DIGG THIS
...by Published on February 1st, 2011 23:50- Categories:
- Nintendo Wii News,
- DCEmu Reviews

Wii Light Gun
Manufacturer: PEGA
Site: Buy from Goldenshop
Price: $19.00
Overview : Playing shooting game with this Wii Light Gun. You can feel the sense of authenticity, just aim at the target on screen and shoot it down. So Easy!
Features
- Convert the Wiimote to a high precision Wii light gun
- Easy to target while playing shooting games
- With exquisite design, using conveniently
- The Wiimote Controller is not included
- This is not an Official Products
Quality/Usability : Every gamer out there is hoping for Nintendo to release the Wii version of the Zapper that was released for the NES. Until that day comes, gamers will have to rely on 3rd party peripheral manufacturers to fill that void.
PEGA has released their light gun attachment for the Nintendo Wii. Its simply just a casing that lets you plug your Nintendo Wiimote and Nunchuk into it. It has an actual trigger. When you press on the trigger, there is a spring inside that will retract a trigger that will press the B button on the Wiimote. Where do you plug the Nunchuk controller? You plug it at the bottom of the light gun.
How well does it work? When the controllers are connected to the light gun attachment, it works pretty well. The Wii picks up every movement as if it wasnt in the attachment. Bad thing about it? When pull the trigger, you have to pull all the way in order for the trigger arm to press the B button. When pressing the button, your hand will jerk a little as you will need a bit of strength to pull the trigger. This will cause your aim to be inaccurate.
Conclusion : Overall, the Wii Light Gun is a great idea and a temporary solution until Nintendo releases their own (whenever that will be). The distance of the trigger arm to the B button is it bit far which means you'll have to pull the trigger even further. By that time, you've already been hit or will be missing your shots. It would have been nice if the trigger arm was closer to the B button which wont take long to pull the trigger. When placing the Wiimote into the attachment, you will need to remove the wrist strap. If you are using a controller glove, you'll have to remove that as well.
Images via comments. Additional images from Brando
DIGG THIS
...by Published on February 1st, 2011 23:50- Categories:
- Nintendo Wii News,
- DCEmu Reviews

XCM II-Case Chameleon
Manufacturer: XCM
Site: Buy from TotalConsole
Price: $54.99
Overview : Stand out from the crowd with the ultimate Wii case: the ii-case that includes LEDS shining in the dark, with our Chameleon technology to rotate between colors! The ii-case is not only a full replacement transparent Wii case, but it also includes a LED system to enlight your Wii. Very complete, it includes Air Flow cover and DVD Rom cover (in metal).
The Chameleon version includes a system of color rotation for the ultimate light effect. An extra button allows you to select a specific color (Red, Purple, Green, Yellow, Blue, Apple Green or Orange) and keep it static on screen.
Includes matching color stand and special Tri-wing screwdriver for installation.
Quality/Usability : After receiving XCM's I-Case Black Knight and reviewing it, we received Team Xtender's second full replacement case, II-Case Chameleon on our doorstep (courtesy of TotalConsole). This time, it houses LEDs to make it even more unique. Those who love to have "flashy" consoles and when I mean flashy, I mean the type that will blind you, would want to read this review.
This is XCM's third? Fourth? Fifth, full replacement casing for the Nintendo Wii? I dont know, but I lost count as they have released so many ranging from chrome, to red, to blue, to even pink! As mentioned above, we reviewed their Black Knight, which is an all black casing. They have been known for slick and unique faceplates, casings, controller mods, cables and other accessories.
The XCM II-Case Chameleon includes the console shell, doors, faceplate, buttons and even the rubber feets at the bottom of the Wii which makes up the whole exterior of the Wii. To match the clear crystal case, they also included a clear stand and tools to help you dismantle the Wii! Not a single piece was left out.
Like all of XCM's products, the quality of the case is excellent and solid. Feels like it came out from Nintendo's factory. The case is clear which allows you to see all the innards of the Wii. The Crystal Chameleon also comes with a metal DVD cover which houses the LEDs near the DVD drive.
I wont go much into detail regarding installation as you can find tutorials on how to dismantle or disassemble your Wii, here. The whole installation process took approximately 50 mins. This is not to say that is how long it will take you to assemble everything. I am a perfectionist and anal when it comes to things like this. For some who are pros or better at things like this can be a lot quicker while noobs, novices or perfectionists like me, may take longer. The whole process is just time consuming and tedious. It will require some patience. It took longer than the Black Knight casing was because the metal DVD cover and Air Flow (which also has LEDs) needed to be installed and wires needed to be connected in order to power the LEDs. To install the metal DVD cover and Air Flow, you can read the tutorial here. Even though I had already installed the Black Knight case on to my Wii, you would think that the installation time would be shorter. It all depends on your skills and perfectionism.
Once installed and the Nintendo Wii put back together, the Crystal Chameleon case is fairly bright. Luckily, you have the option of turning if off but also the option of either having the LEDs fade into different colors or stick with one color.
Click here to see a video of the II-Case Crystal Chameleon case in action.
Conclusion : Overall, the XCM II-Case Crystal Chameleon is unique and flashy product but a bit pricey. But thats the price you have to pay to be unique and different amongst Wii owners. Those looking to kick it up a notch with the look of their Nintendo Wii should definitely look into purchasing the II-Case Crystal Chameleon case. You would be the cool kid on the block (HAHA, that was so cheesy). Again, the time it took me to install the II-Case depends on the person, experience and perfectionism. With the new mods for the Nintendo Wii such as the PulseVU, LED mods for both console and controllers, the Chameleon case would be able to flag a plane (just kidding). Be sure to check out the other colors that XCM has to offer if you want to be even more wild and crazy with colors!
Here is a video of the Chameleon Case with PulseVU and a few other LED changes installed: (by M37R01D)
DIGG THIS
Images via comments ...by Published on February 1st, 2011 23:50- Categories:
- Nintendo Wii News,
- DCEmu Reviews
Wii Blue Light Charge Station
Manufacturer: PEGA
Site: Buy from Goldenshop / Buy from DealExtreme
Price: $15.00
Overview : Charge two Wiimotes at the same time. Includes 2 1800mAh battery packs.
Features :- High quality 3rd party product.
- Comes with 2pcs of 1800mAh rechargeable batteries for the Wii remote controls - no need to take out the battery when charging.
- No need to add extra power supply - get the power from the USB port of the Wii console.
- 2pcs of Wii remote controls can be charged simultaneously.
- Light indicators to show the charging status.
All the battery packs that we have reviewed such as Penguin United Remote Charging Dock + Rechargeable Battery, Wii Remote Battery Charger & Stand or Wii Remote Charge 'N Play, all have the same type of look...plain. Nothing stands out. Nothing fancy. Well, PEGA went and took it to the next step, lights.
The Wii Blue Light Charge Station comes with a dock, USB cable and two battery packs. Both battery packs are 1800mAh's which is pretty much standard for the 3rd party batteries.
The battery are ordinary battery packs and looks similar to Wii 1800mAh Rechargeable Battery. Instead of the 1800mAh being printed, the PEGA version is stickered. Also on the battery pack is a sticker that informs you that before using the battery pack for the first time, you must charge the battery for over 12 hours, or else the battery life will be reduced. Honestly, whether you use it first or charge it, gradually the battery life will be reduced like any other battery. I personally use the battery first and let it die out completely before doing a full recharge. Like the Wii 1800mAh Rechargeable Battery, there is a hole on the battery pack for easy access to the SYNC button.
The dock is what makes the product stand out from the rest of the crowd. Did you purchase the sweet looking Wii Crystal Blue LED Cooler Stand and change the casing of your Nintendo Wii to the Team Xtender II-Case Chameleon? Well your lighted collection isnt complete without this. Thats because the dock lights up also! No, not those cheesy small GREEN LEDs that goes on and off to let you know if its fully charged and done. All around the bottom of the dock is a clear window. This lets the lights from the LED shine through. There are 4 LEDs on the bottom of the dock. To turn on and off the blue lights, there is a switch on the back of the dock. On the top of the dock near the Wiimotes, are two more LED lights, one for each dock. When the battery packs are charging, the light will turn RED...more like pink. When the battery pack is done charging, the light turns blue.
In order to charge the battery pack, you need to have it inside the Wiimote. Sorry, but you'll also have to remove the wrist strap or the contact on the dock wont touch the contacts on the battery pack. Like all other recharging docks, it wont work with silicon skin/glove on. So you'll have to take that off as well.
Charging time took approximately 2-3 hours like all other docks but I left it on there for 12+ hours as recommended even though it wasnt necessary. During game play, I was able to get about a 4.5 hours out of a full charge.
Conclusion : Overall, the Wii Blue Light Charge Station ups the ante in looks for rechargeable docks. The blue lights look great! The battery packs? Well, they're just battery packs. Nothing special. Nice to have an ON/OFF switch for the lights on the bottom of the dock but the lights to show you if the Wiimotes are charging is permanently on. There is no way to turn them off. Placing the Wiimotes on the dock can take some fiddling around so that the contacts on the dock and battery pack touch each other. Having to remove the wrist strap off the Wiimote can be annoying for some Wii'ers. The price of the Blue Light Charge Station of $15 is fairly reasonable considering it comes with two rechargeable batteries and the dock lights up!
Images via comments ...by Published on February 1st, 2011 23:50- Categories:
- Nintendo Wii News,
- DCEmu Reviews

PEGA Wi Wireless Sensor Bar
Manufacturer: PEGA
Site: Buy from Brando
Price: $17.00
Overview : Complaining the Wii sensor bar cable too short? No Problem!
This Wii wireless sensor bar makes you have freedom to locate the bar. It is a easy solution for those Projector type users.
Features
- LED indicator and ON/OFF switch
- Easy to install
- ideal range 3-8 feet
- 2 x AA Batteries is required (NOT included)
Quality/Usability : PEGA has entered the wireless sensor bar market for the Nintendo Wii (is there anything they cant do?!).
The front of the wireless sensor bar are three LEDs. One on each side to interact with the Wiimote and one in the middle. The one in the middle is a green LED. This lets you know hen the wireless sensor bar is on. On the back of the wireless sensor bar is a ON/OFF switch. This lets you turn on and off the wireless sensor bar. On the bottom is a small compartment to insert your 2 AA batteries (not included).
Although the specified ideal range to use the wireless sensor bar is 3-8 feet, you can use it as far as 13 feet. The distance is a little shorter than all the other wireless sensor bars that we have reviewed. The average distance is usually 15 feet. So the PEGA wireless sensor bar falls a little short when compared to other wireless sensor bars on the market but the distance is ideally 5-10 feet, so anyone who uses this should be fine with the wireless sensor bar.
On 2 AA batteries, the wireless sensor bar lasts for about 15-20 hours before the batteries will need to be recharged or changed (depending on what type of battery you are using).
Conclusion : Overall, the PEGA Wii Wireless Sensor Bar works fairly well but falls short when compared to other wireless sensor bars on the market. The furthest distance before the sensor got a bit funky was at 13 feet. Battery life was fairly decent, lasting about 15-20 hours. The price of $17 seems a little high while the Nyko Wireless Sensor Bar retails for $19.99-21.95.
Images via comments ...by Published on February 1st, 2011 23:50- Categories:
- Nintendo Wii News,
- DCEmu Reviews

WiiFree Easy Connect Modchip
Manufacturer: WiiFree Easy Connect
Site:
Price: 12.00 €
Overview : WiiFree is an open source Wii modchip. It required you to load your own code onto a PIC12F629/675/683. In order to load the code, you would need to purchase a programmer as well as the PIC chip. Now there is an easier way to install and upgrade WiiFree.
This is a clean and very cheap solution, which makes the installation of PIC 12F629/675/683 in your Wii console extremely fast and easy; allowing the upgrade of the WiiFree code without any problem.
*Every PCB comes with a brand new PIC12F629 bundled.
Features
- Run GameCube originals
- Run Wii originals
- Run Wii back-ups
- Support for D2A and D2B!!
- Support for 12F629 and 12F683 chips (the installation for the 12F683 is the same as the 12F629)
Quality/Usability : I wont go into full detail as to review the WiiFree open source modchip (will review it later) but will review the WiiFree Easy Connect itself and its installation. As we first brought the news of WiiFree Easy Connect and the first images of Easy Connect in our hands, we now bring you the first review.
WiiFree Easy Connect comes included with a PIC12F683 and cables. When you first receive the Easy Connect the two boards are connected together. You will have to bend them in half to have two separate pieces. Dont worry, its already been sliced so that the break would be even. The board itself is not as thick when compared to other commercial modchips on the market such as the WiiKey, CycloWiz, etc.
On the bigger board, it contains the PIC12F683 chip which contains the WiiFree open source as well as the 8-pin socket to hold the PIC in place. As of this review, WiiFree 2.45 is the latest version available is preloaded onto the PIC so that all you have to do is just solder and install the Easy Connect and you're ready to go. This is great for those who dont have a JDM programmer (used to upgrade/flash PIC chips). The board also has two LEDs. This lets you know if the installation is successful or not. This board is to be placed on the outside of the Wii for easy access to the PIC incase you want to upgrade WiiFree when there are new releases.
The smaller board has the quicker solder points to be soldered onto the Wii mobo. The solder points are so small that you can only do quicker solder. Its very hard to do wire installs unless you're very skilled at doing so. Most people prefer wire installs as it is easier to remove when needed rather than quick soldering.
Other than the small soldering points, its fairly simple. On one end of each board is a small clamp like device that you pull out slightly, insert ribbon cable with blue sticker facing up (included) and close the clamp. This will hold the ribbon cable in place on the board. No soldering required.
Once the smaller board has been soldered onto the Wii and all cables have been connected, you can place the bigger board on the outside of the Wii case. You can route the cable through the side of the USB port or through the vent opening on the back of the Wii case. Usually, the 8-pin socket that holds the PIC12F629 are soldered onto the Wii case with wires to the Wii mobo by drilling 8 little holes and held in place with glue. With WiiFree Easy Connect, you wont have to drill any holes on to the Wii case. You may want to get double sided tape or something to hold the Easy Connect to the case. If not, you can just let it dangle freely.
Conclusion : Overall, the WiiFree Easy Connect is an excellent solution to those who do not want to damage their Wii case by drilling holes. It would have been nice if the points on the Easy Connect were bigger to allow wire installs rather than the quick solder method. Would have been also nice if maybe they had included double sided tape or some way to attach the Easy Connect to the Wii case. With the inclusion of the PIC12F629 and WiiFree already preloaded, this is great for those who do not have a JDM programmer or PIC12F629. Since it comes with a PIC12F926 and if you have a JDM programmer, you can install any open source modchip whether it be OpenWii, Chiip, Yaosm, WiiC, WiiREZ, Wiip! and many more.
Since the PIC chip is removable, you can purchase or request sample PIC chips online and load your preferred open source code to that PIC and swap PIC chips. That is if you still prefer to keep the WiiFree. Regarding the JDM Programmer that lets you put open source code on to the PIC chip, there are two ways of getting one. #1. Make your own by following these instructions. Or #2. You can purchase them online either on gaming sites or through eBay by typing in "jdm programmer" in the search field. You will need to have a RS232 cable (serial) handy in order to connect the JDM Programmer to your computer.
Please note that none of the "upgrade" products listed in this site are endorsed by Nintendo, Sony and/or Microsoft. DCEmu Reviews and DCEmu Network does not condone piracy. The primary functions of a "modchip" ...by Published on February 1st, 2011 23:48
News via AEP
[news]A new update of the NES emulator RockNES has been released.
Quote:
Hello folks, it´s been a long time! RockNES 5.06 has been released! Enjoy.
From this release, I´m no more including the Allegro library with the package. Download it separately. Yes, I have a compiled DLL for you, if that´s the case.
What´s new for version 5.06 (01/31/2011)
Major APU timing fix.
Minor fix for $2004 reads.
Some CPU fixes, including all possible dummy read cases.
Sound sample rate is at 44100hz and cannot be changed for now.
Created config flag to enable/disable sound output.
Changed PRG bank masking for non-power-of-2 values.
Removed disassembling at $4000-$4FFF.
Fixed a bug restoring pAPU savestate block.
Fixed PRG bank number calculation in the disassembler.
Fixed a potential bug of disassembling the main RAM.
Fixed mapper 4 and variants to include CHR-RAM bankswitching.
Fixed Atari RBI baseball mapper number.
Added mapper 86, JALECO-JF-13, partial.
Added mapper 93 "Fantasy Zone (J)".
Added checks for unexpected/non-standard cartridge configs.
Added ability to dump the secondary OAM data.
Added palette RAM viewer.
Added a new screenshot method: captures the desktop.
Added an option for sound to output like a famicom-clone console.
Reworked sound driver and pAPU startup.
No more needed to restart the emulator when changing sound settings.
Palette files are loaded on emulator startup, when specified.
Proper GUI menu items disable, instead of warning popups.
Switched back the color emphasis table.
Removed "quit emulation" key config, now it´s key only.
Lots of general cosmetic changes.
Major update to the emulator documentation.
[/news]
:: Homepage ...by Published on February 1st, 2011 23:48- Categories:
- Nes News
News via AEP
[news]A new update of the NES emulator RockNES has been released.
Quote:
Hello folks, it´s been a long time! RockNES 5.06 has been released! Enjoy.
From this release, I´m no more including the Allegro library with the package. Download it separately. Yes, I have a compiled DLL for you, if that´s the case.
What´s new for version 5.06 (01/31/2011)
Major APU timing fix.
Minor fix for $2004 reads.
Some CPU fixes, including all possible dummy read cases.
Sound sample rate is at 44100hz and cannot be changed for now.
Created config flag to enable/disable sound output.
Changed PRG bank masking for non-power-of-2 values.
Removed disassembling at $4000-$4FFF.
Fixed a bug restoring pAPU savestate block.
Fixed PRG bank number calculation in the disassembler.
Fixed a potential bug of disassembling the main RAM.
Fixed mapper 4 and variants to include CHR-RAM bankswitching.
Fixed Atari RBI baseball mapper number.
Added mapper 86, JALECO-JF-13, partial.
Added mapper 93 "Fantasy Zone (J)".
Added checks for unexpected/non-standard cartridge configs.
Added ability to dump the secondary OAM data.
Added palette RAM viewer.
Added a new screenshot method: captures the desktop.
Added an option for sound to output like a famicom-clone console.
Reworked sound driver and pAPU startup.
No more needed to restart the emulator when changing sound settings.
Palette files are loaded on emulator startup, when specified.
Proper GUI menu items disable, instead of warning popups.
Switched back the color emphasis table.
Removed "quit emulation" key config, now it´s key only.
Lots of general cosmetic changes.
Major update to the emulator documentation.
[/news]
:: Homepage ...by Published on February 1st, 2011 23:47- Categories:
- PS2 News,
- Xbox 360 News,
- DCEmu Reviews
XCM XFPS Mini Guitar (PS2/360)
Manufacturer: XCM
Site: Buy from Goldenshop
Price: $59.00-79.95

Overview : Enjoy all guitar games on Playstation 2 and Xbox 360 with XFPS Mini Guitar. Reduced size but with a great feeling, it is perfect for home but can be carried around easily!
Only half the size of a classic PS2 guitar, the XFPS Mini guitar is compatible with all Playstation 2 guitar games but also with Xbox 360 when used with XFPS 360 (regular, Pro or Sniper version).
Made of wood, it has a nice authentic feeling and is very convenient to play.
Features :
- Half the size of classic PS2 guitar
- Compatible with Playstation 2 and Xbox 360
- Includes all buttons for PS2 and Xbox 360
- Made of wood for authentic feeling
Requires XFPS 360 or XFPS 360 Pro to be used on Xbox 360.
Quality/Usability : Everyone has heard of Guitar Hero. Whether you're a gamer, a parent or both, you heard the name before. Its one of the hottest music games to date and probably sold the most. There are Guitar Hero bundles where it includes game, guitar, strap and stickers. When a new game is released, sometimes its either game or another bundle or even both.
What if you just want the game and not have another huge box/guitar take up room? XCM has stepped in and released a XFPS Mini Guitar. The Mini Guitar is constructed out of actual wood. The main plug is a PlayStation 2 plug but can also work on the Xbox 360 with the addition of XCM's XFPS PRO or 3.0 Sniper. The guitar is fairly small and measures approximately 12 inches. Although the guitar is made of wood, it is actually lightweight.
On the front are 5 fret buttons, two selection buttons, strum bar, whammy bar, start and select buttons. On the back of the guitar is a switch that lets you choose between Guitar Freak & Drum Mania games (Option A) and Guitar Hero games (Option B). Below are usage instructions:

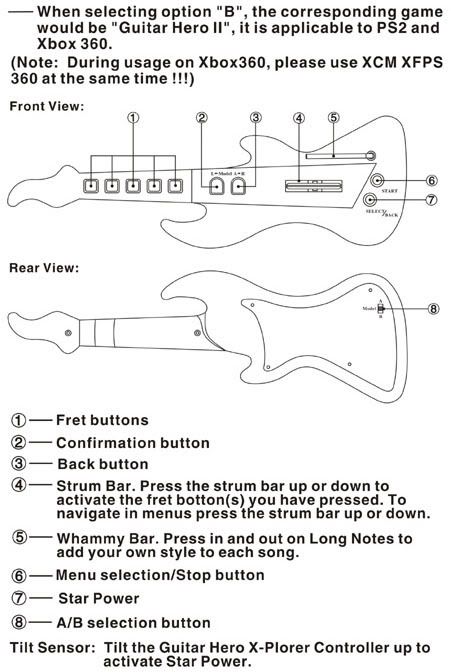
So how good is the Mini Guitar? Where do I even begin? The size and weight is great but it just feels too awkward. Its way too small and feels like a ukulele. The fret and selection buttons are too small and too close to each other. If you have the fret buttons on the left hand, its fine but if you have the fret buttons on the right hand, it will feel uncomfortable as you have a piece of the guitar obstructing your gameplay.
Its cool that the fret and selection buttons light up but you wont be looking at the guitar when you're playing the games so I think its useless. Theres also no need to press on the strum bar which by the way feels awkward. Feels like its going to fall off. Just pressing the any of the fret buttons alone will register as a button press. If you look at the video below from XCM, you'll see what I mean. Just watch the fingers on the fret and strum.
The whammy bar is different as well. On the Guitar Hero guitars, you can swivel the whammy bar to your preferred location which the Mini Guitar allows you to do also. But what it doesnt let you do or as much is press down on the whammy bar. There is no spring reaction. The whammy bar on the Mini Guitar was more parallel to the guitar itself than the stock image below (must be registered to view).
Activating the Star Power can be an annoyance if you prefer to tilt the guitar. I personally prefer to hit the SELECT button even on the Guitar Hero guitars. On the Mini Guitar, sometimes it activates and sometimes it wont. The Star Power will sometimes even activate with a slight tilt or shake of the controller which sucks especially if you're trying to build up on Star Power for that perfect moment.
Conclusion : Overall, the XCM XFPS Mini Guitar (PS2/360) didnt do so well in our testing. The only good thing about the Mini Guitar was that its light and small. Pressing of only the fret buttons is easier for some as you only have to worry about the buttons but it takes the fun out of the game. Its like playing Dance Dance Revolution but with only your fingers. For the prices that online stores are charging, it might be better to pick up a normal sized controller from a 3rd party manufacturer from a retail store for an extra $10-20. If XCM followed the style of the Guitar Hero's, they might have a good product as the GH guitars were perfect for playing. Revamping the style and look backfired on them.
Images via comments
- Search DCEmu
- Advert 3
 News Categories

- Links of Interest
 Sony Consoles News


- Nintendo Consoles News

- Sega Consoles News


- Apple & Android News
- Xbox Consoles News


- Open Source Consoles News
 DCEmu News Archive
- Advert
- Retro Consoles News


- PC News

- Latest DCEmu News


- DCEmu Network Sites
-
 Menu
Menu  Forum Stats
- What is the DCEmu Homebrew & Gaming Network
Catherine: Full Body’s English translation for the Vita