

 DCEmu Homebrew Emulation & Theme Park News
-
DCEmu Reviews Latest News
by Published on February 2nd, 2011 12:06- Categories:
- Nintendo Wii News,
- DCEmu Reviews
Wii Boxing Gloves
Manufacturer: PEGA
Site: Buy from Goldenshop
Price: $22.00
Overview : Feel like you're in the ring with Mike Tyson, without having to get your ear bitten off! This cool product from Pega brings new life to the boxing game in the Wii Sports package. Simply stick your Nunchuk and Wii-mote controllers into each glove, link them up and it's seconds out, Round 1! Gloves are fully padded to protect you, the controllers and whoever you might accidentily hit! Adjustable straps to suit most sizes. Get one, it's a lot of fun!
Features :
- High quality 3rd party product.
- Enhance the joy of playing.
- Easy to use.
Quality/Usability : As we were the first ones to bring you news regarding the Wii Boxing Gloves. We also mentioned that we would bring a review as well and here is the very first Wii Boxing Gloves REVIEW!
So how is it? Its got its share of good and of course, its got its share of bad. So lets start the review!. The quality of the gloves are well made. Its light weight and feels great in the hands. There are velcro straps to tighten the gloves to your hands. The glove itself is pretty much a one size fits all. If you have small hands, it will be loose.
Now the controllers. The controllers go inside the big padded pouch. Right hand for Wii Remote and left hand for the Nunchuk. Inside the pouch is a styrofoam cushin with cutouts for the shape of the Wii Remote and Nunchuk. The cord on the attachment and strap on the Wii Remote go through a little opening on the flap cover of the gloves. Once the Wii Remote and Nunchuk are connected together and placed inside the cushion and the cushion is inside the glove, thats when we run into problems.
Theres no way to press buttons. In order to press buttons, you have to remove the styrofoam cushion to access the Wii Remote. Putting it back together to get ready to play a game isnt easy either as you'll need two free hands to help shove the cushion into the pouch of the glove. The time it takes to put the cushion/controller into the pouch, you're getting your butt whooped by your computer opponent. If you use controller gloves like I do, its a very very tight fit and you'll need to take them off if you're using a glove..thats if you want to use the cushion.
Even if you take out the cushion and just stick the remotes into the pouch, you'll be able to access the buttons but you still have problems. Once the Wii Remote is placed into the glove, you cant select anything on the screen since the Wii Sensor Bar doesnt recognize the Wii Remote since the glove is blocking the IR. So you'll have to take the Wii Remote out just to aim and select what you want. Once you have selected what you want, you have to stick the remote back into the glove. At least this option is a little easier than with the styrofoam cushion.
If you're able to put up with all that hassle, gameplay is somewhat smooth sailing. Although the Wii Sensor Bar doesnt recognize the Wii Remote for you to point and select your options, it recognizes the movement of the controllers..but not completely accurate. Just holding the controllers without the use of gloves isnt accurate to begin with. Its a little harder to do uppercuts and those side-punches. Since the wires are coming out of the top of the controller gloves, the cord may get in the way of gameplay.
Conclusion : Overall, the Wii Boxing Gloves is just a gimmick. The idea is great but the design is poor. Cord being in the way, Wii Remote not being recognized when it comes to selecting things thus having to remove the styrofoam cushion and remote just to select what you want. By the time you're done fiddling with selecting and placing it back into the pouch, you dont want to bother anymore. You're pretty much either in between rounds resting or given up and got KO'd.
If they were to revise the controller glove, I suggest not having the styrofoam cushion over the remote but under it. This will allow user to have access to buttons without having to take out the controller. A cut out for the IR would be need so it is visible to communicate with the sensor bar. And maybe something with the wires where they are at the bottom of the glove rather than at the top. There were a couple of times where I got smacked in the face.
Images via comments ...by Published on February 2nd, 2011 12:06- Categories:
- Nintendo Wii News,
- DCEmu Reviews
Nyko Charger Grip Lite
Manufacturer: Nyko
Site: Buy from Nyko
Price: $24.99
Overview : Increase the battery life and comfort of the Nintendo DS lite with Nyko’s Charger Grip for the DS lite. The Charger Grip lite has a built-in rechargeable lithium-ion battery that adds up to 8 hours of additional playtime. The batteries are encased in an ergonomically designed case designed to minimize discomfort and provide a more comfortable grip for extended playing sessions on road trips, plane flights and more. The ChargerGrip lite utilizes the existing DS lite AC adaptor to charge both the DS lite’s battery and the Charger Grip’s internal battery simultaneously. Attaching and removing the Charger Grip is simple and requires no additional hardware or installation.
Features :
- Built-in rechargeable lithium-ion battery
- Up to 8 hours of additional play time
- Uses existing DS lite AC adaptor
- Enjoy longer periods of gaming without having to recharge
- Ergonomic design meshes with the décor of the DS lite
- Built-in stylus slot
Quality/Usability : Nyko announced and unveiled the Nyko Charger Grip at CES 2007. Since then, DS Lite owners have been wondering how the Charger Grip works out and how well it works. And we're here to bring it to you!
The Charger Grip comes only in one color and thats white. Installation and removal is fairly simple. First you'll need to remove the DS stylus. Fully extend the Charger Grip sliding power connector and place the DS Lite into the Charger Grip. Once the DS Lite is on the grip, slide the power connector down into the DS Lite power connector. Since the stylus has been removed from the DS Lite, Nyko uses a locking pin to secure the DS Lite in place. Where does the stylus go? It goes on top of the grip.
You can charge the Charger Grip alone, or both the Charger Grip and the DS Lite at the same time. Of course, you'll need the AC adapter in order to charge the Charger Grip.
There is a switch on the back side of the Charger Grip and consists of two modes, Charge Mode and Play Mode. Charge Mode is used to charge the Charger Grip by itself. This does not charge the DS Lite system. Play Mode will simultaneously charge the Charger Grip and DS Lite, or you can use the Charger Grip to charge the DS Lite if you are running low on battery.
There is an LED on the left side of the Charger Grip. NO LIGHT obviously means it is not charging. SOLID RED LIGHT means the unit is in Charge Mode. SOLID GREEN LIGHT means it is in Play Mode.
The Charger Grip has a foam cushion to prevent any scratching on the bottom of the DS Lite. With the DS Lite in the Charger Grip in place, the Grip feels comfortable in the hands and it doesnt add much bulk or weight. Access to the volume switch, headphone jack, power switch and both Slot-1 and Slot-2 are all easily accessible.
Conclusion : Overall, the Nyko Charger Grip does its job at supplying additional power to the DS Lite. It takes about 3-4 hours and lasted a little over 8 hours from our testings. If charging both the Charger Grip and DS Lite, it can take longer to charge. Having the Charger Grip would defeat the purpose of portability since it does add some thickness to the DS Lite. It would have been nice if Nyko offered a variety of colors such as black or pink to match the colors that Nintendo released in the US.
Images via comments ...by Published on February 2nd, 2011 12:05- Categories:
- Nintendo Wii News,
- DCEmu Reviews

DecalGirl Wii and Controller Skin (NES Retro Horizontal)
Manufacturer: DecalGirl
Site: Buy from DecalGirl
Price: $14.99 (Wii) / $4.00 (Remote/NunChuk Set) / $4.00 (Classic Controller) - Purchased together
Price: $4.99 (Remote/NunChuk Set) / $4.99 (Classic Controller) - Purchased Separately
Overview : We've always been huge Nintendo fans and we're proud to offer skins for the new Nintendo Wii. Extra care was taken on this next-gen console to cover as much as possible, minimize gaps between panels, and give fellow Wii owners a skin kit that does the box justice.
This Wii skin is made from the best materials - thin enough to cover both sides and still fit in the OEM stand, but thick enough to protect from scratches. The full-color, high-res "Retro Horizontal" design won't fade, smudge, smear, or leave any nasty residue when removed.
The same DecalGirl skins that Nintendo Power called "truly impressive" can now be yours for under $15!
Quality/Usability : Don't expect any fancy retail packaging. The quality of the skin is top notch. I was impressed by the quality the skins were printed on. The Wii skin came in two sheets. The first sheet contained the skin for the right side of the Wii (when stood up; top), front faceplate of the Wii and for the covers for the GameCube controllers. The second sheet was for the left side (bottom of the Wii).
They also included two more sheets. One sheet included skin for the Wii remote and nunchuk. The
second had the Classic Controller skin.
I'm anal and a perfectionist, so when it comes to making things look the best, it has to be perfect. Applying the skin was fairly easy. There were at times when it was not aligned perfectly and lifting/removing the skin was easy. It did not leave any marks or residue and the skin can still be applied.
Applying the top skin (right side when stopped upright), took me a couple of tries before I got it on perfectly. Once that was placed on, applying the rest was a synch once you get a hang of it.
Once all the skins have been applied, I thought there would be some added thickness to the Wii when placed into the stand that came with the Wii. But I was wrong. The Wii fit perfectly into the stand with the skin on.
Applying the skin for the Wii Remote, NunChuk and Classic Controller was easy as well. But if you have a glove on your Wii Remote, you probably wont notice that you have a skin on there.
The color of the skin looks fabulous. Looks exactly like a NES.
Conclusion : Overall, the DecalGirl Wii Skin is a great product. Gives your Wii a unique look until Nintendo releases new Wii colored system or a third party releases colored casings. Unfortunately, the top skin doesnt really cover completely. There is a slight gap. Also, with the skin on the nunchuk/remote and classic controller, I wonder how long it will last for those gamers with sweaty hands. But the skin is a great investment for those who wants to add a new look to their Wii. Not to mention, the skin can also protect the Wii from scratches.
More images via Comments ...by Published on February 2nd, 2011 12:05- Categories:
- Nintendo Wii News,
- DCEmu Reviews
Wii Wireless Sensor Bar
Manufacturer: WirelessSensorBar
Site: Buy from Wireless Sensor Bar
Price: $24.99
Overview : The Wireless Sensor Bar™ can be used with any Wireless / IR control system that uses anchored IR points, such as the Nintendo Wii Remotes ("Wiimotes").
The Wireless Sensor Bar™ is battery powered, extremely easy to use, and has no external wires- perfect for any home gaming or home theatre system.
Quality/Usability : WirelessSensorBar.com is new to the peripheral scene. WSB took the same concept such as the candles, TV remotes, PSPs and Christmas lights but turned it into a real product. The WSB is to either replace the sensor bar that was included with the Nintendo Wii or used as a backup. Most people think that the sensor bar that came with the Nintendo Wii is communicating with the Wii with its 12 foot wire but its really not. The sensor bar is actually just being powered when connected to the Wii.
Honestly, the look of the WSB looks cheap. Looks as if someone just took some PVC moldings/pipes, cut them up and slapped them together. Then drilled some holes, added some LEDs and some soldering and BAM! Wireless Sensor Bar.
The WSB is about 13 inches long, 1 inch tall and about 2 inces thick. It's definitely bigger than the sensor bar that came with the Wii.
Aestheticly the WSB looks cheap but does its job perfectly! The IR LEDs are powered by a 9-volt battery. WSB.com claims the battery can last 48+ hours depending on use.
WSB.com also claims that it has the same range and accuracy that the original sensor bars of 3 and 8 feet but can probably go as far as 15 feet. From testing, it does hold true.
On the front of the WSB, it houses 4 IR LEDs (two on each side), a red LED power indicator and a ON/OFF button. The bottom has 13 inches of double sided mounting tape.
To slide off the covering, all you have to do is remove either end of the WSB and slide the top cover off. Once you have removed the top, the case reveals a simple design of the product. You can see all the wires and soldering. The soldering points look clean and I doesnt seem there would be any problems of it coming off. Even if it did, it would be easy for someone to resolder the points back.
When you turn on the WSB, the red LED is lit up to show you that its powered on. The other 4 LEDs dont light up as they shine IR to the remote.
Features :
- Uses Wii Standard 3-8 foot ideal range
- Setup and use in seconds with 1 button design
- On / Off switch with Red LED indicator
- 48+ hrs of gameplay battery life
- Adhesive strip on bottom for easy mounting
- Uses 9 Volt battery (extended life)
- Designed, produced, and tested in the USA!
Conclusion : Overall, the Wireless Sensor Bar does what its suppose to do. It would of been nice if they made a smaller design and sleeker design. For the price of $24.99, it seems a bit overpriced considering you can use candles, Christmas lights or TV remotes and doesnt include a battery. If you have the cash to burn and/or dont want the extra wires, this is a great alternative.
Image via comments ...by Published on February 2nd, 2011 12:05- Categories:
- Nintendo Wii News,
- DCEmu Reviews
Wii Silicone Case
Manufacturer: 3rd Party
Site: Buy from Brando
Price: $10.00
Overview : The Silicone Case design with high quality silicon plastic protection sleeve. Beautiful design and make you never worry about your controller being scratched.
Features :
- Prevent your Wii controller from scratches and finger print
- Anti-skid design
- Pressing button with suitable cutting
- Available color: Black, White
Quality/Usability : Similar to the Wii Controller Glove, this 3rd party silicone case is here to help you sweaty palmers with your gaming.
The silicone case comes with two cases. One for the Wii Remote Controller and the other for the Nunchuk attachment. They are only available in white and black.
The quality of the cases isnt as high as the Wii Controller Glove. The silicone (rubber) on these is not as thick. But other then quality, its all similar. The cutouts for each button is exact. The only differences between this silicone case and the Controller Glove is that there is no "WII" imprinted, no glow in the dark or multi-color look to it. Also on the back side of the silicone glove, are indentations on the back. This gives you a better grip. Applying the case isnt as hard as the Controller Glove due to its thinness.
Since the Will Controller Glove does not come with a nunchuk attachment, there is nothing to compare it to. In order to get the nunchuk into the silicone case, you would have to put the cord through the bottom. Once thats through, just slide the rest of the cord until you reach the nunchuk. Applying the case to the nunchuk is fairly easy as well.
Conclusion : Overall, the Wii Silicone Case is a great necessity when owning a Nintendo Wii. Price is reasonable as it comes with a silicone case for the nunchuk as well. The quality of the case can be better but the nice addition to the underside of the grip is great. It would of been nice if there were more choices of color to choose from.
Images via comments ...by Published on February 2nd, 2011 12:05- Categories:
- Nintendo Wii News,
- DCEmu Reviews
Wii Controller Carry Bag
Manufacturer: PEGA
Site: Buy from Brando / Buy from DealExtreme
Price: $10.00
Overview : The Wii Controller Carry Bag allows you to store your Wii-remote and Nunchuk controllers.
Features :
- Store Wii controller - Wii-mote & Nunchuk controller
- Protect your Wii consollers
- Convenience to transfer
Quality/Usability : Ever afraid of Wii-mote being scratched or damaged? What about misplacing your Nunchuk? How about accidently pressing the button and causing the battery to drain? Well, with this Wii Controller Carry Bag, you can keep both the Wii-mote and Nunchuk in the same place.
The case has a hardshell casing to protect the controllers. On the case itself is an image of the Wii remote and nunchuk attachment. The case is sealed with a zipper.
Upon opening the case, you'll notice a little netted storage area. You can either use it to hold the Wii remote, Nunchuk or the wires. If you wanted to, you can hold other accessories in that pouch such as SD card or something small.
There is also a small cloth attached inside. With this, you can protect/cover one of the controllers and prevent it from touching the other controller and causing any damage or scratches. There is enough space within the case to keep the controllers secure. Even with a controller glove/silicone case, there is enough room.
To help with transportation, there is a carabiner (clip) attached to it. So you can clip it to your belt, pants or bag.
Conclusion : Overall, the Wii Controller Carry Bag is a great accessory. Not only will it protect your controllers but keep them together as well. If you're like me who shoves the Wii remote into a bag during travel, more than likely one of the buttons is being accidently pressed by some object. When this happens, you're controller searching for the Wii and draining the battery at the same time. I had this happen to me many times where I would go play the Wii and the battery is dead. I know its not from playing. Hopefully, they release the case with more colors.
Images via comments ...by Published on February 2nd, 2011 11:48- Categories:
- PSP News,
- PS3 News,
- PS2 News,
- Nintendo Wii News,
- Xbox 360 News,
- Xbox News,
- Nintendo Gamecube News,
- DCEmu Reviews

XCM 1080p Mega Cool VGA Box
Manufacturer: XCM
Site: Buy from Play-Asia / Buy from Divineo China / Buy from Divineo France / Buy from ConsoleSource / Buy from Amazon
Price: $79.90-120.00
Overview : Connect any Component Video source to any VGA monitor for the best resolution possible! Supports up to 1080p HDTV resolution! New sleek design.
Features :
- Supports PC video display resolutions up to UXGA (1600 x 1200 @ 75 Hz) or HD TV (up to 1920 x 1080)
- Supports 480i, 480p, 576i, 576p, 720p, 1080i, and 1080p
- Display pictures from your console (Game Cube, Playstation 2, Xbox, PSP Slim, Wii , Xbox 360, Playstation 3) on your PC monitor (up to 1600 x 1200) or HDTV (up to 1920 x 1080)
- Supports SDTV, HDTV, XGA, SXGA, and UXGA video formats.
- Works on both PAL & NTSC systems.
- Easy Plug and play installation.
- Connect any compatible YPbPr (component video) device to your VGA monitor via Integrated YPbPr to RGBHV converter.
- Applications: TFT LCD monitor, CRT monitor, Set-top box, Display projector
- Works on LCD TFT monitors
- Video output: VGA
- Automatic video source mode detection (film/graphic)
- Motion-adaptive interfiled de-interlacing
- Uses the power from your USB port, no extra power supply needed!
Quality/Usability : I dont like to have lots of wires dangling or have to constantly plug/unplug cables so I opted to use the XCM Multi-Console Component Cable v3. The XCM 1080p Mega Cool VGA Box is housed in a sturdy chrome casing with component cable input, VGA input and output, stereo speaker input and USB power input. The top of the XCM 1080p Mega Cool VGA Box contains a SOURCE button as well as directional pads. The SOURCE button lights up when in use (blue for component and green for VGA) and allows you to switch between your computer/laptop or consoles. The directional pads allows you to change resolution and frequency on your monitor.
Below is a video of the Mega Cool VGA Box being used with the Multi-Console Component Cable.
I connected my PSP Slim, Wii, PlayStation 3, Xbox 360 and Dell computer to the Mega Cool VGA Box and to my Dell 24" 1080p Widescreen monitor. All worked flawlessly without a problem. Pictures displayed just like it would on a TV/monitor. There were no lags or distortions. I liked that you were able to change the resolution and refresh rate from the VGA box rather than going through all the menus on your monitor/TV. What I dont like however is that it only supports 1 component cable. Luckily, I have the multi-console cable but others might not and this may be an annoyance.
When switching devices, it does not remember the display resolution. So you'll have to go and change it each time. Its not a big problem but would be nice if it remembered the previous setting. I like the fact that it gets it power through the USB. Having multiple consoles, TV, satellite box, computer and other devices plugged in, I am running out of sockets in the surge protector. So using a USB port from either the Xbox 360, Wii, PS3 or PC is a PLUS in my book. If you're not using that device that the VGA box is connected to, it wont be powered. So you'll have to turn it on.
Conclusion : Overall, the XCM 1080p Mega Cool VGA Box works great but as mentioned, it only allows for one component input. So if you have a PS3, Wii and Xbox 360, you can only connect one. If you want to play a different console, you'll have to unplug the cable and insert the other one. If you're like me and want to make your life easier, I suggest looking into XCM Multi-Console Component Cable v3. One cable that has all the connections for all consoles. When you want to use that console, just move the switch to that corresponding console and you're ready to go. No unplugging or plugging needed.
Would be nice if this was extended to incorporate additional component cables and turned into maybe a selector?
Images via comments ...by Published on February 2nd, 2011 11:45- Categories:
- Apple News,
- DCEmu Reviews
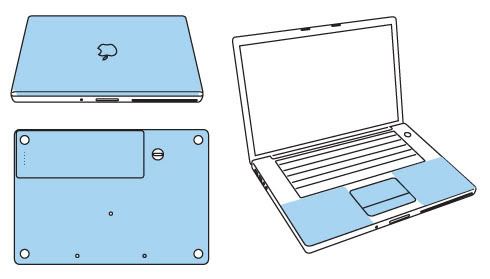
ZAGG invisibleSHIELD Macbook
Manufacturer: invisibleSHIELD
Site: Buy from invisibleSHIELD
Price: $54.95 (full body coverage); $39.95 (standard coverage); $24.95 (wrist rest coverage); $17.95 (battery coverage)
Overview : Your search for a(n) Apple MacBook 13 inch case, skin, or cover is now over. The invisibleSHIELD™ is an exceptionally clear and virtually indestructible film that will protect your MacBook 13 inch from unsightly scratches. Our exclusive nano-memory™ technology covers and shields your device, keeping it as pristine as the day you took it out of the box.
The precision pre-cut invisibleSHIELD applies directly to your MacBook 13 inch, providing the toughest, most durable protection you will find. The invisibleSHIELD has its origins in the military, where it was used to protect high-speed helicopter blades from dust, dirt and debris. Now you can use that same powerful technology to protect your MacBook 13 inch.
The invisibleSHIELD is only .2 millimeters thick making it the slimmest MacBook 13 inch skin or MacBook 13 inch cover of its kind. It is so tough that we back it with a lifetime guarantee. So, if it ever does wear or scratch, we will replace it for free, for the life of your device. And if you ever need to remove the invisibleSHIELD, no problem; it comes off clean and leaves no sticky residue.
If you're still not convinced, check out our demo video and see for yourself how strong the invisibleSHIELD™ really is.
Features:
- Full Body coverage: Top, bottom, wrist rest, track pad and mouse button(s).
- Standard coverage: Top, wrist rest, track pad and mouse button(s).
- Wrist Rest coverage: Wrist Rest only.
- Battery coverage: Battery only.
Quality/Usability : I thought I would spice up the reviews with something not gaming related.
I've been wanting to protect my 13.3" Black Macbook from scratches or marks and possibly give it that glossy look but still keep its cool black color. Since its black, its more visible and noticeable if it there was a blemish so I thought I'd give ZAGG's invisibleSHIELD for the 13" Macbook a try. You've probably have either heard of invisibleSHIELD or seen some form of their advertisement such as key scratching ipod, pen trying to go through invisibleSHIELD. They protect everything from your precious iPods, to cellphones to cameras and even your PSP.
invisibleSHIELD comes in a cardboard tube. Inside the tube are two complimentary bottled solutions (just water), squeegee, instructions and 3 invisibleSHIELD sheets. One sheet contains the cover, second sheet contains the battery and bottom and the third sheet contains the wrist rest, button and trackpad. All invisibleSHIELD products are clear giving you the ultimate protection without changing the looks.
I've installed numerous DecalGirl skins on consoles and those were easy. Even if you messed up, peeling and reapplying was easy. So I thought this would be a walk through the park....boy was I wrong. First, they suggest washing your hands so that your fingerprints arent all over the sticky side of the invisibleSHIELD. OK, I have no problem with that. Next, spray your fingerstips with the SHIELDspray (its just regular water) and peel the invisibleSHIELD off the paper backing. Once peeled off, hold the invisibleSHIELD in your hands with the adhesive side up. Lightly spray the front (instructions states to spray back also, why? I dont know) of the invisibleSHIELD. DO NOT spray on the laptop itself. Once you have applied water to the invisibleSHIELD. Apply it to your laptop and slide it into place. STOP! What they didnt mention is that this method is for glossy Macbook's. My Black Macbook is matte. Its not glossy like the white ones. Had it been glossy, installation would have been a lot smoother. So sliding into place on a matte surface would be very hard to do as the invisibleSHIELD grips onto the matte casing. Since I can not slide into place, I had to lift up the invisibleSHIELD. Use the squeegee to push the excess moisture and bubbles away from the center to the edges. Again, it was impossible with the Black Macbook.
Since I'm a perfectionist and a bit anal when it comes to things like this, I had to lift and re-align the invisibleSHIELD multiple times on the cover. Just when I thought I had it, it was uneven. So I had to take the whole part off and reapply. Doing this also stretched out the invisibleSHIELD. So when I finally had it aligned correctly on three sides of the cover. The fourth side was too long. No way for me to even it out.
The battery was easier as the invisibleSHIELD piece was small and easier to handle. Same goes for the rest of the bottom invisibleSHIELD. But you would think that the wrist rest, button and trackpad would be even easier. Wrong. The illustrated image at the top from invisibleSHIELD shows that the wrist/trackpad area should be four piece. The piece I received was one big piece. I couldnt even take the trackpad or button piece off. You can see the indentation or semi-cut out but was unable to remove ...by Published on February 2nd, 2011 11:43- Categories:
- PS3 News,
- Xbox 360 News,
- DCEmu Reviews
Talismoon HDMI Auto Switch
Manufacturer: Talismoon
Site: Buy from Divineo US / Buy from Divineo China
Price: $29.95
Overview : Tired of Switching? Here is the solution. Talismoon HDMI Auto Switch lets you connect 3 HDMI devices to your screen and switches automatically to the device YOU want! For example, if no device is turned on and you power one on, it will automatically switch to it. Turn a second one on, and it will jump to that new device. Turn it off, it will go back to first one etc. No need to waste time finding the remote and switching back and forth all the time, the HDMI Auto Switch does the job for you.
A small (easy to hide) and smart HDMI 1.3 switch that make old HDMI switches pointless! Excellent performance characteristics allows source devices to be used with HDMI cables up to 15 meters away using AWG 28 HDMI cables at resolutions up to 1080P FULL HD!
This product is confirmed and tested to pass 1080p FULLHD and the new Dolby TrueHD and DTS-HD Master Audio loss-less audio formats found on Blu-ray.
Features :
- Compact in size (only 5cm x 5cm).
- 3 HDMI/DVI-D (hdcp) inputs.
- 1 HDMI/DVI-D (hdcp) output.
- HDCP compliant.
- No IR Remote needed.
- No Power Supply needed in most cases.
- Auto selects any active input signal from the three inputs to the single HDMI output.
- Manual selection button (for manually selecting an input if needed).
- Signaling rates up to 10.2Gbits in support of 1080P Full HD displays.
- Powerful receiver equalization to compensate for 15m HDMI cable losses.
- Pre-emphasis to compensate for PCB losses.
- Each HDMI port supports HDMI or DVI inputs.
- Dust covers provided for unused inputs.
- Smart Function (Auto Selection)
- HDMI signal to the display. As result of this functionality, user could use simple method of power off/on sources to choose the desired HDMI signal. If several sources are powered on, the last powered source will be chosen. This allows the switch to still be used with sources that are always on such as cable TV and satellite receivers.
Quality/Usability : Having my DirecTV, Xbox 360 and PlayStation 3 all hooked up via HDMI, it sometimes gets annoying and time consuming having to switch my video output between my 3 devices. Each device is connected to a HDMI port on my 32" Samsung. Luckily for me, I have 4 ports while for others, you may have 1 or 2 ports whether it be on your HDTV or computer monitor.
The Talismoon HDMI Auto Switch can help you give you additional HDMI ports and helps you switch between HDMI sources with a press of a button. As of late, I've been watching more TV than playing games so I have my DirecTV receiver plugged into INPUT1. So when a friend calls me up to hop online to play some games, all I would need to do is turn on my console and the HDMI Auto Switch will automatically select that INPUT and my console is now displayed on my HDTV. No need to go to the TV or to pick up the remote to change input. Simply turn on console and thats it. When you turn off your console, the HDMI Auto Switch will automatically switch back to the first device.
Next to the OUTPUT port, there is a small selector button. This allows you to cycle through the INPUTS if you have all 3 devices turned on. So I can have my 360, PS3 and DirecTV all turned on. I can be downloading a movie or an update on one system while playing online with the other. To check the status, I would just press the "SELECTION" button to select the input that I want to display.
The switching between inputs is fairly quick with minimal lag/delay.
Conclusion : Overall, the Talismoon HDMI Auto Switch is a great product if you have less than 2 HDMI ports on your TV or hate having to change the input on your TV. Each input port has a dust cover for when it is not in use. Its great that it automatically switches to the newest input and goes back to its original when the newest input is turned off. Its also nice that they included the ability to select your input if you have more than 1 device turned on.
Images via comments ...by Published on February 2nd, 2011 11:43
Shinobii Console Toolkit
Manufacturer: Shinobii
Site: Buy from Shinobii / Buy from Amazon
Price: €19.99 / $24.99
Overview : This 19-piece toolkit contains everything you need in order to disassemble all the latest consoles such as Wii, DSi, PS3, XBOX 360 and PSP 3000. Of course, we havent forgotten about classic console owners therefore this kit also includes tools for opening up older consoles such as DS, DS LITE, PS2, PS1, XBOX, PSP1000, PSP2000, GAMEBOY, GAMECUBE, PSTWO, N64, SNES as well as Game cartridges and cellphones.
Perhaps you want to replace a defective drive, burnt out laser lens, scratched or cracked screen or any other defective part. Maybe you want to add an internal fan providing less noise and more cooling? No matter what, as most gamers already know, the console makers really give you a hard time when trying to open up their units and it`s a real challenge to find all the right tools to get the job done at least without damaging your console. The solution is the Console Toolkit™ from Shinobii.
All tools are precision machined from heat treated chrome vanadium steel and have chrome finish.
Console Toolkit™ includes: (Tools marked with a * are tamper resistant.)
- T2
- T3
- T6*
- T8*
- T10*
- T15*
- T20*
- PH#0
- PH#00
- PH#000
- PH#1
- Triwing#00
- Triwing#01
- Hex 0.05
- Slotted 7/64
- Linehead Nut Setters #6
- Linehead Nut Setters #8
- 360Tool
- Tweezer
- Anti-slip Rubber Handle
- EasyGuide Plastic card (explaining what tools to use)
Quality/Usability : So the fine folks at Shinobii sent me their newest product, the Console Toolkit™. The tool kit consists of 19 pieces needed to disassemble everything from the Wii, DSi, Xbox 360, PS3 and PSP3000 all the way to old school and semi-old school products like the Xbox, DS, PS2, PS1, GameCube, N64 and even the SNES. The 19 pieces are placed inside a small black plastic case. Underneath the cover are 10 tools and tweezers. The bottom holds a 360 tool and anti-slip rubber handle.
All 10 tools are held in place by a rubber holder that prevents any of the falling out or. On the top of this rubber holder is a loop that allows you to pull the bits out and on this rubber holder are numbers. This lets you identify what tool is what by looking at the EasyGuide card. Incase you forgot where they belong, the numbers are also printed on the pieces themselves as well as Shinobii's company name. All the bits/pieces has two ends of them except for two (Linehead Nut Setters). So the end that is not used will be inserted into the anti-slip rubber handle and the side that is needed, is exposed.
Each piece is about 4½" long. When inserted into the rubber handle, approximately 2¾" is exposed. The rubber handle is just shy of 3½" long and 1" wide. The pieces insert smoothly but may feel a little loose at times but will not fall out unless you heavily shake it out. Each bit is also magnetic so you will be able to pick up screws without having to worry about dropping them or using a second hand to help you hold the screw in place while the other holds the handle. The bottom of the handle has grooves/curves that help assist you in gripping the handle better and tightening or loosening screws.
I'm not the type to go and open up perfectly working consoles unless I really have to but since I had some busted up and non-working electronics laying around, I thought I would give it a try. The handle felt good in the hand and removing screws was very easy and didnt require any effort. I was able to grip onto the handle thanks to the anti-slip rubber. I'm the type that has sweaty hands so this is a plus. I had an old PS1 that stopped working and was going to recycle it in the trash but was too lazy. Once I took the console apart, I didnt want to stop. I tried finding other electronics such as my old handheld TIGER devices, old cellphones that stopped working (fit the screws on the cellphones I had) and eventually, I couldnt find anything else. Now, I'm left with gutted and disassembled electronic casings and chipsets.
Conclusion : Overall, the Shinobii Console Tool Kit is a very nice product. It eliminated some of the bulk but putting a piece on each end rather than have 19 different pieces and makes fairly easy to carry and dropping it in your bag. I love the fact that the handle has grooves for your finger/thumb to allow you to have a better grip for turning and for someone who has sweaty hands, I didnt loose my grip. I also like that each piece is magnetic so the screws cling on to the piece for easy removal and insertion without the need for a second hand. However, I would of probably liked to see the anti-slip rubber handle be slightly bigger. Those with big hands may find the handle a little small for their grips.
Images via comments ...
- Search DCEmu
- Advert 3
 News Categories

- Links of Interest
 Sony Consoles News


- Nintendo Consoles News

- Sega Consoles News


- Apple & Android News
- Xbox Consoles News


- Open Source Consoles News
 DCEmu News Archive
- Advert
- Retro Consoles News


- PC News

- Latest DCEmu News


- DCEmu Network Sites
-
 Menu
Menu  Forum Stats
- What is the DCEmu Homebrew & Gaming Network
Catherine: Full Body’s English translation for the Vita