

 DCEmu Homebrew Emulation & Theme Park News
-
DCEmu Reviews Latest News
by Published on February 1st, 2011 23:51- Categories:
- Nintendo Wii News,
- DCEmu Reviews
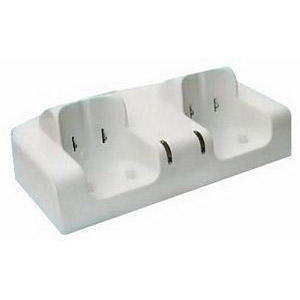
Double Wiimote Power Pack with Charger Stand
Review by: wraggster
Provided by: DCEmu Reviews
Manufacturer: Dragon
Site: Buy from GameInfinity
Price: $19.95
Overview : Stop wasting money on batteries and easily charge a set of Wiimotes with the Dragon Double Wiimote Power Pack with Charger Stand! A light indicator will let you know once remote controllers are fully charged, and you are ready to play again with many hours after around 2 hours of charging.
Easily charge and store your Wii Remotes with this Charge Station for Wii. It includes 2 NiMH rechargeable batteries, exclusively designed for the Wii Remote, each providing up to 25 hours of play time.
Features :
- 2 hours quick charge function
- Full charge auto detect function
- High quality and efficient product
- Remote controller stand function
- Rechargeable AAA size dry batteries compatible
- 4 * AAA size rechargeable batteries are included
- Power charge cable is included
- Normal alkaline AAA size dry batteries compatible
- Simultaneously charge 2 Wii-remote controllers
Quality/Usability : The Dragon Double Wiimote Power Pack with Charger Stand consists of a USB Cable to get the power, A Base Deck for the actual charging with 2 points to charge your WiiMotes, you also get 4 750MAH AAA Batteries and the plastic casing they fit in which gives you the ability to charge the Wiimotes without having to take the batteries out every time.
The review sample came with no instructions but it is very simple to most people
Firstly make sure you put the batteries the right way around in the plastic battery casing, failure to do so could cause problems and well its not going to work.
The USB Cable can be connected to your Nintendo Wii or any USB Compatible Device, if you have a PC or Laptop i suggest using them over using your Nintendo Wii, put simply the less stress on the Nintendo Wii causes less problems with over heating. Once the USB Cable is connected to both Base Charging Unit and USB Host you can then put your Wiimotes onto the Base Unit.
Once you have connected the Wiimotes (with the plastic casing/rechargeable batteries) correctly, the light will light up to let you know its charging. Once the Wiimotes are charged the red light will go out. Now your ready for Wii Gaming
As the Wii is more a casual console its very hard to test how long the batteries are before they run out but being rechargeable you should easily get a day out of them before charging.
Conclusion : Overall, with the Wiimote being a bit on the hungry side with batteries its a great idea to use rechargeables and the ability to recharge without taking the batteries out every time is very handy The AAA batteries arent as powerful as 2 2500MAH AA Batteries but the ability to recharge without taking it all apart is a major plus. The only problem with this method is that you'll need to sync the Wiimote before using the Double Wiimote Power Pack. The charging of the Wiimotes took me longer than 2 hours but that may be down to my laptop I used to charge.
Do I recommend this product? Yes, very much so if your still using normal batteries then get one now.
Images via comments ...by Published on February 1st, 2011 23:51- Categories:
- Nintendo Wii News,
- DCEmu Reviews

Joytech Sharp Shooter Gun
Manufacturer: Joytech
Site:
Price: $27.95
Overview : Lock and load with the Sharp Shooter from JOYTECH. Fully compatible with all forms of TV's and displays including plasma and LCD, the Sharp Shooter brings Wii shooting games to life with amazing realism. Connecting quickly and safely to the Wii Remote and Nunchuck, the Sharp Shooter is lightweight, simple to use and requires no batteries, no leads and no worries! Shoot to thrill!
Features :
- Convert your Wii Remote and Nunchuk into a precision shooter
- Easy-load and Quick-Eject design connects and dismantles to the Wii Remote and Nunchuk in seconds
- Maintains full access to the Wii Remote and Nunchuk controls
Quality/Usability : While us gamers wait for Nintendo to release the Wii Zapper, we have to resort to 3rd party peripherals to fill in that void. There have been various different types of light gun attachments on the market. Before the Wii Zapper was announced, the Joytech Sharp Shooter was the talk of the town.
Unlike the Wii Light Gun, the Sharp Shooter's main trigger is the "Z" button on the Nunchuk rather than the "B" button on the Wii Remote. The Wii Remote is placed on top of the barrel while the Nunchuk is used as the handle/grip.
To insert the Wii Remote into the barrel, there is a locking mechanism with a spring on it, that holds the handle and barrel closed. Pulling back the locking mechanism will allow the barrel to fold down. This will allow you to insert the Wii Remote as well as connect the Nunchuk to the bottom of the Wii Remote. The bottom of the barrel has an opening for easy access to the "B" button. The barrel also allows easy access to any of the buttons on the Wii Remote.
Once the Wii Remote is in place, you'll have to pull the locking mechanism back to gain access to connecting the Nunchuk to the Wii Remote. On the side of the Sharp Shooter, there is a small opening on the side. This is where the cord of the Nunchuk is placed so that it is not in the way of the locking mechanism.
Placing the Nunchuk in place is fairly simple. Simply pull back on the locking mechanism and place the Nunchuk into the cradle. The locking mechanism covers the top of the Nunchuk slightly so that it does not fall out of its cradle. Accessing the "Z" or "C" button on the Nunchuk is accessible without a problem along with the joystick.
To connect everything together, simply move the barrel back up and use the locking mechanism to lock the handle and barrel together. It will require you to put some pressure to lock it in place. To dismantle, simply pull back on the locking mechanism.
Conclusion : Overall, the Joytech Sharp Shooter Gun is probably the best constructed light gun attachment on the market..for now. Depending on the game available for the Wii, it may require either the "B" button or "Z" button to be used as the trigger button even though the layout of the Sharp Shooter suggests that the "Z" button is the trigger. So regardless of which is used as a trigger button, the Sharp Shooter accommodates both possibilities nicely. What I dont like is the Nunchuk cord dangling from the side of the gun. This can get annoying at times during gameplay.
Images via comments ...by Published on February 1st, 2011 23:51- Categories:
- Nintendo Wii News,
- DCEmu Reviews
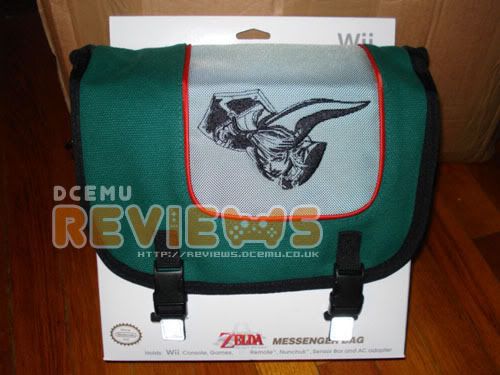
Legend of Zelda Wii Messenger Bag
Manufacturer: ALS Industries
Site:
Price: $54.95
Overview : The Legend of Zelda Wii Messenger Bag (Z180) is an official Nintendo licensed product. It can hold Wii Console, games, Wii remote, Nunchuk, Wii sensor bar and AC Adapter. Official licensed product.
Features :
- Main pocket holds Wii console
- Zippered paded inside pocket for Sensor bar
- Padded middle pocket holds AC adapter and controllers
- Front pocket holds games and additional controllers
- Comfortable carrying handle
- Convenient mesh side pockets
- Strong designer hardware
- Adjustable shoulder strap
Quality/Usability : The Nintendo Wii is the smallest console amongst the next-gen consoles (PlayStation 3 and Xbox 360). With the Nintendo Wii still hard to find in stores (Yes, even after a little more than a year of being released in the US, its still hard to find on store shelves), I had to bring my Wii to relatives house so we can all enjoy the family fun. Isnt that Nintendo's intentions?
As the name of the product/review states, the messenger bag has a Legend of Zelda theme to it. The flap has an a stitched image of Zelda and underneath is Zelda's shield made of hard rubber. The messenger bag has three compartments and two elastic mesh side pockets.
The two elastic mesh pockets can hold your cables or the other small accessories such as extra Wiimotes.
The flap has two clips to keep the flap closed and underneath the flap are two velcro strips that attaches to the bag. Also under the flap but above the main compartment is a small mesh pouch. This mesh pouch is for the sensor bar. Unfortunately, if you have a wireless sensor bar, it wont fit as they usually tend to be bigger and thicker. This is actually the first carry case or that I know of that has its own pocket for the sensor bar.
The main compartment holds the Nintendo Wii console. The compartment holds the Wii securely in place and has a lot of padding to give that extra protection. Inside the main compartment, is another compartment. This compartment allows you to hold two Wiimotes and AC adapter. There are even three elastic bands to hold them in place.
The front pocket lets you hold Nunchuks, Wii games and any other controllers or accessories you may need to carry such as classic controller, GameCube controllers, etc.
Conclusion : Overall, the Legend of Zelda Wii Messenger Bag is a well constructed bag. Even with all the pockets and compartments filled, the bag isnt too big compared to some carry cases on the market. Most cases on the market can only hold the system, cables, power supply and 1-2 controllers. This doesnt even include the sensor bar. While the Zelda bag can carry everything and then some. The images on ConsoleShop can be a little misleading as what I received (see image at top or attached) is not what is pictured on the site even though the images on the site is on the package itself. The image on the site is slightly different and the size of the bag looks like a regular normal messenger bag when the bag I received is smaller and almost the size of the Wii. The mesh pockets arent brown. They are black. The price isnt attractive at a very pricey $54.95 for a carry case. But if I had a choice of the Legend of Zelda Wii Messenger Bag or any of the 3rd party carry bags on the market, I'll choose the Zelda Messenger Bag as it offers more protection and it can store more.
DIGG THIS
Images via comments ...by Published on February 1st, 2011 23:50- Categories:
- Nintendo Wii News,
- DCEmu Reviews
CycloWiz Modchip v1 (DMS/D2A)
Manufacturer: Team Cyclops
Site: Buy from Divineo US (v1) / Buy from Divineo US (v2) / Buy from Divineo China
Price: $30.00-$40.00
Overview : The amazing CycloWiz Mod Chip for the Nintendo Wii has arrived! The CycloWiz is possibly the easiest modchip to install on any system. A quicksolder pattern on the PCB board removes the need for wires. All you need to do us solder onto the designated parts and the installation is complete.
Not only is the CycloWiz easy to install, but this ModChip also has amazing features including Stealth Mode, the ability to play both WII and Gamecube backups, GameCube homebrew and imports. The CycloWiz also has an optional LED to let you know when the Mod Chip is ON or OFF.
Features :
- Fully upgradable via DVD
- Easy installation(5 solder points / no wires required)
- Stealth Mode to keep the Mod Chip from ever being detected by the current Wii firmware
- Play both Wii and GameCube backup copies
- Play GameCube homebrew and Imports
- Built In audio-fix for GameCube backup copies
- Multidisc GameCube game support
- Supports both 8cm and 12cm discs
- Optional disable feature to turn the Mod Chip ON or OFF
- Multipurpose LED to let you know that the CycloWiz Mod Chip is on and working, if there is an error, or if it is off
Quality/Usability : Let me start off first by saying that this review is based on the first version (v1) of CycloWiz Wii modchip and on a North American (NTSC-US) Wii. All games tested during this review, we own the original games. CycloWiz v1 comes in a plain unbranded ESD bag. New modchips will come in a CycloWiz branded ESD bag. This modchip is only compatible with Wii's that have a DMS or D2A chipset. This will NOT work on a D2B chipset.
If you bought your Wii after January 2007 and it contains a D2B chipset and have a CycloWiz v1, you email Team Cyclops and they will exchange your CycloWiz for a v2. Also, during manufacturing, there was some chips that had their solder points bridged together. You can easily fix this by following their PDF guide. If not, they will also replace it for a new one.
The CycloWiz comes in a plain ESD bag but does not provide any protection during shipping (unless retailer protects it). The CycloWiz is basically a chip on a small thin PCB. The solder pads allows you to either quick soldering or wire installation. Wire installation is the best way to go because if for whatever reason you need to remove it, it is a lot easier and cleaner.
Installation : Before installing the CycloWiz, you must have at least some experience with soldering and have read their instruction manual which can be downloaded from here. As for me, I dont have any experience with soldering, so I had a friend install this for me. In order to install the CycloWiz onto your Wii, you must take it apart. Here is a tutorial on how to dismantle your Wii. You can also find other tutorials or even videos on the web.
Once you have dismantled the Wii, you must locate the points outlined in their installation manual. These points are where you will connect the soldering between the Wii and the CycloWiz. When soldering, you must remember to stay within the points and not to use too much solder or you may risk shorting out the chip as well as the Wii. When soldering the CycloWiz, you also have the option of installing 3 more wires which is then connected to a switch (sold separately). Any type of switch will do whether it be a push-in switch or a flip switch but the smaller the better. You can install the switch anywhere you want. It can be in the vent at the bottom of the Wii or you can drill a hole into the casing of the Wii, whichever is more convenient to you. This switch will enable you to upgrade your CycloWiz via DVD.
On the CycloWiz, there is an LED that will light up if youve installed the chip correctly. You would want to try the Wii out before closing it up by hooking the Wii back together without the casing or you will not be able to view the LED. This is a great way to tell you whether or not your installation was successful or not without having to reopen your Wii later on.
Wii Compatibility : With v1, compatibility of games were not that great. There were DRE (Disc Read Errors) and it took a couple of tries before the Wii can recognize the game. Some games even experienced heavy lag during gameplay. Playing imports is a hit or miss when it comes to playing on a different region. Some games will work and some games will not. But if you're playing in the same region such as NTSC-US (North America) and NTSC-J (Japan), there is not problem. With the great support from Team Cyclops, they have fixed these problems in the upgrades which will be explained further down.
Homebrew Compatibility : There are three ways to load GameCube homebrew; bootable disc, SDLoad and GCOS. Loading via SDLoad, you will need a SD Gecko adapter as well as an SD card. If using GCOS or a bootable disc, you can load the emulators and games on to a DVD and be able to load from them without having to use additional media. All emulation ...by Published on February 1st, 2011 23:50- Categories:
- Nintendo Wii News,
- DCEmu Reviews
Wii Remote Charge 'N Play
Manufacturer: Unknown
Site: Buy from Goldenshop
Price: $17.00
Overview : The Charge 'N Play converts your Wii Remote into a rechargeable gaming remote. The Charge 'N Play features a USB charging dock that keeps your Wii Remote charging when not in use. With Charge 'N Play, drained batteries are a thing of the past.
Features :
- High quality 3rd party product.
- Comes with a rechargeable battery for the Wii remote control - no need to take out the battery when charging.
- USB socket on the charger stand - another charger stand can be connected at the same time.
- No need to add extra power supply - get the power from the USB port of the Wii console.
Quality/Usability : With the flood of rechargeable battery packs hitting the market, there has been different styles and different kinds.
The Charge 'N Play is a little different than all the other rechargeable batteries. The Charge 'N Play comes with a rechargeable battery and a dock. The dock has a USB cord that can plug into a USB port whether it be your computer or your Nintendo Wii.
The dock has two hooks on the left side that can attach to another dock (of course they need to be the same type). The right side has two openings for those hooks to be clipped onto another dock. On the front of the dock is a small LED. The LED is red when the battery is charging and blue when it is done.
What is unique about the Charge 'N Play is that you can either charge the battery with the Wii-mote or you can just charge the battery pack. Other rechargeable battery packs on the market require the battery to be on the remote control in order for it to charge.
The dock has two levels. The "upper level" is for the battery pack and Wii-mote. If you have a controller glove also known as rubber skin on the Wii-mote, you will need to remove it or lift the bottom high enough that it does not block the dock. The "lower level" is big enough just to fit the battery pack. The battery pack stays in place by pushing its clip itself against the upper level. Sometimes it does take a few tries to get it correctly in place. Once in place, it is snug and wont come out.
Charge time is approximately 2 hours. Once fully charged, the battery lasts for about 3-4 hours on continuous play and approximately 5-6 days with on and off play (approximately 30-60 mins a day).
Conclusion : Overall, the Wii Remote Charge 'N Play as I know of posting this review, is the only charger that allows you to only charge the battery without the need of the Wii-mote. Battery life is fairly decent. It would have been nice if the LED light turned off once the battery was fully charged. The idea of allowing another dock to be attached is good.
Images via comments ...by Published on February 1st, 2011 23:50- Categories:
- Nintendo Wii News,
- DCEmu Reviews
Wii Remote Battery Charger & Stand
Manufacturer: PantherLord
Site: Buy from Goldenshop
Price: $15.00
Overview : The Wii Remote Battery Charger & Stand charges your Wii Remote when the battery pack is dead via USB. Not only does it charge but it also holds your Nunchuk.
Features :
- High quality 3rd party product.
- Comes with a rechargeable battery for the Wii remote control - no need to take out the battery when charging.
- No need to add extra power supply - get the power from the USB port of the Wii console.
- Extra space for storing the Nunchuk.
- Light indicators to show the charging status.
Quality/Usability : The Wii Remote Battery Charger & Stand comes with a 1800mAh battery and a USB stand/dock. All these 3rd party Asian rechargeable batteries are all starting to look alike. I wouldnt be surprised if all of them work with one another.
The battery is attached to the battery cover so you will need to put away your original battery cover as it will no longer be needed. Inside the battery pack, you can see that there are two rechargeable AA batteries. On the front of the battery pack are two metal plates. This is where the batteries are charged when connected to the dock.
On the stand, the right side houses the Wii Remote and on the left side is the Nunchuk. The Nunchuk only sits there and does nothing else. Its pretty much just a holder. The Wii Remote fits securely in place when docked. Unfortunately, like all other rechargeable battery docks, it will not fit a Wii Remote with a controller glove on it. You will either have to take it off or just lift it up enough so that the metal contacts on the dock can touch the contacts on the battery pack.
When the Wii Remote is placed on the stand to be charged, how do you know if its charging or when its done? Simple. In between the Nunchuk holder and the Wii Remote, there is a LED. Its not really visible as its underneath the white plastic housing. Though, it is visible when the LED is lit up. When the rechargeable battery is being charged, a red LED is lit up and when it is done, the LED will be green.
Charge time took about 2 hours to completely charge. When the rechargeable battery is in use, it only lasted about 3-4 hours. This is pretty much standard with all 3rd party batteries that come from Asia.
Conclusion : Overall, the Wii Remote Battery Charger & Stand is no different from any other rechargeable battery packs on the market. It performed the same as all others. It even looks so much a like as all the other 3rd party rechargeable battery packs. The Nunchuk stand is pretty useless as all it does is hold the Nunchuk in place. Since they incorporated it into the stand, they should of made something for the cord on the Nunchuk as well. The cord is just either left hanging on the table or just thrown on top of the stand. Would of also been nice if the LED turns off when the battery is fully charged rather than the LED be green.
Images via comments ...by Published on February 1st, 2011 23:50- Categories:
- Nintendo Wii News,
- DCEmu Reviews
Wii Cooling Fan
Manufacturer: PEGA
Site: Buy from Brando
Price: $10.00
Overview : Lower your Wii temperature effectively. Make you can play games more smoothly.
Features :
- Lower the temperature of the console
- Use USB power, no extra power adapter is required
Quality/Usability : With todays nex-gen consoles, there are problems with overheating due to the enormous amount of power that is required to power the system. To combat this situation 3rd party companies are releasing cooling fans to cool off your consoles.
The Wii Cooling Fan uses both USB ports of on the back of the Wii. But dont worry, the cooling fan has a pass-through port that allows you to use a USB port if needed. There is no power switch as this is automatically powered on once the Wii is turned on. There is a green LED on the cooling fan to let you know that its on.
The cooling fan has a fan similar to that found on your computer tower but a smaller version. The cooling fan is approximately 3.5" (h) x 1" (d) x 2" (w).
Once plugged in and the Wii powered on, the fan automaticallyl starts. It would of been nice if there was some form of covering to prevent dust from entering such as the dust cover. The fan itself is pretty strong and a good amount of wind is entered and at the same time, a bit too loud. The loudness of the fan overpowers the sound from the TV unless you have your TV's volume put on "deaf".
Conclusion : Overall, the Wii Cooling Fan is a great product and blends in perfectly with the Wii. After playing with the Wii for 3 hours straight, the Wii was still rather cool compared to not having the fan at all. As mentioned above, my only two complaints is how loud it is and the lack of a dust cover. But for the price, its a great buy.
Images via comments ...by Published on February 1st, 2011 23:50- Categories:
- Nintendo Wii News,
- DCEmu Reviews
Wii Sensor Bar Cobra Stand
Manufacturer: Dragon
Site: Buy from Goldenshop
Price: $8.00
Overview : Holds your sensor bar and allows you to turn any angle, bend in a different shape.
Features :
- High quality 3rd party product.
- Can be bended to different shape.
- Vacuum hook - easy to fix on to or remove from any smooth surface like windows, glass, etc...
Quality/Usability : Although the Nintendo Wii's sensor bar allows you to attach it to a flat surface, it may damage your TV/stand as you try to remove the sensor bar. By removing the sensor bar off the surface, this may cause the sticky mount on the sensor bar unusable for future use. Even if you mount it or not to your TV or stand, the sensor bar may have problems reading the Wiimote.
The Sensor Bar Cobra Stand not only holds the sensor bar in place but at the same time, lets you adjust the angle of the sensor bar. You can adjust the angle and direction of the sensor bar by bending the "arms" of the stand. The Cobra Stand allows you to twist as well.
The Cobra Stand only works for the official Nintendo Wii sensor bar that came with your stand. There is no way to adjust it. There are 3rd party sensor bar whether it be wired or wireless, it will not fit unless its the same exact size as the original one.
Conclusion : Overall, the Wii Sensor Bar Cobra Stand is only good for those who does not have a flat surface near or on their television to hold their sensor bar, do not want to damage their TV/stand or needs the extra height. It would have been nice if it allowed the user to adjust the width of the holder to accommodate different sizes of sensor bars, both wired and wireless. It would have been nice if they were able to incorporate a way to tie up the excess cord on the sensor bar.
Images via comments ...by Published on February 1st, 2011 23:50- Categories:
- Nintendo Wii News,
- DCEmu Reviews
Wii Multi-Functional Carry Bag
Manufacturer: Dragon
Site: Buy from Goldenshop
Price: $13.00
Overview : Carry your Nintendo Wii, controllers, cables, etc. in a multi-functional carry bag. You can also play your Wii without having to remove it from the bag.
Features :
- Prevent any shock and scratch
- Compact size design with shoulder strap for carrying
- Super strong protect function with console and accessories
- Fully compatible with different version and model of Wii console
- No need take-out console can direct connect with home set TV system
- Storage function with Wii console, game card, AV cable, AC adapter/adaptor, remote controller, nunchuk pad, sensor bar, stand and other accessories
Quality/Usability : The Wii Multi-Functional Carry Bag lets you carry your Nintendo Wii, controllers, cables, sensor bar and whatever else is needed for the Nintendo Wii. The bag comes only in gray with white zippers and a black trip. It also comes with a black shoulder strap.
Lets start with the front compartment. The front flap of the compartment has a hard plastic to prevent any accidental bumps to the case. This protects whatever accessories you have in the small front compartment. Upon opening the compartment, you have three dividers. This allows you to separate your accessories. Each section seems equally spaced. You can hold your AC adapter, AV cables, Wiimote and Nunchuk. Adding an extra Wiimote and/or Nunchuk can be a tight fit.
The main compartment houses the Wii console stand and of course, the Wii console. Before we get to that, on the underside of the flap are a couple of small compartments. First are three mesh compartments. This allows you to hold 3 SD cards or memory cards. Above the mesh compartment is a flap. When pulled off its velcro, it reveals 6 game pouches to store your Wii or GameCube games. Like the front compartment, the main compartment also has a divider for the stand and the console. A white velcro strap runs across the compartment to hold the Wii, sensor bar and stand in place during transportation as well as when system is in use while it is inside the bag. I noticed that when the sensor bar is placed inside with the Wii, its a little hard to zipper up the carry bag. There are two white straps on both sides of the case. These straps prevent the flap from falling over. But if you have something in the front compartment, the flap will fall due to the weight. To prevent the flap from falling when it is opened, there are clips on both straps. This allows you to completely open the flap.
As mentioned above, you can play your Wii while it is in the bag. No need to remove the Wii and having to set it up. On the bottom of the bag (when stood up), there is a cover. This cover has rubber "spiked teeths" for when you place the Wii Multi-Functional Carry Bag on the floor but at the same time, allows easy access to the ports on the back of the Wii console as well as USB ports. This cover is held in place with velcro.
To the left of the carry bag is a mesh grill. This is the ventilation for the bottom of the Nintendo Wii console when the Wii is placed inside the bag. Unfortunately, the vent does not lineup exactly with the mesh grill.
Conclusion : Overall, the Wii Multi-Functional Carry Bag is definitely multi-functional. Its great that you are able to play with the Wii while it is in the bag rather than having to remove it to set it up. It would have been nice if the mesh grill was aligned better with the Wii's bottom vent. I also noticed that the main compartment is a little cramped when zippering it up. Not to mention, the quality feels a little cheap. Sometimes, I'm scared of zippering the main compartment because the zipper feels a bit flimsy. The excess zipper is hidden under the gray material which looks tacky.
Images via comments ...by Published on February 1st, 2011 23:50- Categories:
- Nintendo Wii News,
- DCEmu Reviews
Nyko Wireless Sensor Bar
Manufacturer: Nyko
Site: Buy from Divineo China
Price: $21.95
Overview : Simplify and enhance your Wii set up with Nykos Wireless Sensor Bar for Nintendo Wii. The Wireless Sensor Bar allows full Wii Remote functionality without the hassle or mess of any wired connection to the console. The infrared field created by the Wireless Sensor Bar allows for play up to 25 feet away, perfect for larger or wall-mounted TVs. Compatible with Nintendo's official Sensor Bar stand, the Wireless Sensor Bar is easy to set up, requiring no software or hardware installation on the Wii. Featuring 30 hours of battery life off 4 AA batteries (included) and a unique power saver mode with audible alarm, the Wireless Sensor Bar is designed for ultimate convenience.
Features :
- Design: Sleek design blends in with TV and is compatible with standard sensor bar stand
- Power Saver Mode: Audible alarm warns when powered for too long and will even automatically shut off the device
- Superior IR Field: The IR field created by the Wireless Sensor Bar allows for play up to 25 feet away
- Battery Powered: 4 AA batteries (included) provide up 30 hours of use; No cords needed
- Compatible with the Nintendo Wii sensor bar stand
- Ideal for wall-mounted flat screens
Quality/Usability : When the Nintendo Wii was released, gamers started to tinker with ways of making their own sensor whether it be from PVS tubing with LEDs, candles, remotes or even Christmas lights. Nyko has entered the market with their own that is better looking on the eyes and isnt so cheesy.
The Wireless Sensor Bar doesnt come in your ordinary plastic blister pack or box. It actually comes in a plastic tubing. Inside the tube is the wireless sensor bar, 4 AA batteries and instruction booklet.
On the front is a black shiny face and the housing is gray similar to that of the original Nintendo Wii sensor bar that came with the system. The difference is that it is slightly bigger in height, width and depth as well it being wireless. Although slightly bigger, the wireless sensor bar can still fit on the sensor bar stand that came with the Wii. There are blue LEDs on both sides of the sensor bar. The top of the sensor bar has a power button as well as a small speaker. When turned on, a blue LED is lit up on the front of the sensor bar. To turn off the bar, simply hold the power button for 3 seconds. On the back is a timer switch. You can set it to OFF, 1 HR or 2 HRS. What this does is alert the gamer how long the wireless sensor bar has been on for. Hence the little speaker near the power button. The batteries are hidden underneath. What is also a great feature is that if no interaction with the wireless sensor bar after the audible sound has gone off, the sensor bar will automatically turn off which will help save the battery from draining.
Nyko claims that on a full set of AA batteries (included), the wireless sensor bar can last 30 hours. I was able to get a little more than 30 hours when used on and off. But if played for longer periods of time and consecutively, it lasted about 25-26 hours. It is best to invest in some rechargeable batteries rather than alkaline.
Nyko also claims the wireless sensor bar has a range of 25 feet. During testing of the product, we did get to about 25 feet. But at the same distance, the response wasnt as strong as if you were standing 15 feet-20 feet.
Conclusion : Overall, the Nyko Wireless Sensor Bar is a must get for those who do not want to deal with the long cord on the original sensor bar from Nintendo. Its a lot safer than using a candle as your sensor bar and looks a lot better than homemade sensor bars. It was a great idea for Nyko to include a timer to let you know how long the sensor bar has been on. I know there have been times when I have left other wireless sensor bars on, only to come back to a dead set of batteries. Its also great that we are still able to use the original sensor bar stand. When powered on, the blue LED can get a bit distracting if its near the monitor.
Images via comments ...
- Search DCEmu
- Advert 3
 News Categories

- Links of Interest
 Sony Consoles News


- Nintendo Consoles News


- Sega Consoles News


- Apple & Android News
- Xbox Consoles News


- Open Source Consoles News
 DCEmu News Archive
- Advert
- Retro Consoles News


- PC News

- Latest DCEmu News


- DCEmu Network Sites
-
 Menu
Menu  Forum Stats
- What is the DCEmu Homebrew & Gaming Network
Catherine: Full Bodys English translation for the Vita