

 DCEmu Homebrew Emulation & Theme Park News
-
DCEmu Reviews Latest News
by Published on February 1st, 2011 23:51- Categories:
- Nintendo Wii News,
- DCEmu Reviews
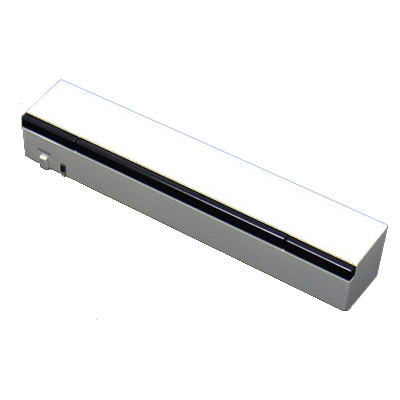
Penguin United Remote Charging Dock + Rechargeable Battery
Manufacturer: Penguin United
Site: Buy from Penguin United (dock + battery) / Buy from Penguin United (dock + 2x battery) / Buy from Penguin United (battery only) / Buy from Penguin United (2x docks + 4x batteries)
Price: $19.99 (dock + battery) / $24.99 (dock + 2x battery) / $7.99 (battery only) / $44.99 (2x docks + 4x batteries)
Overview : The included rechargable battery will provide you with 38 hours of game playing time and tons of $$ saved on batteries. To recharge your Wii Remote, simply place your Wii Remote on the charging dock. Your Wii remote will be charged from USB cable using modified battery cover provided.
Includes : (dock + battery)
- Wii Remote Chargin Dock
- USB Connection Cable
- Rechargeable battery pack lasting 38 hours
- Recharge enabled battery cover
Includes : (dock + 2x battery)
- 1X Wii Remote Charging Dock
- 1X USB Connection Cable
- 2X Rechargeable battery pack lasting 38 hours
- 2X Recharge enabled battery cover
Includes : (battery only)
- Rechargeable battery pack lasting 38 hours
- Recharge enabled battery cover
- Requires dock
Includes : (2x docks + 4x batteries)
- 2X Wii Remote Charging Dock
- 2X USB Connection Cable
- 4X Rechargeable battery pack lasting 38 hours
- 4X Recharge enabled battery cover
Quality/Usability : Ever since the release of the Nintendo Wii whether it be in Asia, Europe or North America, 3rd party manufacturers have been releasing rechargeable battery packs. Why? Because everyone wanted rechargeable battery packs to save money rather then spend it on regular alkaline batteries. The Wii Remote would eat through batteries like no tomorrow and would need to be replaced as if it was a handheld system.
With the need of rechargeable battery packs, Penguin United has jumped in to help fellow gamers. Penguin United released their Remote Charging Dock and Rechargeable Battery. PU originally offered only the dock and battery but due to demand, they are offering different bundles. You can pick up either a dock and battery, dock and two batteries, batteries only or two docks and 4 batteries, at relatively cheap prices!
Upon opening up the box (dock + battery), you'll find a USB cable, dock, rechargeable battery, battery cover and instructions. Setting up the dock is easy. Just plug one end of the USB cable into either your computer or the Wii and the other end into the dock. Thats it.
Putting the battery into the remote isnt as easy. It takes a bit of trial and error but once you know what to do, it shouldnt be a problem. To insert the battery into the remote you would need to hold the remote right-side up and hold the battery with the (+) and (-) sign facing the bottom. While holding the battery at an angle, place the (+) and (-) into position and then push down. At the same time, push the top of the battery into place. The battery should now be inserted into the remote.
In order to charge the batteries, you must use the included battery cover as it has a custom connection that will work with the dock. The battery cover though is a bit darker then the Wii remote itself. But if you have a glove or case on the Wii remote, you wont notice it. Speaking of glove, you will either have to remove the glove or lift it up enough so that the remote can fit into the dock. When the remote is placed into the dock, there is a blue LED. A steady blue means it is charging and if the LED is blinking, it means it is done charging.
In the instructions that were included, they suggested that the battery require 12 hours of charging before use. The battery were done charging within 2 hours or so and the dock started to blink.
Once the battery was fully charged, I took it for a test (7 straight days of playing). After the first couple hours of WarioWare, Wii Sports and Zelda, the Wii remote still showed 3 battery bars. Played a couple more hours the next couple of days and it still showed 3 bars. Probably by the 4th or 5th day, the battery dropped a bar. By the 7th day, it was still at 2 bars. Had I played longer, it would of probably lasted me almost 2 weeks on one full charge! Thats insane.
Conclusion : Overall, the Penguin United Remote Charging Dock + Rechargeable Battery exceeds my expectations. The battery life is long lasting. Only minor complaints is the non-matching color of their battery cover to the Wii remote and the dock not stop charging if it is fully charged. If you're looking for a rechargeable battery pack, I suggest checking out PU's Remote Charging Dock + Rechargeable Battery. Interested International buyers can purchase this through their eBay store. PU will be releasing a dual charger sometime in April. But it would be nice to see a charger only for the battery rather then a dock.
Images via comments ...by Published on February 1st, 2011 23:51- Categories:
- Nintendo Wii News,
- DCEmu Reviews

CHUCKii Wiimote Replacement Shell
Manufacturer: Xtreme Enterprise
Site:
Price: $29.95
Overview : CHUCKii is a full replacement case set for both the Wii-mote and the Nunchuk of the Wii console (sold as a complete set) and available in several colors and transparency. Made from the highest quality materials and durable ABS plastic carbonates, as well as patented Japanese acrylic paint, CHUCKii suits your lifestyle and colors up your gaming console.
- Made from High Quality Durable Materials
- Patented Japanese Acrylic Paint
- Beautiful Finishing and Stylish
- Currently Available in 2 Colors
- Full Online Installation Instructions
Plastic Materials Used:
High quality ABS and polycarbonate composite plastic materials combined for greater durability and toughness.
Paint Materials Used:
Industrial grade Modified Acrylic paint branded RECRACK from Fujikura Kasei Co. Ltd, Japan. Paint provides excellent chemical, abrasion and weather resistance for long-lasting usage.
Package Contents:
Wii-mote
- Top/Bottom Case
- Buttons and Trigger
- Battery Cover
Nunchuk
- Top/Bottom Case
- Buttons
Quality/Usability : With the new look that I did to my Nintendo Wii by adding a Team Xtender I-Case Black Knight case mod, I thought it was only right to have a matching Wiimote and Nunchuk to go along with it. With that said, Xtreme Enterprise is the first to release Wiimote and Nunchuk replacement shell cases.
To open up the Wiimote and Nunchuk, I had to use the triwing from Zoozen Action PRO Toolkit v2. First I removed the battery cover and batteries, and unscrewed four (4) screws. Next, I split open the housing of the Wiimote. Be careful when doing so as you may break off a tab that holds the casing together (I snapped it off). Once the casing has been pried off, all you do is place all the innards from the original Wiimote into the replacement shell. Everything fits perfectly. You'll also have to remove the metal contacts that is inside where the batteries connect to. Once all components have been transfered to the new shell, everything fits perfectly. If you do not like the buttons that came with the replacement shell casing or just want to mix and match, the original buttons will also fit.
The Nunchuk itself has two (2) triwing screws on the bottom. Once both screws have been removed, same process of taking the casing apart on the Wiimote applies with the Nunchuk. With the Nunchuk, everything is connected except for the buttons. You'll have to wiggle the wire so that it comes off of the bottom housing of the Nunchuk. Once its off, just place it into the replacement shell along with buttons and screw the triwing screwdrivers back on and you're done!
Conclusion : Overall, the CHUCKii Wiimote Replacement Shell is identical to that of the original casing of the Wiimote and Nunchuk. The buttons though dont feel as fluid and smooth when pressing them. The ability to mix and match the buttons is great. I used the original power button, A and home button on the Cool Black housing and those buttons stand out more as they are colored and white as opposed to all black. Separating the casings will need to take some patience because if you just pull them apart without being careful, you'll snap off the tabs that keeps the cases closed. Once the tab breaks off, the controllers will stay closed but not completely.
DIGG THIS
Images via comments ...by Published on February 1st, 2011 23:51- Categories:
- Nintendo Wii News,
- DCEmu Reviews

XCM II-Hot Rock Case
Manufacturer: XCM
Site: Buy from ConsoleSource
Price: $64.95
Overview : The XCM II-Hot Rock Wii Case is a new innovation in case modding technology. With a built in Digital LED thermometer, the XCM II-Hot Rock Wii Case is able to alert the user by changing the LED color when the Wii console reaches certain temperatures. Color changes takes place in 5 degree increments. For example, if your Wii console's temperature reaches over 55 degree Celsius, the LED will display 'RED' and start flashing.
Features :
- Below 29C : Light blue
- 30-35C : Blue
- 36-40C : Green
- 41-41C : Yellow
- 46-50C : Orange
- 50-54C : Red
- Over 55C : Red light flashing
Quality/Usability : The II-Hot Rock Case by XCM is similar to that of the Team Xtender II-Case Chameleon but the difference between the two is that the II-Hot Rock Case displays the temperature of the Nintendo Wii but doesnt cycle through the LEDs like the Chameleon case does. Main purpose is to display the Wii's temperature.
The XCM II-Hot Rock Case includes the console shell, doors, faceplate, buttons and even the rubber feets at the bottom of the Wii which makes up the whole exterior of the Wii. To match the clear crystal case, they also included a clear stand and tools to help you dismantle the Wii! Not a single piece was left out.
Like all of XCM's products, the quality of the case is excellent and solid. Feels like it came out from Nintendo's factory. The case is clear which allows you to see all the innards of the Wii. The Crystal clear case also comes with a metal DVD cover which houses the LEDs near the DVD drive.
I wont go much into detail regarding installation as you can find tutorials on how to dismantle or disassemble your Wii, here. The whole installation process took approximately 45 mins. This is not to say that is how long it will take you to assemble everything. I am a perfectionist and anal when it comes to things like this. For some who are pros or better at things like this can be a lot quicker while noobs, novices or perfectionists like me, may take longer. The whole process is just time consuming and tedious. It will require some patience. It took longer than the Black Knight casing was because the metal DVD cover and Air Flow (which also has LEDs) needed to be installed and wires needed to be connected in order to power the LEDs. To install the metal DVD cover and Air Flow, you can read the tutorial here.
Once installed and the Nintendo Wii put back together, the II-Hot Rock Case is fairly bright like the Crystal Chameleon. Luckily, you have the option of turning if off the LEDs. You also have the option of turning off the LED and the digital LED thermometer. But there is no way to have the LED off but the digital LED thermometer turned on.
Conclusion : Overall, the XCM II-Hot Rock Case is a nice product to tell you if your Nintendo Wii's temperature is too hot. With the reports the WiiConnect24 bricking Nintendo Wii's when in standby mode, this would come in handy but doesnt work when the system is turned off. There is also another cheaper do-it-yourself alternative to finding out what the temperature in your Nintendo Wii is but will not be as fancy with the bright lights.
DIGG THIS
Images via comments ...by Published on February 1st, 2011 23:51- Categories:
- Nintendo Wii News,
- DCEmu Reviews

Dragon Wireless Sensor Bar
Manufacturer: Dragon
Site:
Price: $14.95
Overview : Play your Wii in total freedom without that messy (and fragile) sensor bar cable with Dragon wireless sensor bar. With a range of 5 meters to the Wii console and 5 meters to the Wiimote, you can set up your playing area as you wish.
Features:
- Can be placed anywhere
- High quality and efficient
- Wireless function and easy to set up
- 5 meters operating range to Wii console
- 5 meters operating range to Wiimote controller
- Requires 6 pieces of alkaline dry AA batteries (72 hours of continuous play time)
- Compatible with any Wiimote
Quality/Usability : Well known 3rd party peripheral manufacturer, Dragon, has released their own version of the wireless sensor bar. The wireless sensor bar has the style and look of the Nintendo Wii and the sensor bar. With the style and look, comes size.
The size of the wireless sensor bar is HUGE. With the Nintendo Wii placed on the stand that came with the Wii and standing up, the sensor bar is as wide as the Wii and is even taller than the Wii. Compared to the original sensor bar that came with the Wii? With the sensor bar laying flat, its takes about four original sensor bars stacked on top of each other to be the same height as the Dragon Wireless Bar. It takes about two sensor bars back to back to be the same depth as the wireless sensor bar.
On the front of the wireless sensor bar is a button that looks similar to that of the Nintendo Wii. This powers on and off the sensor bar. Next to it is an LED to let you know if the sensor bar is on or off. To power this monstrous peripheral takes 6...yes, SIX!!! AA batteries. The batteries are placed on the back of the sensor bar.
The batteries lasted about two weeks depending on how much and how long it was used. This may vary either less or more depending on the usage. So the more you use the wireless sensor bar, the more the battery will be drained. The opposite is said if it was used less.
Conclusion : Overall, the Dragon Wireless Sensor Bar is just way too big. It lasts a decent amount of time but thats because it uses 6 AA batteries. It would cost you a lot of money if using regular alkaline batteries. You can use rechargeable batteries but majority of chargers can charge up to 4 batteries at one time.
Images via comments ...by Published on February 1st, 2011 23:51- Categories:
- Nintendo Wii News,
- DCEmu Reviews

Multi Complex Mini-Stick
Manufacturer: Dragon
Site:
Price: $6.95
Overview : Improve your Wiimote comfort, grip and performance on games with Dragon multi complex mini stick. Not only does it turn you Wiimote directional pad into a small joystick, but special grips are included to fit best with various type of games.
Features :
- Easy to use and setup
- Comfortable and suitable for long gaming session
- Compact design and comes with 5 different types of silicon cap for various
game style - Compatible with all Wiimote
Quality/Usability : The Multi Complex Mini-Stick turns your Wiimote into a semi-joystick. This attachment goes over the directional pad and "A" button on the Wiimote. Underneath the directional pad and "A" button of the Multi Complex Mini-Stick are foam. This is what touches the pad and button on the Wiimote to prevent any scratching.
What makes the joystick move around is a spring. This allows flexibility in the movement whether it be up, down, left or right. The "A" button on the Multi Complex Mini-Stick doesnt have any springs on it but lays right on top of the "A" button on the Wiimote.
Included are 5 silicon caps (1 on joystick and 4 additional ones). Each joystick vary in style/shape that best suits your needs during gameplay. Removing the caps is very simple. Placing them on the joystick can take some time..for me that is. Since there isnt much space between the top of the joystick where the caps go and the body of the Multi Complex Mini-Stick, its hard to lift and pull the opening of the silicon cap to go over the joystick.
Conclusion : Overall, the Multi-Complex Mini Stick was a cool idea when I first saw and read about it but after using it an experiencing with the peripheral, my thoughts on the use/need of this has changed. I really dont see the use or need for this since majority of Wii games all use motion. This may come in handy for Virtual Console (VC) games but thats about all. Since the joystick uses a spring to help maneuver over the directional pad, the spring rubs against the plastic which gives that "nail on the chalkboard" or scratching feel to it.
Images via comments ...by Published on February 1st, 2011 23:51- Categories:
- Nintendo Wii News,
- DCEmu Reviews
Nextronics Wii Wireless Sensor Bar
Manufacturer: Nextronics
Site: Buy from Nextronics
Price: $19.00
Overview : Talk about a great range! The Nextronics wireless sensor bar has been reviewed by IGN, and found to have a range of up to 30 ft! This small and stylish sensor bar is only 9 inches long, and 1/2 inch tall which makes it even smaller than Nintendo's own sensor bar. Nextronics sensor bar needs no connection to the Wii, and includes an AC adapter, and battery pack for multiple power options.
30 ft range should be considered maximum possible range, adjust sensitivity settings in Wii menu to optimize range.
Quality/Usability : With the release of the Nintendo Wii, there have been a lot of requests for accessories such as controller gloves, rechargeable battery packs and even wireless sensor bars.
The first wireless sensor bar to released was wirelesssensorbar.com's Wireless Sensor Bar, followed by Nyko's Wireless Sensor Bar, and now Nextronics' Wireless Sensor Bar. Sure you can use IR ports from your TV remotes, candles or Christmas lights, but its not the same.
People have complained of the original sensor bar that came with the Wii being way too long and that is why companies are jumping on the bandwagon of wireless sensor bars.
There is no packaging for the Nextronics Wireless Sensor Bar. It came wrapped in bubble wrap. Its like a hybrid of the garage built wirelesssensorbar.com's and Nyko's put into one. In the package was the wireless sensor bar, battery pack and AC adapter.
You read that right, you can either use AC adapter or 3 AA batteries! The sensor bar is slightly shorter then the official Nintendo sensor bar. There is double sided sticky tape placed on the bottom of the sensor bar. Does anyone even use the double sided sticky tape?
Unlike the other wireless sensor bars, Nextronics is the first to use an AC adapter to power the wireless sensor bar. With the included AC adapter, you wont have to worry about the sensor bar dying out on you while you're playing an intense game. In addition to the AC adapter, as mentioned above, you can also use 3 AA batteries via battery pack. There is a screw on the battery pack to keep the cover closed. The battery pack is then connected to the cable that is attached to the sensor bar. The cable on the sensor bar is approximately 6 inches long as well as on the battery pack.
During testing, running on the sensor bar on batteries were pretty strong. It tracked every movement accurately and even during gameplay up to 20 feet (may have gone further). Since there is no warning of when the batteries are dying on the sensor bar, you'll have to go by the hand cursor or during gameplay. You'll either have no control or the hand cursor will start to flicker.
Battery life is pretty decent lasting about 15-20 hours or so on 3 AA batteries. I suggest using rechargeable batteries but is kind of awkward only having to use 3 batteries. Why couldnt it have been 2 or 4 batteries? Some rechargeable kits require 2 batteries at the same time to charge so having to charge 3rd battery wont be possible. Luckily, the battery pack has an ON/OFF switch.
Conclusion : Overall, the Nextronics Wii Wireless Sensor Bar is a pretty good product. The ability to either use 3 AA batteries or AC adapter is a great thing to have. Although it doesnt look professionally built from a manufacturer, it looks close enough. Only drawback is no way of telling if the battery is near dead and if you have an LCD or plasma TV, using the battery can be trouble some. There is no place to put it on top of the monitor unless you put it at the bottom. The weight of the battery pack will just drag the sensor bar with it. They could of also left out the screw but it looks as if someone built this out of their garage by purchasing the required parts and building it themselves. But it damn looks good and works as well!
Images via comments ...by Published on February 1st, 2011 23:51- Categories:
- Nintendo Wii News,
- DCEmu Reviews

Joytech Wii Power Station
Manufacturer: Joytech
Site:
Price: $44.95
Overview : Bring order to your Wii™ Remote with the Power Station™ from JOYTECH. Rechargeable Battery Packs removes the need for replacement batteries and when you're finished gaming, the Power Station™ charges, stores and protects your Wii™ Remote, so you'll always have power when you need it most!
Features :
- Rechargeable Battery Packs and Docking Station for your Wii™ Remote
- Two rechargeable Battery Packs remove the need for standard batteries
- Store, protect and recharge your Wii™ Remote
Quality/Usability : Joytech has entered the Wii rechargeable battery market by releasing the Wii Power Station. The Joytech Wii Power Station includes two rechargeable batteries, charging dock and power cable. The power cable actually plugs into the back of the Wii's power port and the consoles power cable connects to it. So its pretty much a pass-through port and does not use USB like the rest of the rechargeable battery packs which results in a faster charge. The controllers will charge whether the system is in standby mode or turned on.
On each side of the dock are two extendable arms that holds your Nunchuks. Personally, there was no need for this as it took up space and didnt do a really good job of holding as you still had the cords dangling. Each port has a small LED that lights up. Red means it is charging and green when the controllers are fully charged. Whats nice about the Joytech Wii Power Station is that with the controllers placed in, you can leave the wrist strap on. The wrist strap comes out from from the bottom of the controller and works with both the thin and thick straps.
According to the instruction booklet, it stated that it takes 5 hours to fully charge the Wiimotes. It seem to take a lot less to charge. Unfortunately, there is no mention of what mAh the batteries are so it is hard to gauge how long the batteries will last compared to AA alkaline batteries.
Conclusion : Overall, the Joytech Wii Power Station is a nice charging station but there were some things I didnt like about it. Joytech could have done without the Nunchuk holders. Would of been also nice to have stated the batteries rating (mAh). What I loved about the Joytech Wii Power Station is the way it charges the batteries using the pass-through port cable. This allows for faster charging and no need to find a USB port or AC wall plug. The cost is also slightly $10 higher than its well known competitor, Nyko.
Images via comments ...by Published on February 1st, 2011 23:51- Categories:
- Nintendo Wii News,
- DCEmu Reviews
Nyko Wii Charge Station
Manufacturer: Nyko
Site: Buy from ConsoleSource
Price: $34.99

Overview : Easily charge and store your Wii Remotes with Nyko's Charge Station for Wii. The Charge Station includes 2 NiMH batteries, exclusively designed for the Wii Remote, each providing up to 25 hours of play time. Each battery is easily recharged by placing the Wii Remote in the charging dock. The charging dock conveniently plugs into any standard wall outlet, allowing for rapid recharging of both batteries in 8 hours.
The Charge Station includes 2 custom battery covers with contact pass-through points so you can charge the batteries while they are still in the remote. Each battery cover is also rubberized for superior grip during intense gaming sessions. The Charge Station matches the décor and styling of the Wii, and is small enough to fit in any home entertainment center.
Features :
- Easily store 2 Wii remotes in any home theater with the small and stylish charging dock
- Dual injected rubberized and textured battery covers provide a safe and comfortable grip
- 2 NiMH rechargeable batteries provide up to 25 hours of play time
- Easily see when batteries are done charging with 2 LED indictor lights
Quality/Usability : There has been so many rechargeable battery packs flooding the gaming market that its insane especially for the Nintendo Wii. One of today's leading 3rd party peripheral manufacturers, Nyko has joined in on the fun. During the CES 2007, Nyko first unveiled the Charge Station for the Nintendo Wii. Ever since then, its been the talk of the town as to how good this product is.
As we all know, the biggest fault with the Wiimote is the amount of alkaline batteries gamers have to go through unless you have rechargeable batteries or rechargeable battery packs from other peripheral makers. Nyko's solution to this is the Charge Station.
Included in the Charge Station package is the charging station along with two rechargeable batteries for two Wii Remotes and two replacement battery door covers with contact points to charge. The replacement battery door covers has a thin layer of silicone to allow better gripping of the Wiimote. To power the Charging Station unlike some other products on the market that uses a USB port, it plugs into an AC outlet. The Charge Station holds up to two Wiimotes at one time. When the Wiimotes are docked on the station, a LED on the Charge Station will light up blue. Once it is fully charged, the light will turn green.
Depending on what rechargeable battery you are using and if it has a dock, the Nyko Charge Station allows you to charge the Wiimote even with the wrist strap on. Only problem is that you will have to play around with the wrist strap and move it around so that it does not get in the way. If it does, the Wiimote replacement battery door cover contacts will not be able to reach the contacts on the Charge Station.
The Charge Station will not let you charge the Wiimote if it is active with a game or synced with the Wii. The Wiimote must not be communicating with the Wii in order for it to charge. Charging took approximately 1-2 hours for one battery and about 3-4 hours for both batteries to fully charge at the same time. With both batteries fully charged, I was able to get about 25 hours of gameplay.
Like any other recharging docks out there, you are still unable to charge your Wiimote with a silicone case on the Wiimote. You'll either have to remove it from the Wiimote or lift it high enough that the silicone does not get in the way.
Conclusion : Overall, the Nyko Wii Charge Station is a solid product. My only complaint is the fiddling of the wrist strap so that the Wiimote fits in the dock securely. The Charge Station stylish as well. I think there may be a tie between the Charge Station and the Penguin United Remote Charging Dock and Rechargeable Battery.
Images via commentsby Published on February 1st, 2011 23:51- Categories:
- Nintendo Wii News,
- DCEmu Reviews
Wii Wireless Sensor Bar
Review by: TrialSword
Provided by: DCEmu Reviews
Manufacturer: Dragon
Site: Buy from GameInfinity
Price: $9.95
Overview : Experience the freedom of wireless gaming with wireless sensor bar for the Nintendo Wii. This wireless Wii remote receiver can be placed anywhere in the room for cable-free gaming up to 25' away.
Features:
- Infrared technology detects pointer and motion movements up to 25 feet away
- No wires of any sort are needed
- 6 AA batteries provide hours of use (not included)
- Perfect for home theater setups with wall mounted TVs or complicated cabling
- Dimension: 9 inch x 1.6 inch x 1.6 inch
Quality/Usability : A nightmarish jungle of wires and plugs plague the back end of any home entertainment center with multiple components, and if you're like me you'd love to alleviate the problem at any opportunity. The Wii's wireless remotes are a lot of fun to wave around, but the sensor bar is tethered to your Wii by a thin wire, yet another addition to your teeming throngs of black cables. The solution here is simple, a wireless sensor bar to match your already wireless controllers! Game Infinity provides such a solution, but is it more trouble than it's worth?
Just at a glance, there are a few notable differences between the stock wired sensor bar and this wireless bar. For one, it's much, much larger. About three times the height and twice the depth of the original. The IR sensors rest at the top, and the power button and power LED lay under it. Why all the extra real estate? The answer is batteries. This baby takes SIX AA batteries to operate. That's right, six batteries. It all seems like way too much and for some might be a dealbreaker.
I used the wireless bar for a number of functions, including the Virtual Console, Wii games and web browsing. The bar did its relatively simple task rather well, and I didn't lose any signal or run out of battery for the 6 hours I used it for this review's purposes. Metroid Prime 3 and Warioware, 2 motion heavy games, performed excellently, with no difference in performance between the wireless bar and Nintendo's original. There are some gripes, however, most notably the size of the bar making its options for positioning far more limited. Some flat panel TV's will simply not be able to support the sensor bar on top. If the TV is mounted to a wall you'll be hard pressed to find a decent location, unless there's a stand below it. Another problem is the power LED. It shines a bright blue when the power is turned on, making it quite distracting.
Conclusion : Overall, as far as a wireless sensor bar goes, I can't help but feel like they could have made it much smaller, less intrusive, and less power consuming. Six AA batteries seems like way too much and makes it way too big. It performs well, though, and if you absolutely need it to be wireless, e.g. the Wii is far away from the TV or you have a projection setup, it's not bad, especially for the low price tag.
The Good: Performs well, is wireless, design matches Wii colors
The Bad: Takes six AA batteries, large size makes it difficult to place in some circumstances, distracting power LED
The Bottom Line: Unless you REALLY need a wireless setup, I'm not sure it would be worth the trouble with Game Infinity's wireless sensor bar, though the low price makes it tempting.by Published on February 1st, 2011 23:51- Categories:
- Nintendo Wii News,
- DCEmu Reviews
CycloWiz Modchip v2 (DMS/D2A/D2B)
Manufacturer: Team Cyclops
Site: Buy from Divineo
Price: $30.00-$40.00
Overview : The CycloWiz Wii Mod Chip has been updated to be universally compatible with all current Wii drive chipsets including DMS, D2A and D2B.
The amazing CycloWiz Mod Chip for the Nintendo Wii has arrived! The CycloWiz is possibly the easiest modchip to install on any system. A quicksolder pattern on the PCB board removes the need for wires. All you need to do us solder onto the designated parts and the installation is complete.
Not only is the CycloWiz easy to install, but this ModChip also has amazing features including Stealth Mode, the ability to play both WII and Gamecube backups, GameCube homebrew and imports. The CycloWiz also has an optional LED to let you know when the Mod Chip is ON or OFF.
Features :
- Compatible with all current Wii chipsets including the DMS, D2A and D2B
- Fully upgradable via DVD
- Easy installation(5 solder points / no wires required)
- Stealth Mode to keep the Mod Chip from ever being detected by the current Wii firmware
- Play both Wii and GameCube backup copies
- Play GameCube homebrew and Imports
- Built In audio-fix for GameCube backup copies
- Multidisc GameCube game support
- Supports both 8cm and 12cm discs
- Optional disable feature to turn the Mod Chip ON or OFF
- Multipurpose LED to let you know that the CycloWiz Mod Chip is on and working, if there is an error, or if it is off
Quality/Usability : This review is an updated review based off of our CycloWiz v1 (DMS/D2A) - 3.0B FW review that worked only on DMS and D2A chipsets. This review is based on a North American (NTSC-US) Wii. All games tested during this review, we own the original games. This modchip is only compatible with Wii's that have a DMS, D2A or D2B chipset. This will NOT work on a D2C chipset.
Like CycloWiz v1, this modchip will work on DMS, D2A and now, D2B chipsets. This will not work on D2C chipsets as the structure has changed and did not allow the use of modchips. If you bought your Wii after June 2007, it probably contains a D2C chipset. You can find out what your Wii probably has by using this Wii Tracker.
The CycloWiz comes in a ESD bag but does not provide any protection during shipping (unless retailer protects it). The CycloWiz is basically a chip on a small thin PCB. The solder pads allows you to either quick soldering or wire installation. Wire installation is the best way to go because if for whatever reason you need to remove it, it is a lot easier and cleaner. Team Cyclops also started to include a switch with all CycloWiz's
Installation : Before installing the CycloWiz, you must have at least some experience with soldering and have read their instruction manual which can be downloaded from here. As for me, I dont have any experience with soldering, so I had a friend install this for me. In order to install the CycloWiz onto your Wii, you must take it apart. Here is a tutorial on how to dismantle your Wii. You can also find other tutorials or even videos on the web.
Once you have dismantled the Wii, you must locate the points outlined in their installation manual. These points are where you will connect the soldering between the Wii and the CycloWiz. When soldering, you must remember to stay within the points and not to use too much solder or you may risk shorting out the chip as well as the Wii. When soldering the CycloWiz, you also have the option of installing 3 more wires which is then connected to a switch. The switch that is included is a flip switch but any type of switch will do whether it be a push-in switch or a flip switch but the smaller the better. You can install the switch anywhere you want. It can be in the vent at the bottom of the Wii or you can drill a hole into the casing of the Wii, whichever is more convenient to you. This switch will enable you to upgrade your CycloWiz via DVD.
On the CycloWiz, there is an LED that will light up if you’ve installed the chip correctly. You would want to try the Wii out before closing it up by hooking the Wii back together without the casing or you will not be able to view the LED. This is a great way to tell you whether or not your installation was successful or not without having to reopen your Wii later on.
Wii Compatibility : With Team Cyclops constantly improving the CycloWiz, game compatibility has improved dramatically. There were less and less DRE's (Disk Read Errors), sometimes even none at all. Playing imports is still a hit or miss when it comes to playing on a different region. Some games will work and some games will not. But if you're playing in the same region such as NTSC-US (North America) and NTSC-J (Japan), there is not problem.
Homebrew Compatibility : Loading homebrew is still the same as v1. There are three ways to load GameCube homebrew; bootable disc, SDLoad and GCOS. Loading via SDLoad, you will need a SD Gecko adapter as well as an SD card. If using GCOS or a bootable disc, you can load the emulators ...
- Search DCEmu
- Advert 3
 News Categories

- Links of Interest
 Sony Consoles News


- Nintendo Consoles News

- Sega Consoles News


- Apple & Android News
- Xbox Consoles News


- Open Source Consoles News
 DCEmu News Archive
- Advert
- Retro Consoles News


- PC News

- Latest DCEmu News


- DCEmu Network Sites
-
 Menu
Menu  Forum Stats
- What is the DCEmu Homebrew & Gaming Network
Catherine: Full Body’s English translation for the Vita