

 DCEmu Homebrew Emulation & Theme Park News
bandit
by Published on February 2nd, 2011 00:47- Categories:
- Xbox 360 News,
- DCEmu Reviews
Xbox 360 Slim Hard Drive Case Shell
Manufacturer: N/A
Site: Buy from LighTake (black) / Buy from LighTake (red) / Buy from LighTake (pink) / Buy from LighTake (white) / Buy from LighTake (teal) / Buy from LighTake (green) / Buy from LighTake (blue)
Price: $10.28 (black) / $7.40 (all other colors)
Pre-installed HDDs with Shell Case
Site: Buy from LightTake (250GB)
Price: $57.20
Overview :
Features :
- Compatible only with Xbox 360 Slim consoles
- Replacing your old, damaged, broken hard drive or case
- Ability to use your own HDD or old Xbox 360 HDDs
- More room to grow your entertainment
- Play, watch, save, store expand your entertainment possibilities
- Plenty of room to store all of your favorites from Live!
- Its the easiest way to get the most from your Xbox 360
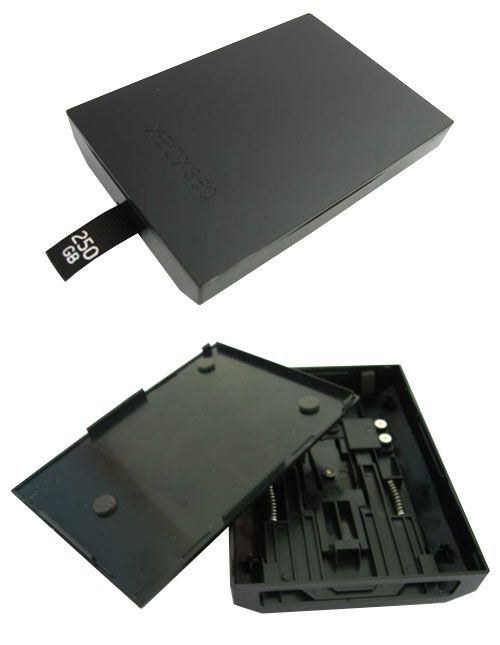
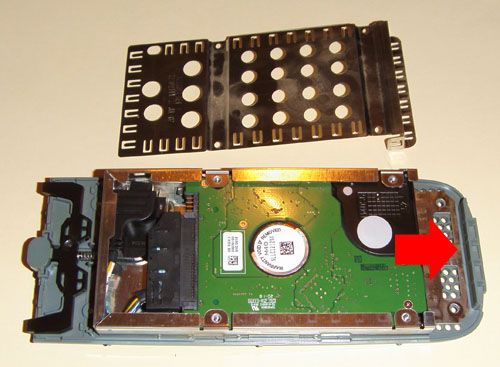
Quality/Usability : For those who purchased or received an Xbox 360 Slim 4GB version, will sooner or later find out that they will probably need more HDD space, once you factor in downloading content, movies and game saves. You can go out and spend $130USD on Microsoft's own 250GB HDD but like all OEM products, they are overpriced. You can even use your own HDD but this requires some precision aiming to get the HDD to land correctly onto the connections, as seen below:
Just dropping in the HDD into the Xbox 360 Slim is not stable as the HDD can wobble around inside the bay and may even damage the connections. If there is a way, there are accessories. Never count out 3rd party manufacturers. To help gamers fix the wobble issue and to provide a cheaper solution and alternative, there is the Xbox 360 Slim Hard Drive Case Shell. This allows you to use your own HDD or from an old Xbox 360 without the risk of damaging the HDD or Xbox 360 Slim console. The case is made of plastic. There are no screws to hold hard drive in place and no screws to hold case together.
If you're using your own hard drive that you bought from a store or had laying around (it must be Western Digital 2.5"), you'll need to do more than just dropping the HDD into the Xbox 360 Slim. The new HDD will need to be formatted to work with the Xbox 360 Slim console using HDDHackr and a PC.
The following Western Digital (WD) HDD's work on the Xbox 360 with HDDHackr (20GB, 60GB, 120GB or 250GB):
- WD Scorpio Series BEVS/BEAS
- WD Scorpio Blue Series BEVS/BEVT/BPVT
- WD Scorpio Black Series BEKT/BJKT
- WD VelociRaptor Series
- WD AV-25 Series BUDT
How to use HDDHackr : (file attached and does not contain any copyrighted files)
- HDDHackr is made only for real MS-DOS, not for Windows Command Prompt or even Windows XP/Vista/7!
HddHacker supports two flashing modes, Auto and Manual. Typing HddHackr at a DOS prompt will start auto mode. In auto mode all hard drives will be detected automatically. In manual mode you can enter all the parameters used for flashing by hand.
The following help screen is displayed if you start HddHacker with a wrong number of arguments:
HDDHACKR [C|D|F|R] [PORT] [DRIVE POS] [SECTOR FILE] [RESTORE FILE]
C: Create Partitions 0/2/3
D: Dump sector 16-22 from XBOX360 HDD to file
F: Flash Western Digital firmware
R: Restore Western Digital firmware
PORT: Port to send command to e.g. 09F0
DRIVE POS: A0 for Master, B0 for Slave
SECTOR FILE: Sector dump file e.g. HDDSS.BIN
RESTORE FILE: Firmware restore file e.g. UNDO.BIN
Example for create, dump, flash and restore:
HDDHACKR C 09F0 A0
HDDHACKR D 09F0 A0 HDDSS.BIN
HDDHACKR F 09F0 A0 HDDSS.BIN UNDO.BIN
HDDHACKR R 09F0 A0 UNDO.BIN
Explanation of the Parameters
[C|D|F|R]
- this will set the mode of operation, it is recommended to first try to dump the XBOX360 hard drive data, if the dump will fail, it is highly unlikely that a flash or restore will succeed on the Western Digital drive
[PORT]
- the port to which the Hard Drive is connected, a port number should always be entered in hexadecimal and have 4 hex digits, valid ports are: 01F0, 09F0, .....
- this option can be used if your PCI adapter card or on board SATA ports are not identified by the auto mode
[DRIVE POS]
- on SATA ports this value is always A0, cause you can only connect a master drive to a SATA port, so for SATA you will always type A0 here
[SECTOR FILE]
- name of the sector 16-22 dump file better known as HDDSS.BIN
[RESTORE FILE]
- name of the firmware restore file e.g. UNDO.BIN
Using HddHacker in manual mode
* Dumping the HDDSS.BIN file *
Boot to MS-DOS from a writeable medium (like a floppy or UBS Stick).
Connect an *original* Xbox360 HDD to your SATA controller. Make sure it is the only SATA device that is connected. Now run 'HDDHACKR D [PORT] A0 HDDSS.BIN' and it will create the file 'HDDSS.BIN' and save it to the path you've started HddHacker from.
* Creating Partitions 0/2/3 *
In auto-mode the Partition 0/2/3 will be created automaticly to make the drive compatible with "Xplorer360" and XBOX360 Console. In manual-mode you have to type 'HDDHACKR C [PORT] A0'.
* Flashing your Western Digital *
Turn off your PC and connect the Western Digital hard drive. Boot to MS-DOS again.
Type 'HDDHACKR F [PORT] A0 HDDSS.BIN UNDO.BIN' from the same path you have saved the HDDSS.BIN file to. This will create an 'UNDO.BIN' file that you need if you want to undo the hack and flash your firmware back to the original state.
* Restoring your WD to original state *
If you don't want to use your modded WD HDD in your XBOX360 anymore and you want to flash it back to its original size/state, then you can now do so. Boot to MS-DOS and run 'HDDHACKR R [PORT] A0 UNDO.BIN'. This will use the UNDO.BIN file you created before to restore the drive to its original state.
* Vendor Intro Power Brute for misflashed drives *
To enter the recovery mode you should boot to MS-DOS, connect your hard drive to PC and type 'HDDHACKR R [PORT] A0 UNDO.BIN'. If the hard drive is misflashed you will be prompted with:
"Western Digital Vendor Intro failed on port [PORT]"
"Do you want to resend the command until the drive responds (Y/N)?"
Press YES, disconnect the hard drive from power and connect it again.
You should get Status 0x50 and the drive will be reflashed.
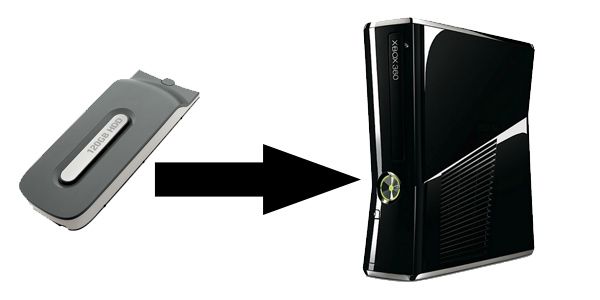
If you plan on using your hard drive from your old Xbox 360, you won't need to do any formatting to get it to work as its already formatted but you'll need tools to help you dismantle the old hard drive case. I suggest picking up the Shinobii Tool Kit to make things easier. This has all the tools needed and more, which can be used for other electronic devices. Below are instructions on how to dismantle your old Xbox 360 hard drive: (performing this will void your old Xbox 360's hard drive warranty)
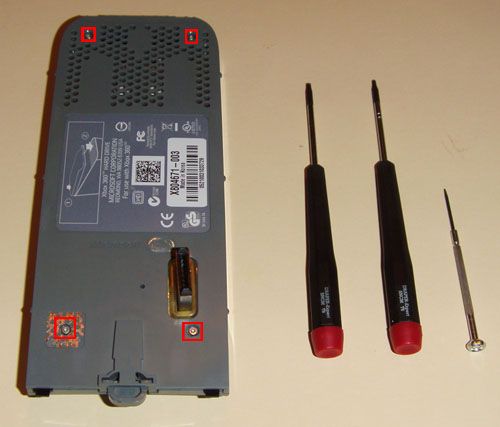
Opening the Xbox 360 drive enclosure
To open your Xbox 360 hard drive, you will need a Torx T6 screwdriver. Remove the 3 screws and the 4th screw is behind the hologram sticker. You can either poke through the sticker or remove the sticker. Either one of these will void the warranty on the hard drive:
You can now remove the top cover. Next, you have to remove 4 screws from the metal plate. These require a Torx T10 screwdriver:
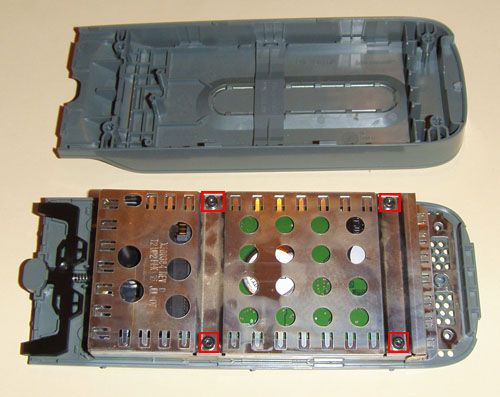
You can now remove the metal plate. All that is left is to slide the hard drive out.
To insert the new Xbox 360 Slim HDD Case, simple remove the bottom grille plate from the bottom of the Xbox 360. Pulling this plate back will reveal the hard drive bay. Simply insert the new hard drive case into the bay and push it in until you hear a click. This click will let you know that the HDD is in place and connected to the Xbox 360 Slim. Just make sure that he ribbon is facing out. This allows you to grab and pull out the hard drive when you need to.
Once you format a new hard drive using HDDHackr or removed the hard drive from your old Xbox 360 hard drive, you can insert it into the Xbox 360 Slim HDD case. Simply place the HDD inside the case and snap the cover to the case. Since there are no screws to hold the HDD in place, you can get some double sided mounting tape and cut off two small rectangle pieces and place it on the inside of the case to prevent the HDD from moving. Once the cover is snapped on, its fit snuggly and will not easily come off. When inserting the hard drive into the Xbox 360 Slim, the connector goes in first. Once inserted, push down on the hard drive until you here it click. The tab on the hard drive shell case allows you to easily remove the hard drive when needed.
Conclusion : Overall, the Xbox 360 Slim Hard Drive Case Shell is a must have for those planning to take their old Xbox 360 hard drive or their own and placing it into the Xbox 360 Slim. The case gives support for the HDD and fits perfectly into the Xbox 360 Slim. Even if you purchase a pre-installed aftermarket 250GB Xbox 360 Slim HDD, you're only paying $57. That's more than half the price of what Microsoft would charge you for their Official 250GB hard drive.
What I have noticed in our YouTube video was that a lot of people have asked if this would void your warranty and would you get banned. Lets start with the warranty concern. You will NOT void your warranty on your Xbox 360 Slim. If your Xbox 360 Slim fails and needs to be sent to MS to be repaired, simply remove the HDD. Nothing is permanent and MS won't know it was installed. The only warranty you will void however is your old Xbox 360 hard drive. There is a screw behind the warranty sticker so this would need to be removed or punctured to get to it. If you're going to use your old hard drive, you probably don't care by now as the warranty has probably expired.
As for being banned, you will NOT get banned. There is no hacking or cheating involved and no change the Xbox 360 firmware/dashboard. You're simply increasing storage space. The concept is the same as buying Microsoft's own 250GB hard drive just that you're using own you and more work is required. With the case of the old Xbox 360 hard drive, just think of it as putting it in a new case. So do not be afraid.
Images via commentsby Published on February 2nd, 2011 00:46- Categories:
- Xbox 360 News,
- DCEmu Reviews

XCM White 360 HDMI 1080i Cable
Manufacturer: XCM
Site: Buy from Goldenshop
Price: $65.00
Overview : Another exclusive product from XCM, this cable will let you connect your non HDMI Xbox 360 with an HDMI cable to a HDTV or DVI monitor with a high resolution signal of 1080i thanks to XCM HDMI 1080i Cable for Xbox 360 without HDMI Port.
You can now enjoy the same resolutions than people with Xbox 360 Elite!
Features :
- High quality 3rd party product.
- Converts the analog signal to digital signal and acts as a HDMI digital signal solution for HDMI-less Xbox 360's.
- Comes extra RCA sockets and optical socket for connection to speakers.
- Comes with a HDMI to DVI adapter - can be used on a PC monitor as well as a HDTV.
Quality/Usability : Recently within the past year, Microsoft has started to include HDMI port to all Xbox 360 consoles. Unfortunately, for those early adopters playing on a HD TV/monitor are left with a HDMI-less Xbox 360 unless they went out and bought a new Xbox 360 with HDMI port on it.
But those who's original white Xbox 360 didnt succumb to the RRoD (Red Ring of Death) and/or still have the original white Xbox 360, can now have the same ability to play in HD just like all new owners of the Xbox 360. XCM has filled that void by releasing a White 360 HDMI 1080i Cable. Included is HDMI cable, HDMI to DVI adapter, and XCM's nifty device that converts signal to HD.
Setup is fairly easy (video below). With the HDMI 1080i Cable, you'll get up to 1080i output from your original white Xbox 360. The same as if you were to get a Xbox 360 Premium, Elite or Halo 3 edition. To get this setup, simply connect the device to the back of the Xbox 360. Take the HDMI cable and connect it to the other end of the device and the other end of the cable to your monitor/HD TV. If you dont have a HDMI port on your monitor, you can use the included HDMI to DVI adapter.
Connect via HDMI
Just remember that HDMI supports digital audio through the cable but DVI does not, so you'll need to connect speakers. The device has two RCA audio jacks (red/yellow) for those who are using DVI. If you have speakers that also has RCA audio jacks, simply plug it into the HDMI device.
Once all cables are connected, simply turn on the Xbox 360 and you will now have an original white Xbox 360 capable of running in HD via HDMI/DVI. The HDMI device also has a power indicator to let you know that the product is turned on and in use. From what I have tested, the visual quality is the same using this adapter and connecting the Xbox 360 directly to the HDTV via HDMI. I didnt notice any loss of quality.
Conclusion : Overall, the XCM White 360 HDMI 1080i Cable is the best solution for those wanting to play in HD on their original white HDMI-less Xbox 360. The only thing I dont like about the White 360 HDMI 1080i Cable is the size of the device. Its approximately 5" wide. Thats not including the cable. But those who still have the original Xbox 360 and want to play in HD via HDMI should consider looking into this device.
If you're running out of HDMI ports, consider looking into Talismoon HDMI Switcher with Remote, XCM HDMI/DVI Crossover Selector for additional HDMI/DVI ports.
Images via comments ...by Published on February 2nd, 2011 00:46- Categories:
- Xbox 360 News,
- DCEmu Reviews

XCM XFPS Sniper Plus
Manufacturer: XCM
Site: Buy from Play-Asia
Price: $89.90
Overview : Let's be honest, first person shooters just weren't pioneered to be played on a standard Xbox 360 controller. Ask any First-Person-Shooter (FPS) fan out there what method of control they find optimal, and you will find the resounding majority shout out mouse and keyboard! The days of getting your fingers in a twist while trying to grapple with those unfriendly analog sticks are over. The XFPS 3.0 Sniper Plus is here to help Xbox 360 gamers with the ultimate way to play FPS titles with a Mouse & Keyboard! The XFPS 3.0 Sniper Plus is the latest edition of this amazing device!
The XFPS 3.0 Sniper Plus is an innovative keyboard and mouse adapter for the Xbox 360 which allows you to have an unrivalled First Person Shooter (FPS) experience for the next-generation gaming console. Not only is the XFPS 3.0 Sniper Plus compatible with all standard PS/2 input devices but also modern USB keyboards and mice. The XFPS 3.0 Sniper Plus even makes traditional Playstation 2 Dual Shock 2 controllers compatible with the Xbox 360, as well as a multitude of other peripherals. This amazing device even manages to bring auto-fire to the Xbox 360.
Features :
- Compatible with 95% of the PS/2 or USB keyboard and mouse combinations
- Instant plug and play technology
- Ideal for use with all First Person Shooter titles such as Call of Duty and Halo series and more!
- Extremely durable Yellow coloured shell
- Brings auto-fire functionality to the Xbox 360
- Allows gamers to use Playstation 2 Dual-Shock 2 controllers on the Xbox 360
- Allows remapping of any Xbox 360 controller key (include both analog sticks) to any key of the keyboard.
- Compatible with the newest version of the Official Xbox 360 wired controllers.
- XFPS Sniper v3.0 Plus is the latest version of the XFPS Keyboard and Mouse Adapter!
Compatible with these PS2 products:
As already touched upon, the XFPS 3.0 Sniper Plus is compatible with Playstation 2 controllers but also the following Playstation 2 peripherals :
- PS2 Light Guns
- PS2 Racing Wheels
- PS2 Dancing mats
- PS2 Guitars
To configure your keyboard to act as an analog button for movement, simply set the switch from DEFAULT to SET, plug in your wired Xbox 360 controller and unplug your mouse. Press "P" to program. A red LED will light up. Move the left analog stick either left, right, up or down and press the key on the keyboard you want it as. Repeat until you have done this for all 4 directions. For the right analog stick, perform the same procedure.
To configure your mouse as the trigger, simply unplug your keyboard and connect the mouse. Like the keyboard, press "P" to program. Press the right trigger and than press the left mouse click. Now your mouse is configured to be the trigger. You can use the keyboard as your trigger as well. You can configure it however you like and which ever is more comfortable for your gaming style.
To set up rapid fire function, flip the switch, RT for Right Trigger and turbo is automatically enabled. So when you pull the trigger on the controller or press the left mouse click, your gun will fire rapidly.
The same mouse and keyboards will work on the Plus version. As mentioned, nothing has really changed except for color and minor tweaks.
Conclusion : Overall, the XCM XFPS Sniper Plus works like it should but do we really need all these different revisions? They should just make one product and have it be updated via firmware or something unless its a whole new redesign/product. I think XCM might be running out of colors of the rainbow. Clear colored shell would of been a lot nicer looking like the XCM XFPS RateUp for the PlayStation 3. If you already have the original Sniper version, stick with it. Not worth getting this unless you're rich and want the latest product.
Images via comments ...by Published on February 2nd, 2011 00:46- Categories:
- Xbox 360 News,
- DCEmu Reviews

DecalGirl Xbox 360 HD DVD Skin
Manufacturer: DecalGirl
Site: Buy from DecalGirl
Price: $14.99
Overview : Make your Xbox 360 HD-DVD player look as good as the movies it plays with a new full-color skin kit from DecalGirl. This three-piece kit covers the bland ivory panels with a vibrant DecalGirl skin design, digitally printed at art-quality resolution on the best materials money can buy. As with all of our full-color skins, the glossy finish won't fade, smudge or smear, and there's no residue left behind when you decide to change the skin.
Quality/Usability : With the HD DVD player add-on, there are no replacement cases for it for those looking to change the look or style. There have been people who have dyed the egg-white color casing of the HD DVD player to match their Xbox 360 Elite. Unfortunately, some people dont know how or are too afraid to mess it up. What is the next option? Skins. The DecalGirl Xbox 360 HD DVD Skin is made from vinyl. There are some out there on the market that gives you different designs but the quality are either limited to a certain amount, horrible or the quality is poorly made. Price is cheap but what you pay, is what you get.
With DecalGirl skins, you get the best of all worlds. Not only do you have a lot of selections to choose from but the quality is the best on the market and the price is very reasonable.
The Xbox 360 HD DVD Skin has three skins; top, bottom and side. All skins that you order from DecalGirl are all pre-cut to fit your desired device. Unlike the DecalGirl Nintendo DS Skin, you wont need a pen or sharp object to detach the skins from little pieces. Since the pieces are all huge skins, handling and applying the skins are very very easy.
To apply, I simply started by matching the corners of the skin to the corner of the HD DVD player for both the top and bottom. Once matched, I did it to the other 2 corners and left the fourth corner alone. There are a couple of ways to smooth out the skin. You can use a credit card or something similar, your fingers or a rag. I personally use my fingers first to set the skin in place and use a rag to flatten and smooth the skin out. I dont use a card because it has sharp edges/corners and if there is a small hard particle that got trapped underneath the skin, it can ruin the skin.
The side skin was a little different. It was cut and shaped differently since it curves. I had to line one side before before smoothing out the rest. If not lined up first, the skin would not fit perfectly on the player.
The only problem I had was the side skin (the smallest piece). The reason why was because it was actually bigger than the HD DVD itself. I had to take an x-acto knife to mark off where the excess skin is. Once marked off or kind of stenciled, I took a scissor and cut it off. Once cut off, the skin fit perfectly. DecalGirl might need to check their template. But its nothing major.
Conclusion : Overall, the DecalGirl Xbox 360 HD DVD Skin fits perfectly and looks great. Applying the skin was very easy and quick. As mentioned, the only minor problem was the slightly bigger side skin which was taken care of by simply cutting the excess skin off. Removing of the skin will not leave any sticky residue which is a big factor when applying anything to your devices. So if you dont like it or messed up, you can reapply it.
Images via comments ...by Published on February 2nd, 2011 00:46- Categories:
- Xbox 360 News,
- DCEmu Reviews
Xbox 360 System Back Pack XB3400
Manufacturer: ALS Industries
Site:
Price: $89.95
Overview : The System Back Pack bag is a official Xbox 360 licensed product. It can hold your Xbox 360, up to 4 controllers, the power pack, AV cable and the AC cord.
Features :
- Holds Xbox 360 Console, Up to 4 Controllers, Power Pack, AV Cables and Power Cord.
- Main Pocket Holds and protects Xbox 360 Entertainment System with Bottom Section for Power Supply.
- Middle Pocket Holds up to 4 Controllers and Front Pocket for Games, Headset and Other Accessories.
- Convenient Mesh Side Pockets for Ethernet Cable and Component HD AV Cable.
- Comfortable Carrying Handle.
- Adjustable Padded Sraps.
- Fully Padded Bag for Maximum protection.
This product is manufactured under license from Microsoft Corporation.
Quality/Usability : We all know that the Xbox 360 isnt the lightest system nor the smallest. Since I'm the gamer in the family and pretty much the entertainer amongst the kids, I tend to bring my consoles to family gatherings to keep everyone entertained whether it be PSP, DS, Wii, PS3 and/or Xbox 360. Its not easy having to carry all those systems plus cables, controllers and games. Thats where the Xbox 360 System Back Pack XB3400 comes in play.
The XB3400 is a back pack so you can easily wear it and not feel uncomfortable while still leaving both your hands free to carry other things. The XB3400 has a flap with a clip at the end of it to keep it closed. When you flip open a flap, you are given three compartments and two elastic mesh pockets on the side.
The two elastic mesh pockets can hold your cables whether they are ethernet, AV, HDMI or the other half of the power adapter.
Lets start with the biggest compartment, the system area. At the very bottom, this is where you will place the brick they call the power supply. Near the bottom is a flap attached via velcro. This is actually a divider between the system and the power supply. When placing the system in, you may need to stick your hand in so that the system doesnt get stuck to the top of the velcro to prevent it from going down further.
The next big pocket accomodates up to four controllers. You can also use it to hold games, other accessories or mix and match.
The smaller compartment also allows you to hold more games or stuff you were unable to hold in the middle pocket.
Conclusion : Overall, the Xbox 360 System Back Pack XB3400 fits everything you would need and more. The bag has a nice thick backing but it would of been nice if the shoulder straps were a little thicker considering the weight of the bag will be all on your shoulder when worn. Downside? The price. $90 for a bag? Its an officially licensed product but I still dont know if this would justify a $90 purchase. This case can be bought from Amazon. Luckily, ConsoleShop offers a price guarantee where they will beat any online price by 5%.
Images via comments ...by Published on February 2nd, 2011 00:46- Categories:
- Xbox 360 News,
- DCEmu Reviews
XCM XFPS 360
Manufacturer: XCM
Site: Buy from Divineo US / Buy from Divineo China
Price: $59.99
Overview : The XFPS 360 is an innovative keyboard and mouse adapter for the Xbox 360 which begins an unrivalled First Person Shooter (FPS) experience to the next-generation gaming console. Not only is the XFPS 360 compatible with all standard PS/2 input devices but also modern USB keyboards and mice. But wait, there's more! The XFPS 360 even makes traditional PS2 DualShock2 controllers compatible on the Xbox 360, as well as a plethora of peripherals. This exquiste device even manages to bring auto fire functionality to the Xbox 360, now that tops off what promises to be the must have peripheral for years to come!
Features :
- Compatible with most PS/2 or USB keyboard and mouse combinations, those expensive FPS set-ups have not gone to waste!
- Instant plug and play technology
- Ideal for use with all FPS titles such as Call of Duty and Halo series
- Highly durable modern black coloured shell
- Brings all new auto fire functionality to the Xbox 360
- Allows gamers to use PS2s Dual-Shock 2 controller on the Xbox 360
- Enjoy enhanced performance on titles such as Pro Evolution Soccer 6, which originally debuted on the Playstation.
XFPS 360 is also compatible with:
- PS 2 Light Gun
- PS 2 Racing Wheel - The XBOX 360 steering controller is very expensive, but you can use the PS 2 steering wheel for it now
- PS 2 Dancing mat
- PS 2 Guitar
etc.
Quality/Usability : The XFPS 360 is fairly small shelled in a black hard plastic. On the front, there are two USB ports, two PS/2 ports for older mouses and keyboards that dont use USB and the center is where you plug your PlayStation peripherals into.
Setting it up is fairly easy. Take the cord that is attached to the XFPS and plug it into the USB port on the Xbox360. The XFPS requires a wired controller connected in one of the USB ports on the adapter along with mouse and keyboard in order for the adapter to be recognized. Once the Xbox360 recognizes the XFPS, you can remove the wired controller as it is no longer needed unless you are going to re-map the mouse/keyboard buttons. The cable on the adapter is not long and does not have a quick disconnect.
Once you're all connected, it should be smooth sailing. Using the mouse and keyboard is like using a PC. Its easy. If you're playing a first person shooter, its just a matter of point and click. Unfortunately, the XFPS sometimes does not recognize small movements but in some games, you can adjust the sensitivity but even sometimes that doesnt work and the mouse can be finicky especially during those crucial moments when you're going for that headshot! So its pretty much a hit or miss. There were no problems with the use of the keyboard.
What's great about the XFPS 360 is that it is programmable which allows you to re-map buttons to your likings. To re-map the buttons you simply set the switch to SET, push the "P" button, select the buttons on the wired controller you wish to re-map and select the keyboard/mouse button you with to re-assign. An example would be using the left mouse button to shoot: press the "P" button, pull the right trigger on your controller, and click the left mouse button. Now, your left mouse button will do the shooting.
Plugging a PlayStation controller is simple as well. Once it is plugged it, the PlayStation controller mimics the Xbox360 controller without the function of the jewel.
Conclusion : Overall, the XFPS 360 is great for gamers who are use to PC FPS games. The downsides of the adapter is the mouse aiming can be screwy especially during those crucial gameplay moments, MUST need a wired controller in order for the Xbox360 to recognize the adapter and lack of support for headset. Although this may improve gameplay some look down on it. Why? While someone is using a controller to play, someone on the other ends is using a point and click which to some is considered cheating. For the price tag of $80 , its a bit steep if you're a hardcore FPS gamer or on play on a team.
Images via comments ...by Published on February 2nd, 2011 00:46- Categories:
- Xbox 360 News,
- DCEmu Reviews
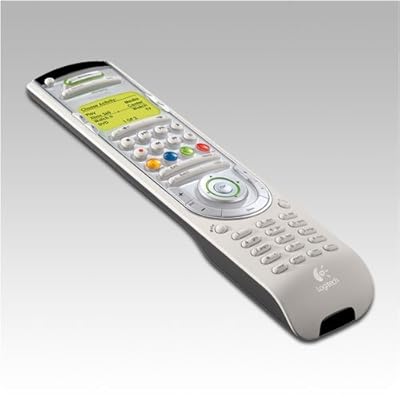
Logitech Harmony Advanced Universal Remote for Xbox 360
Manufacturer: Logitech
Site: Buy from Amazon / local electronics store
Price: $79.99-99.99
Overview : The Harmony 360 Remote Control for Xbox 360 is teh sure way to get more enjoyment out of your Xbox 360 and home entertainment system, without having to juggle a dozen remotes. Just connect the Harmony Remote to your computer and the Web wizard walks you step-by-step through a simple set up. It shows you how to set it up so that it's controlling your TV, DVD or clicking into game mode. Even the most complex home entertainment system is easy to control -- and best of all, you can do it without all the hassle of writing macros.
Features :
- Just connect your remote to your computer and answer a few questions about how you currently use your audio/video and entertainment components. Logitech's patented Smart State Technology does the rest.
- Gives you full control of up to 12 devices -- everything from HDTVs to PVRs, DVD players to VCRs, and game consoles to lighting controls
- Use the special Xbox buttons - The Harmony 360 includes convenient Y, X, A, and B buttons and media center controls for your Xbox gaming
Quality/Usability : Having a Samsung HDTV, Xbox 360, HD DVD add-on, satellite/cable box, VCR and sound system, each device comes with their own remote control. Having to touch and turn on/off each one is troublesome not to mention having batteries for each one. Lose one remote or break and and you're screwed in the "not having to get up" department.
The Logitech Harmony Advanced Universal Remote for Xbox 360 is just that...a universal remote for all your home electronic devices. I was fortunate enough to pick up two of these for the price of $36.97 at a local Sears but is available at any electronic retail store but for $99.99. How I get it so cheap considering it retails for $99.99? Sears had a clearance on game items and I snatched them up (i.e. $14.97 for 12 month Xbox Live subscription!). Does the remote look familiar? It should because the look and style is exactly like the Harmony 550 with the exception of color and the 360 version has the four Xbox buttons (Y, X, A, B). How well is this all-in-one remote? Lets find out....
The Harmony remote includes everything you would need to get started once you open the package. There are four AAA batteries already inserted into the remote (for those interested consumers to try out) and four fresh batteries to swap out before actually using the remote.
Unlike some universal remotes, you'll need a computer with internet as the setup process takes place on the internet. It works on a PC (running Windows 98, 2000, Me, or XP) or a Mac (OS X 10.2 or later) with an open USB port. Inside the package, you'll find the following items:
- Logitech Harmony Advanced Universal Remote for Xbox 360
- USB cable
- Installation CD
- Installation Guide
- 4 AAA Batteries
Before starting, its best that you write down all the devices you want to program onto the remote (you can use scrap paper or use the included worksheet provided). Be sure to write the the device type (cable box, TV, speakers, DVD players, Xbox 360, etc.), manufacturer and model number.
Installation and setup of the remote consists of only 5 steps but those 5 steps will require a bit of your time to configure and setup your remote to your likings. Install the four fresh batteries and reset the remote by simultaneously pressing the Y, X, B, A button on the remote.
Whats great about the remote is that Logitech has included more than 80,000 different devices from 2,500 manufacturers. So more than likely, your device is covered. If not, you'll be able to configure the Harmony remote by using the learning feature. What this means is that you can teach the Harmony Remote IR commands. Of course, you'll need the original remote as this is where the Harmony will be learning and syncing from.
To teach commands to the remote for your origional device's remote:
- Click Devices your home page.
- Select the appropriate device.
- Click Learn infrared commands.
- Select the commands you want to teach the device.
Note: To teach a command that is not listed, in the Learn a New Command box enter the name of the command you would like to teach and click Learn New Command. - Click the Learn Selected Commands button and follow the instructions to teach the commands.
Note: "Your original remote" will appear beside the command on the infrared language page, indicating the command has been learned correctly. - When you have finished teaching the commands, click Done to return to your home page.
- Update the remote.
Once you have written down all your devices, insert the provided installation CD into your computer or you can download the latest file from Logitech's website. As mentioned before, this will work on box PC and Mac. Installation is fairly short and takes a few minutes. Once completed, the Remote Software automatically launches and you are prompted to connect the USB cable to your PC and Harmony Remote.
...by Published on February 2nd, 2011 00:46- Categories:
- Xbox 360 News,
- DCEmu Reviews

Hori Arcade Fighting Stick EX2
Manufacturer: Hori
Site: Buy from GoldenShop
Price: $79.00
Overview : Now you have a complete fighting chance on your XBOX360. The Hori Arcade Fighting Stick for your XBOX360 is the premier fighting game fans' stick of choice. Stick features authentic Japanese style convex button layout & solid state mechanics.
Features :
- Officially licensed for Xbox 360
- Same style as arcade design
- Recommended for fighting and classic arcade games that are available on Xbox Live
- Comfortable button layout: The lever and buttons are designed and placed on same layout as the arcade for maximum comfort.
- Expansion port included: The port allows you to attach your headset to this unit!
Quality/Usability : Let me start off by saying that all the Xbox 360 Hori Arcade Fighting Stick EX2's are the same with the only difference being the artwork whether it be plain EX2, Soul Calibur, Dead or Alive or Virtua Fighter.
The Hori Arcade Fighting Stick EX2 does not feel heavy as it weighs a couple of pounds and is reasonably sized so that it will fit comfortably on your lap (measures 11" (W) x 8" (L) x 1½" (H)). The casing of the EX2 is made of white plastic. On the left, you have your joystick. To the right, you have your standard buttons such as A, B, X, Y as well as LT and RT. The top contains the LB, SELECT, Xbox 360 Guide with indicators, START and RB. Towards the bottom is an expansion port to connect your communication headset. The USB cord on the stick is fairly long (approximately 5-6 feet long) that you don't have to sit so close and it features a quick disconnect cord in case someone trips over it, it wont knock your stick or your console over.
Connecting the EX2 is simply plug and play. Plug the USB cord to the front of the Xbox360 and press the Xbox Guide to activate and power the stick. The EX2 works with all games but with the layout of buttons, it may be hard to play with. With fighting games, you would be able to configure the buttons to your liking while majority of games, you can't. So this should be used with fighting games or XBLA games.
While playing Street Fighter IV with the EX2, the controls were responsive. I'm not that big on fighting games but I play it once in a while. I felt that the EX2 pulled off majority of the moves that I wanted to do. I also tend to be a button masher and the EX2 withstood my bashings. The joystick clicked at every location I moved it to. However, the buttons did not click like the arcades. It had a mushy feel to it unlike the arcade as it is missing microswitches. The 6 buttons also have a domed shape top to it. It would have been better if the buttons were concave. This would of made the experience better.
The parts used on the EX2 are stock and good but not as great as Sanwa or HAPP parts. These parts are used in arcades and in tournaments. If you're skilled and brave enough, you can mod the EX2 with these parts but I heard the EX2 is difficult to mod (link on how to mod below).
Conclusion : Overall, the Hori Arcade Fighting Stick EX2 is a sturdy arcade stick. If you're a hardcore gamer who's into fighting games, you might want to stay away from this. Either get a better high end fighting stick or get a custom one with better parts. For those who are novice or rarely play fighting games like myself, may want to look into this. However, for something you'll probably rarely use, $80 is a bit pricey. But if you can find this cheaper, it worth taking a look. Do know that this will not replace your regular controller.
If you're really brave or skilled with hacking accessories or electronics, you can mod and upgrade your EX2 with Sanwa or HAPP parts by following this guide, here is another or how about this one. There are probably more guides or tutorials by searching Google.
Images via comments ...by Published on February 2nd, 2011 00:46- Categories:
- Xbox 360 News,
- DCEmu Reviews

XCM White 360 HDMI 1080p Cable
Manufacturer: XCM
Site: Buy from Play-Asia / Buy from Divineo China
Price: $75.00-$109.95
Overview : This cable converts the analog singal to a digital signal and acts as a HDMI digital signal solution for HDMI-less Xbox 360 consoles, while also sporting an extra RCA socket and digital optical audio output socket for connection to your audio source. The cable also comes with an HDMI to DVI adapter so it can be used on a PC as well as HDTV.
Features :
- Easy connection - Plug & Play!
- Can change the analog signal from the older model Xbox 360 consoles into a digital signal, effectively decreasing signal loss, and upgrades the picture quality and hardware performance.
- Auto identifies the consoles signal, no need for manual settings.
- Built in optical and analog sound outputs, adaptable to various multimedia devices.
- High quality cables. Uses gold plated plugs for superior contacts, guaranteed picture quality and stability.
- Does not require an external power supply.
- Includes Super Thick High Quality Braided & Shielded HDMI cable ($50-60 Value) - No additional HDMI cable needed! (Comparable to Monster Cable HDMI Cables selling for $99+)
- Also includes HDMI to DVI Adapter.
- Automatically detects and plays any Xbox 360 Game or DVD Movie disc.
Quality/Usability : The XCM White 360 HDMI 1080p Cable is an upgrade to its predecessor, XCM White 360 HDMI 1080i Cable. Instead of only being able to display 1080i, it can now display 1080p for Xbox 360's without HDMI port built in (1st Generation).
Design and setup is exactly the same as its previous version. Included is HDMI cable, HDMI to DVI adapter, and XCM's nifty device that converts signal to HD.
Setup is fairly easy (video below). With the HDMI 1080p Cable, you'll get up to 1080p output from your original white Xbox 360. The same as if you were to get a Xbox 360 Premium, Elite or Halo 3 edition. To get this setup, simply connect the device to the back of the Xbox 360. Take the HDMI cable and connect it to the other end of the device and the other end of the cable to your monitor/HD TV. If you dont have a HDMI port on your monitor, you can use the included HDMI to DVI adapter.
Just remember that HDMI supports digital audio through the cable but DVI does not, so you'll need to connect speakers. The device has two RCA audio jacks (red/yellow) for those who are using DVI. If you have speakers that also has RCA audio jacks, simply plug it into the HDMI device.
Once all cables are connected, simply turn on the Xbox 360 and you will now have an original white Xbox 360 capable of running in HD via HDMI/DVI. The HDMI device also has a power indicator to let you know that the product is turned on and in use. From what I have tested, the visual quality is the same using this adapter and connecting the Xbox 360 directly to the HDTV via HDMI. Like the 1080i version, I didnt notice any loss of quality.
Conclusion : Overall, the XCM White 360 HDMI 1080p Cable works just like the 1080i version. Only difference between the two is color and instead of 1080i, it outputs to 1080p. This is by far the best solution for those wanting to play in HD on their original white HDMI-less Xbox 360. MadCatz has their own version that is sold at electronics stores like Best Buy but it costs $99.99 and is smaller. XCM used the same design. I still wish they made a smaller version of it.
If you're running out of HDMI ports, consider looking into Talismoon HDMI Switcher with Remote, XCM HDMI/DVI Crossover Selector for additional HDMI/DVI ports.
Images via comments ...by Published on February 2nd, 2011 00:46- Categories:
- Xbox 360 News,
- DCEmu Reviews
Nyko Intercooler 360
Manufacturer: Nyko
Site: Buy from Nyko / Buy from ConsoleSource
Price: $19.99
Overview : Reduce the internal operating temperature of the 360 while prolonging the consoles lifespan. The Intercooler 360 is a snap on cooling attachment that easily connects to the Xbox 360 to significantly reduce the internal heat of the console. The Intercooler 360 provides increased air flow throughout the 360 which allows the internal circuitry to perform at cooler temperatures and last longer. No internal modification of the Xbox 360 is required. A pass through power connection utilizes the existing Xbox 360 power supply negating the need for an extra AC adaptor. The unit also powers on and off automatically with the 360 and the Intercoolers small size will fit in tight spaces like entertainment centers with your 360 displayed in either horizontal or vertical format.
Features :
- Increase air flow and reduces heat throughout the 360 providing extended life and reliability
- Powered by the Xbox 360 console, no extra AC adaptor needed
- Auto or manual power on and off
- Snap on installation means no tools or other modifications are required
- Can be used with the Xbox 360 in vertical or horizontal position
Quality/Usability : The Nyko Intercooler 360 is set out to keep your Xbox 360 cool from overheating and prolong the life of your consoles life. Does it? Read and see what we have to say about it.
The Intercooler 360 has three extra cooling fans that is housed in a plastic housing that matches the 360's color. The Intercooler is snapped onto the back of the Xbox 360's own internal fan to circulate air inside the Xbox 360 which lowers the temperature inside the console. The Intercooler 360 is snapped into the Xbox 360 by using plastic clips that go into the ventilation holes.
The Intercooler 360 has a pass-thru which allows you to plug your power cord into the Intercooler like you would on the console. The Intercooler itself adds about 2 inches to the depth of the Xbox 360 and turns ON and OFF when the console starts and shuts down. Nyko also gave the ability the user the ability to manually turn off the Intercooler with a built-in switch.
With three times the fan power, the Intercooler significantly pushes through more air into the Xbox 360. Simply by placing your hands over the fans, you can feel the air being blown in to the Xbox 360. NYKO claims that there is a ~10 degree difference between the internal temperature with the Intercooler in place versus just the internal fan from the consoles fan. I dont have the ability or the utility to confirm this but we'll just have to take Nyko's word for it.
With three additional cooling fans, you wont notice much noise as the console itself is pretty noisy as it is. You'll be so focused on your game, you wont notice any noise.
There have been some information on the web regarding the Intercooler 360. Some users have stated that the Intercooler has damaged their system or left burn marks on the back of the Xbox 360. Rest assured, there has been no problems. I'm not sure if Nyko has fixed this problem or if it was just a isolated problem and was a defective product for those certain users. But my Xbox 360 has not crapped out on me nor left any burn marks on my system.
Conclusion : Overall, the Nyko Intercooler 360 is a must own for those who have their console in a tight or want to prolong the life of their console. With a reasonable price to boot, its a great investment rather than having to spend another $400 on a new console or having to deal with the hassle of Microsoft's repair center.
Images via comments ...- Search DCEmu
- Advert 3
 News Categories

- Links of Interest
 Sony Consoles News


- Nintendo Consoles News


- Sega Consoles News


- Apple & Android News
- Xbox Consoles News


- Open Source Consoles News
 DCEmu News Archive
- Advert
- Retro Consoles News


- PC News

- Latest DCEmu News


- DCEmu Network Sites
-
 Menu
Menu  Forum Stats
- What is the DCEmu Homebrew & Gaming Network
Catherine: Full Bodys English translation for the Vita