

 DCEmu Homebrew Emulation & Theme Park News
Xbox 360 News
by Published on February 2nd, 2011 10:29- Categories:
- PS3 News,
- Nintendo DS News,
- PC News,
- Xbox 360 News
Electronic Arts believes one day the game industry will get its Avatar a game that proves once and for all just how successful stereoscopic 3D can be but for now there are more important things.
For EA, they are Internet Protocol television (IPTV), and connectivity between devices.
"My personal view is the larger idea, at least for the present, would be the connected game," COO John Schappert said during an investor conference last night.
"I'm more in the camp that IPTV is a bigger idea for gaming, at least in the near term, than 3D is. It just provides a better social experience and you know that consumers playing with one another is a very positive and powerful motivator."
Streaming services are growing in the games business, with the likes of OnLive and Gaikai making early moves in the market.
David Perry's cloud-based gaming service Gaikai.com launched quietly in November last year with EA's sci-fi role-player Mass Effect 2. "BioWare simply rocks," Perry said at the time. "They've been very supportive as has Electronic Arts. The good news for them is we are getting a surprising amount of people clicking 'BUY' without even making them a special offer."
Another emergent technology that sits above 3D on the videogame priority list, for Schappert, is device connectivity.
"While there's no doubt that our industry will have its Avatar, where 3D is a defining aspect of the game ... I'm mostly interested, with all the mobile devices that are coming out, in how they're being connected to one another and how the same IP is shared over the top," he continued.
"I think that's actually a bigger driver for EA and the industry in the near term."
Two companies that are sure to disagree with Schappert are Sony, which has invested millions in 3D gaming with the PlayStation 3 and its 3D-enabled TVs, and Nintendo, which is preparing the glasses-free 3DS for launch next month.
http://www.eurogamer.net/articles/20...t-their-avatar ...by Published on February 2nd, 2011 00:47- Categories:
- PC News,
- Xbox 360 News,
- DCEmu Reviews
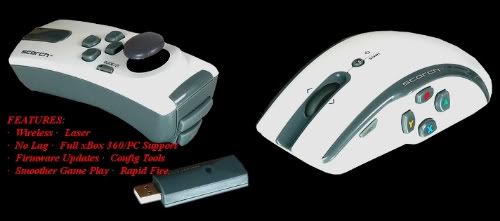
Bannco xScorch Scorch 360 PC
Manufacturer: Bannco
Site: Buy from Play-Asia / Buy from Divineo US / Buy from Divineo China / Buy from Divineo France / Buy from Amazon / Buy from Bannco Authorized Dealers
Price: $79.99
Overview : The Scorch controller is the most advanced universal cross-platform gaming tool for PC and Xbox 360. Scorch is compatible with all PC and 360 games. Use the mouse for targeting prey while moving with the left hand grip for full motion control. Between the Mouse and Grip, Scorch contains all the normal Xbox 360 controller buttons making it ideal for that first person PC shooter game style youre used to. Get the PC experience on the console or play PC games on a TV without a keyboard.
Programmable, digital sniper buttons and upgradeable firmware provide unprecedented levels of accuracy and customization. Scorch is also a full featured wireless PC gaming WASD controller.
The ultra-high resolution laser mouse and pistol grip is the best game controller in the world.
Note: You will need a wired Xbox 360 controller to first initiate Scorch on the 360. After initiated, you use the Mouse and Grip as a full featured wireless game controller.
Note: Wireless communicator is suggested.
Features:
- Officially licensed product.
- High End 2.4G wireless laser mouse controller combo set
- Cross-platform with full Xbox360 and PC game support.
- Adjustable sensitivity.
- Designed for high precision and speed.
Quality/Usability : XCM is known for their XFPS line which allows you to use a keyboard and mouse combination for speed and accuracy as you would find when playing PC first person shooters. Although majority of gamers would consider the Xbox 360 as the ideal controller when playing first person shooter, some may not. Especially PC gamers. The Scorch (sometimes also called xScorch) has a bit of both mouse, keyboard and controller all mashed into one, combining a wireless mouse with a wireless nunchuck like controller called a WASD grip. Included in the packaging along with the wireless controllers is a USB dongle, short USB to mini USB cable, quick start card (on a piece of paper) and extra pads for the bottom of the mouse. No instruction manual or software disc is included. The quick start card is very vague and did not give a lot of information. But for a more detailed manual, visit here. If you want more information on setting up and other information, visit Bannco's website.
The quality of the controllers are actually pretty good. The casings have a solid feel to them. The buttons feel good, they click and are laid out in a place where its comfortable and easy to reach. Both the grip and mouse require 1x AA battery each. So that means the mouse uses 1 AA battery and the grip uses 1 AA battery. On the mouse, the expected right (RB) and left (RT) mouse buttons, 4-way depressable scroll wheel, a power/start button, the familiar A, B, X and Y buttons on the left side where you thumb would rest and a "F" button above where your thumb rests. The "F" button acts as a function where you would hold down the "F" button and scroll the wheel mouse up or down to increase or decrease sensitivity, respectively and to activate rapid fire. The WASD grip is also decked out with buttons. It has the 4 directional buttons in the middle of the grip, analog joystick, power/guide button, back button and upper (LB) and lower (LT) trigger buttons. Unfortunately, you will not be able to power on the Xbox 360 with the Scorch 360. If the mouse and grip has been inactive for 8 mins, it will automatically shut off so it does not drain your battery. If the LEDs on the grip or mouse flash fast, this indicates low battery and that it would need to be replaced.
To setup the Scorch 360 on your Xbox 360, plug your wired Xbox 360 controller into the short USB to mini USB cable. Plug the mini USB cable into the Scorch USB Dongle and than plug the dongle into one of the front USB ports on the Xbox 360. Press the power button on the top of the Mouse and press the Guide button on the Grip to power up.
Pressing the Mouse wheel down acts as your Right Analog Stick Down. If you press and hold the F button and roll the wheel forward, you increase the sensitivity. To decrease sensitivity, press and hold the F button and roll the wheel backward. Note that there are 20 sensitivity adjustments when on the Xbox 360. To turn on or off the mouse wheel features - press and hold mouse F and press mouse wheel down. You can also use the 4-way directional wheel mouse for quick view to the left, right, up and down. To enable or disable rapid fire, press and hold the F button then press RT (Left Click). You can adjust the shot repetition in the xScorch Setup Utility.
In order to remap the buttons you would need a Windows XP/Vista operated PC. Sorry Mac users. The xScorch Setup Utility allows you to remap both Xbox 360 and PC use. The configuration is fairly simple. There are pictures of the buttons and a map of a the controller. To change a button, simply drag the button to the location you want to place it. If you remap the buttons, they are saved onto the mouse and/or grip so you will not have to remap them everytime. But if you're playing a different game and want to remap them to a different setup, you'll need to use the software.
...by Published on February 2nd, 2011 00:47- Categories:
- PS3 News,
- Xbox 360 News,
- DCEmu Reviews

KontrolFreek SpeedFreek Joystick
Manufacturer: KontrolFreek
Site: Buy from KontrolFreek / Buy from Amazon
Price: $9.95 (pack of 2) / $17.50 (pack of 4)
Overview : SpeedFreek allows you to relax your thumb and not worry about sliding off the analog stick. With its unique design, SpeedFreek keeps your thumb on the existing analog stick surface. There is no separation between the natural geometry that you have learned to use. The additional supporting side walls enable quicker and sharper movements, while adding control and precision. As a result, gamers report less stress on their thumbs and quicker lap times.
Quality/Usability : As more and better racing games comes out (both in gameplay and graphics), gamers want that semi-real racing effect. Gamers will pay up to $150 for a steering wheel with force feedback. I have been a big fan of racing games since the days of Rage Racer and Gran Turismo. I got my first steering wheel peripheral when Logitech released the Driving Force Feedback Steering Wheel for Gran Turismo 3 on the PlayStation 2. Luckily, at the time of release, I worked Electronics Boutique and got the steering wheel for free for working on launch and meeting creator of the game, Kazunori Yamauchi.
With the expensive price tag for steering wheel, who can afford them considering games themselves cost $50-60 each. Not to mention, the size of these peripherals and the amount of room they take up. KontrolFreek aims to solve both the cost and size factor by offering SpeedFreek.
SpeedFreek is made of plastic and in the shape of a "U" or a half-pipe. The design is very simple and basic and comes in two colors; white and black. The SpeedFreek attaches to the left analog thumb-stick. There are prongs that attaches to the thumb-stick. The side rails provide extra leverage in racing games. Turning in corners and passing cars was smoother than ever. I no longer had to nudge the joystick in order to make the turn. With a slight move of the thumb-stick, I was able to squeeze into tight spots as opposed to using a regular thumb-stick and bouncing off cars like a pinball machine.
The packaging is eye-catching. As mentioned at the very top, you can purchase a pack of two or four. The SpeedFreek comes packaged in a plastic tube. Inside the plastic tube is the SpeedFreeks are holding instructions rolled up. This also helps the SpeedFreek stay upright and in place.
Conclusion : Overall, the KontrolFreek SpeedFreek Joystick works great for racing games. No more nudging of the thumb-stick. Now I have a can make smooth turns every time and it also improved my lap times. I tried the SpeedFreek with a FPS game such as Gears of War and GRAW2 and although it helped me with my aim and accuracy, it wasnt perfect. Whats great is that it works both on the PS3 and Xbox 360. If you're interested in the FPS version, be sure to order yours here.
Images via comments ...by Published on February 2nd, 2011 00:47- Categories:
- Xbox 360 News,
- DCEmu Reviews
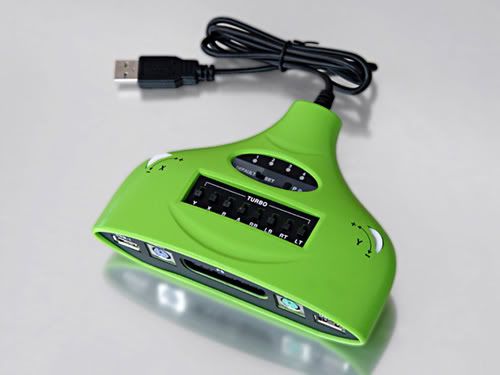
XCM XFPS Sniper
Manufacturer: XCM
Site: Buy from Goldenshop
Price: $79-89.99
Overview : The ultimate way to utilize a keyboard and mouse on your Xbox 360 console just got even better! XCM has lisented to customer feedback and have produced the Sniper Edition XFPS 360 console which allows for total keyboard and mouse control on the Xbox 360, which results in a vastly improved gameplay experience on top selling titles such as Halo 3 and BioShock. The Sniper also supports the use of Playstation controllers on the Xbox 360 and this simply could not have come at a better time with the release of Pro Evolution Soccer 2008. XCM are sure that this latest build is the gateway to perfect keyboard and mouse play and promises greater sensitivity, greater smoothness and greater sniper like precision.
The XFPS 360 is an innovative keyboard and mouse adapter for the Xbox 360 which begins an unrivalled First Person Shooter (FPS) experience to the next-generation gaming console. Not only is the XFPS 360 compatible with all standard PS/2 input devices but also modern USB keyboards and mice. But wait, there's more! The XFPS 360 even makes traditional PS2 DualShock2 controllers compatible on the Xbox 360, as well as a plethora of peripherals. This exquiste device even manages to bring auto fire functionality to the Xbox 360, now that tops off what promises to be the must have peripheral for years to come!
Features :
- Compatible with most PS/2 or USB keyboard and mouse combinations, those expensive FPS set-ups have not gone to waste!
- Instant plug and play technology
- Ideal for use with all FPS titles such as Call of Duty and Halo series
- Highly durable modern black coloured shell
- Brings all new auto fire functionality to the Xbox 360
- Allows gamers to use PS2s Dual-Shock 2 controller on the Xbox 360
- Enjoy enhanced performance on titles such as Pro Evolution Soccer 6, which originally debuted on the Playstation.
XFPS 360 is also compatible with:
- PS 2 Light Gun
- PS 2 Racing Wheel - The XBOX 360 steering controller is very expensive, but you can use the PS 2 steering wheel for it now
- PS 2 Dancing mat
- PS 2 Guitar
etc.
Quality/Usability : As we have already reviewed the original XCM XFPS 360 and XCM XFPS 360 PRO, this review will just talk about the new feature that was added to the 3.0 Sniper Edition.
The 3.0 Sniper Edition is nothing more than just a slight improvement and color change from the XFPS 360 PRO version. Instead of white with black dials, its lime green with white dials. Design is the same exact thing with no change except for what was mentioned above. The only difference is the slight improvement to deadzones on the XFPS.
With the XFPS PRO, I used an adapter called SmartJoy Frag that was made for the PS2. This helped eliminate majority of the deadzones. But to get this adapter to work, you needed to modify it so that it would output enough power to power your keyboard and mouse.
The 3.0 Sniper Edition tried to incorporate both the XFPS PRO and features of the SmartJoy Frag. The Sniper Edition did a good job of removing any deadzones but at a price. Below is a video of the 3.0 Sniper Edition in action.
The same mouses and keyboards that worked on the XCM XFPS 360 PRO will also work on the Sniper Edition. You can view the list of recommended mouses at XCM's site.
Conclusion : Overall, the XFPS 360 3.0 Sniper removed deadzones that were on the XFPS PRO. There was not other improvements as it looked the same like its predecessor just a minor upgrade in color. Different people will have different buying opinions. Some prefer to get rid of the old and buy the latest upgrade while some prefer to keep the old and look for a way to improve or people will just complain. XCM should look into releasing an adapter like the SmartJoy Frag for those who purchased previous versions instead of releasing a slightly upgraded version and charging $80-90. Not only will early adopters lose money if resold but they have to shell out more money for the new upgrade.
Images via comments ...by Published on February 2nd, 2011 00:47- Categories:
- PS3 News,
- Xbox 360 News,
- DCEmu Reviews
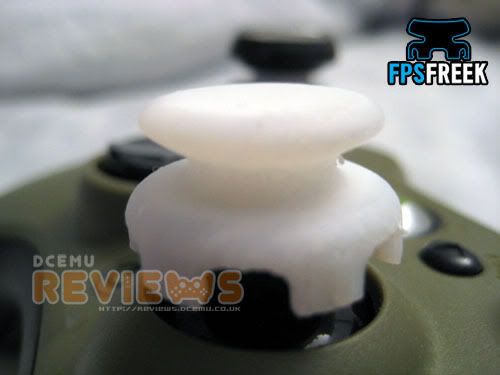
KontrolFreek FPS Freek Joystick (Prototype)
Manufacturer: KontrolFreek
Site: Buy from KontrolFreek / Buy from Amazon
Price: $9.95 (pack of 2) / $17.50 (pack of 4)
For RETAIL version of review, CLICK HERE.
Overview : Similar concept to KontrolFreek's SpeedFreek. Improve your aim, accuracy, control and gaming in First Person Shooter (FPS) games.
Quality/Usability : As mentioned above, FPS Freek is based off of KontrolFreek's SpeedFreek. Only difference is that instead of a "U" (half-pipe) shaped control, its similar to that of the Xbox 360 controllers. But why release a controller attachment that is shaped the same as the first-party controllers? Simply put, accuracy. When you move the analog sticks around, it feels a bit stiff. With the FPS Freek, its feels looser and gives you better precision.
Too attach the FPS Freek add-on, simply place the FPS Freek over the analog stick and push down until its securely in place. This adds another 1/2 inch in height to the sticks which gives you better leverage to the joystick. Even with the added height, pressing on down on the sticks feels comfortable. As mentioned, with the FPS Freek add-on installed, this gives a better accuracy and control over movement of the joystick. Putting the FPS Freek through our gameplay testing (Ghost Recon Advanced Warfighter 2, Gears of War, Rainbox Six: Vegas 2 and Call of Duty 4), we saw that we were able to make minor aiming adjustments that would cause us to move right by our target on a normal controller. Instead of shooting past enemy heads or wasting bullets trying to shoot a running target, we were able to precisely aim our crosshair/sight onto our enemies even while they were running like a chicken with their heads cut off.
I admit, I'm not the best at FPS games as I tend to move my joystick too much just to get the right aim and by the time I get my aim to where I want it, I'm shot dead. With the FPS Freek, I no longer have that problem. My aim has been consistent as well as my kill rate. What I usually average 0-2 kills (if I'm lucky) now gets me 2-5 kills per round/game.
Conclusion : Overall, the KontrolFreek FPS Freek Joystick has great potential and will definitely improve aiming accuracy. The FPS Freeks we received were prototypes and not finalized retail products. It did not have the rubber caps on top of the add-on, so I went out and bought GelTabz ($5 for the pair) to replicate the final product. KontrolFreek will more than likely also offer the FPS Freek in black just like the SpeedFreek. As of this review, if you preorder you get 20% off when it is available.
Images via comments ...by Published on February 2nd, 2011 00:47- Categories:
- PS3 News,
- Xbox 360 News,
- DCEmu Reviews
KontrolFreek FPS Freek Joystick (Retail)
Manufacturer: KontrolFreek
Site: Buy from KontrolFreek / Buy from Amazon
Price: $9.95 (pack of 2) / $17.50 (pack of 4)


Overview : FPS Freek increases your accuracy in first-person shooter games including Halo, Gears of War, Call of Duty and more.
FPS Freek was tested by professional gamers in Halo tournaments and by avid gamers across the country. The results are clear FPS Freek enhances aiming precision and increases game performance with a minimal learning curve.
The added analog stick length provides 40% more linear distance from full stop to stop. This gives you more leverage and increased control without disturbing your natural gaming feel.
Patent Pending
Quality/Usability : This review is an update to the KontrolFreek FPS Freek Joystick. This review is based off of the final retail product.
The prototype that I received was just a piece of plastic. I had to provide my own rubberized top which was Gel Tabz. The final and retail product has a black rubberized top on it.
Too attach the FPS Freek add-on, simply place the FPS Freek over the analog stick and push down until its securely in place. This adds another 1/2 inch in height to the sticks which gives you better leverage to the joystick. Even with the added height, pressing on down on the sticks feels comfortable. As mentioned, with the FPS Freek add-on installed, this gives a better accuracy and control over movement of the joystick. Putting the FPS Freek through our gameplay testing (Ghost Recon Advanced Warfighter 2, Gears of War, Rainbox Six: Vegas 2 and Call of Duty 4), we saw that we were able to make minor aiming adjustments that would cause us to move right by our target on a normal controller. Instead of shooting past enemy heads or wasting bullets trying to shoot a running target, we were able to precisely aim our crosshair/sight onto our enemies even while they were running like a chicken with their heads cut off.
Having used the FPS Freek for over a year, I am still not the best at FPS games but I have improved my aiming.
Conclusion : Overall, the retail product of KontrolFreek FPS Freek Joystick is just as good as the prototype. Now that it includes the rubberized top, the height is now 1/4 smaller compared to when I used the Gel Tabz. Like the SpeedFreek, this can be used on both PS3 and Xbox 360.
Images via commentsby Published on February 2nd, 2011 00:47- Categories:
- Xbox 360 News,
- DCEmu Reviews
Xbox 360 Slim Hard Drive Case Shell
Manufacturer: N/A
Site: Buy from LighTake (black) / Buy from LighTake (red) / Buy from LighTake (pink) / Buy from LighTake (white) / Buy from LighTake (teal) / Buy from LighTake (green) / Buy from LighTake (blue)
Price: $10.28 (black) / $7.40 (all other colors)
Pre-installed HDDs with Shell Case
Site: Buy from LightTake (250GB)
Price: $57.20
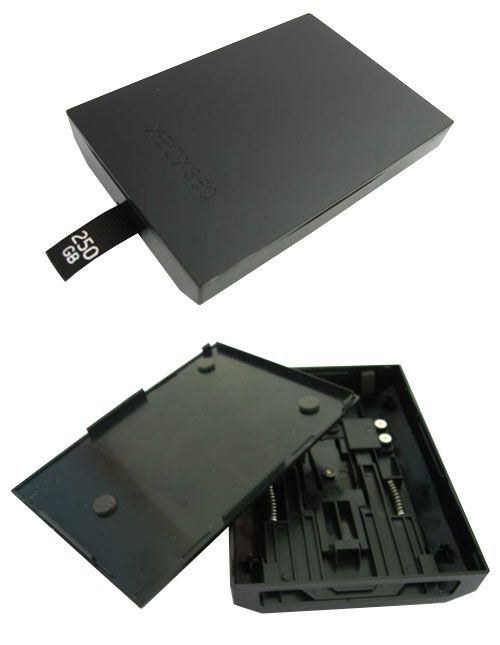
Overview :
Features :
- Compatible only with Xbox 360 Slim consoles
- Replacing your old, damaged, broken hard drive or case
- Ability to use your own HDD or old Xbox 360 HDDs
- More room to grow your entertainment
- Play, watch, save, store expand your entertainment possibilities
- Plenty of room to store all of your favorites from Live!
- Its the easiest way to get the most from your Xbox 360
Quality/Usability : For those who purchased or received an Xbox 360 Slim 4GB version, will sooner or later find out that they will probably need more HDD space, once you factor in downloading content, movies and game saves. You can go out and spend $130USD on Microsoft's own 250GB HDD but like all OEM products, they are overpriced. You can even use your own HDD but this requires some precision aiming to get the HDD to land correctly onto the connections, as seen below:
Just dropping in the HDD into the Xbox 360 Slim is not stable as the HDD can wobble around inside the bay and may even damage the connections. If there is a way, there are accessories. Never count out 3rd party manufacturers. To help gamers fix the wobble issue and to provide a cheaper solution and alternative, there is the Xbox 360 Slim Hard Drive Case Shell. This allows you to use your own HDD or from an old Xbox 360 without the risk of damaging the HDD or Xbox 360 Slim console. The case is made of plastic. There are no screws to hold hard drive in place and no screws to hold case together.
If you're using your own hard drive that you bought from a store or had laying around (it must be Western Digital 2.5"), you'll need to do more than just dropping the HDD into the Xbox 360 Slim. The new HDD will need to be formatted to work with the Xbox 360 Slim console using HDDHackr and a PC.
The following Western Digital (WD) HDD's work on the Xbox 360 with HDDHackr (20GB, 60GB, 120GB or 250GB):
- WD Scorpio Series BEVS/BEAS
- WD Scorpio Blue Series BEVS/BEVT/BPVT
- WD Scorpio Black Series BEKT/BJKT
- WD VelociRaptor Series
- WD AV-25 Series BUDT
How to use HDDHackr : (file attached and does not contain any copyrighted files)
- HDDHackr is made only for real MS-DOS, not for Windows Command Prompt or even Windows XP/Vista/7!
HddHacker supports two flashing modes, Auto and Manual. Typing HddHackr at a DOS prompt will start auto mode. In auto mode all hard drives will be detected automatically. In manual mode you can enter all the parameters used for flashing by hand.
The following help screen is displayed if you start HddHacker with a wrong number of arguments:
HDDHACKR [C|D|F|R] [PORT] [DRIVE POS] [SECTOR FILE] [RESTORE FILE]
C: Create Partitions 0/2/3
D: Dump sector 16-22 from XBOX360 HDD to file
F: Flash Western Digital firmware
R: Restore Western Digital firmware
PORT: Port to send command to e.g. 09F0
DRIVE POS: A0 for Master, B0 for Slave
SECTOR FILE: Sector dump file e.g. HDDSS.BIN
RESTORE FILE: Firmware restore file e.g. UNDO.BIN
Example for create, dump, flash and restore:
HDDHACKR C 09F0 A0
HDDHACKR D 09F0 A0 HDDSS.BIN
HDDHACKR F 09F0 A0 HDDSS.BIN UNDO.BIN
HDDHACKR R 09F0 A0 UNDO.BIN
Explanation of the Parameters
[C|D|F|R]
- this will set the mode of operation, it is recommended to first try to dump the XBOX360 hard drive data, if the dump will fail, it is highly unlikely that a flash or restore will succeed on the Western Digital drive
[PORT]
- the port to which the Hard Drive is connected, a port number should always be entered in hexadecimal and have 4 hex digits, valid ports are: 01F0, 09F0, .....
- this option can be used if your PCI adapter card or on board SATA ports are not identified by the auto mode
[DRIVE POS]
- on SATA ports this value is always A0, cause you can only connect a master drive to a SATA port, so for SATA you will always type A0 here
[SECTOR FILE]
- name of the sector 16-22 dump file better known as HDDSS.BIN
[RESTORE FILE]
- name of the firmware restore file e.g. UNDO.BIN
Using HddHacker in manual mode
* Dumping the HDDSS.BIN file *
Boot to MS-DOS from a writeable medium (like a floppy or UBS Stick).
Connect an *original* Xbox360 HDD to your SATA controller. Make sure it is the only SATA device that is connected. Now run 'HDDHACKR D [PORT] A0 HDDSS.BIN' and it will create the file 'HDDSS.BIN' and save it to the path you've started HddHacker from.
* Creating Partitions 0/2/3 *
In auto-mode the Partition 0/2/3 will be created automaticly to make the drive compatible with "Xplorer360" and XBOX360 Console. In manual-mode you have to type 'HDDHACKR C [PORT] A0'.
* Flashing your Western Digital *
Turn off your PC and connect the Western Digital hard drive. Boot to MS-DOS again.
Type 'HDDHACKR F [PORT] A0 HDDSS.BIN UNDO.BIN' from the same path you have saved the HDDSS.BIN file to. This will create an 'UNDO.BIN' file that you need if you want to undo the hack and flash your firmware back to the original state.
* Restoring your WD to original state *
If you don't want to use your modded WD HDD in your XBOX360 anymore and you want to flash it back to its original size/state, then you can now do so. Boot to MS-DOS and run 'HDDHACKR R [PORT] A0 UNDO.BIN'. This will use the UNDO.BIN file you created before to restore the drive to its original state.
* Vendor Intro Power Brute for misflashed drives *
To enter the recovery mode you should boot to MS-DOS, connect your hard drive to PC and type 'HDDHACKR R [PORT] A0 UNDO.BIN'. If the hard drive is misflashed you will be prompted with:
"Western Digital Vendor Intro failed on port [PORT]"
"Do you want to resend the command until the drive responds (Y/N)?"
Press YES, disconnect the hard drive from power and connect it again.
You should get Status 0x50 and the drive will be reflashed.
If you plan on using your hard drive from your old Xbox 360, you won't need to do any formatting to get it to work as its already formatted but you'll need tools to help you dismantle the old hard drive case. I suggest picking up the Shinobii Tool Kit to make things easier. This has all the tools needed and more, which can be used for other electronic devices. Below are instructions on how to dismantle your old Xbox 360 hard drive: (performing this will void your old Xbox 360's hard drive warranty)
Opening the Xbox 360 drive enclosure
To open your Xbox 360 hard drive, you will need a Torx T6 screwdriver. Remove the 3 screws and the 4th screw is behind the hologram sticker. You can either poke through the sticker or remove the sticker. Either one of these will void the warranty on the hard drive:
You can now remove the top cover. Next, you have to remove 4 screws from the metal plate. These require a Torx T10 screwdriver:
You can now remove the metal plate. All that is left is to slide the hard drive out.
To insert the new Xbox 360 Slim HDD Case, simple remove the bottom grille plate from the bottom of the Xbox 360. Pulling this plate back will reveal the hard drive bay. Simply insert the new hard drive case into the bay and push it in until you hear a click. This click will let you know that the HDD is in place and connected to the Xbox 360 Slim. Just make sure that he ribbon is facing out. This allows you to grab and pull out the hard drive when you need to.
Once you format a new hard drive using HDDHackr or removed the hard drive from your old Xbox 360 hard drive, you can insert it into the Xbox 360 Slim HDD case. Simply place the HDD inside the case and snap the cover to the case. Since there are no screws to hold the HDD in place, you can get some double sided mounting tape and cut off two small rectangle pieces and place it on the inside of the case to prevent the HDD from moving. Once the cover is snapped on, its fit snuggly and will not easily come off. When inserting the hard drive into the Xbox 360 Slim, the connector goes in first. Once inserted, push down on the hard drive until you here it click. The tab on the hard drive shell case allows you to easily remove the hard drive when needed.
Conclusion : Overall, the Xbox 360 Slim Hard Drive Case Shell is a must have for those planning to take their old Xbox 360 hard drive or their own and placing it into the Xbox 360 Slim. The case gives support for the HDD and fits perfectly into the Xbox 360 Slim. Even if you purchase a pre-installed aftermarket 250GB Xbox 360 Slim HDD, you're only paying $57. That's more than half the price of what Microsoft would charge you for their Official 250GB hard drive.
What I have noticed in our YouTube video was that a lot of people have asked if this would void your warranty and would you get banned. Lets start with the warranty concern. You will NOT void your warranty on your Xbox 360 Slim. If your Xbox 360 Slim fails and needs to be sent to MS to be repaired, simply remove the HDD. Nothing is permanent and MS won't know it was installed. The only warranty you will void however is your old Xbox 360 hard drive. There is a screw behind the warranty sticker so this would need to be removed or punctured to get to it. If you're going to use your old hard drive, you probably don't care by now as the warranty has probably expired.
As for being banned, you will NOT get banned. There is no hacking or cheating involved and no change the Xbox 360 firmware/dashboard. You're simply increasing storage space. The concept is the same as buying Microsoft's own 250GB hard drive just that you're using own you and more work is required. With the case of the old Xbox 360 hard drive, just think of it as putting it in a new case. So do not be afraid.
Images via commentsby Published on February 2nd, 2011 00:46- Categories:
- Xbox 360 News,
- DCEmu Reviews

XCM White 360 HDMI 1080i Cable
Manufacturer: XCM
Site: Buy from Goldenshop
Price: $65.00
Overview : Another exclusive product from XCM, this cable will let you connect your non HDMI Xbox 360 with an HDMI cable to a HDTV or DVI monitor with a high resolution signal of 1080i thanks to XCM HDMI 1080i Cable for Xbox 360 without HDMI Port.
You can now enjoy the same resolutions than people with Xbox 360 Elite!
Features :
- High quality 3rd party product.
- Converts the analog signal to digital signal and acts as a HDMI digital signal solution for HDMI-less Xbox 360's.
- Comes extra RCA sockets and optical socket for connection to speakers.
- Comes with a HDMI to DVI adapter - can be used on a PC monitor as well as a HDTV.
Quality/Usability : Recently within the past year, Microsoft has started to include HDMI port to all Xbox 360 consoles. Unfortunately, for those early adopters playing on a HD TV/monitor are left with a HDMI-less Xbox 360 unless they went out and bought a new Xbox 360 with HDMI port on it.
But those who's original white Xbox 360 didnt succumb to the RRoD (Red Ring of Death) and/or still have the original white Xbox 360, can now have the same ability to play in HD just like all new owners of the Xbox 360. XCM has filled that void by releasing a White 360 HDMI 1080i Cable. Included is HDMI cable, HDMI to DVI adapter, and XCM's nifty device that converts signal to HD.
Setup is fairly easy (video below). With the HDMI 1080i Cable, you'll get up to 1080i output from your original white Xbox 360. The same as if you were to get a Xbox 360 Premium, Elite or Halo 3 edition. To get this setup, simply connect the device to the back of the Xbox 360. Take the HDMI cable and connect it to the other end of the device and the other end of the cable to your monitor/HD TV. If you dont have a HDMI port on your monitor, you can use the included HDMI to DVI adapter.
Connect via HDMI
Just remember that HDMI supports digital audio through the cable but DVI does not, so you'll need to connect speakers. The device has two RCA audio jacks (red/yellow) for those who are using DVI. If you have speakers that also has RCA audio jacks, simply plug it into the HDMI device.
Once all cables are connected, simply turn on the Xbox 360 and you will now have an original white Xbox 360 capable of running in HD via HDMI/DVI. The HDMI device also has a power indicator to let you know that the product is turned on and in use. From what I have tested, the visual quality is the same using this adapter and connecting the Xbox 360 directly to the HDTV via HDMI. I didnt notice any loss of quality.
Conclusion : Overall, the XCM White 360 HDMI 1080i Cable is the best solution for those wanting to play in HD on their original white HDMI-less Xbox 360. The only thing I dont like about the White 360 HDMI 1080i Cable is the size of the device. Its approximately 5" wide. Thats not including the cable. But those who still have the original Xbox 360 and want to play in HD via HDMI should consider looking into this device.
If you're running out of HDMI ports, consider looking into Talismoon HDMI Switcher with Remote, XCM HDMI/DVI Crossover Selector for additional HDMI/DVI ports.
Images via comments ...by Published on February 2nd, 2011 00:46- Categories:
- Xbox 360 News,
- DCEmu Reviews

XCM XFPS Sniper Plus
Manufacturer: XCM
Site: Buy from Play-Asia
Price: $89.90
Overview : Let's be honest, first person shooters just weren't pioneered to be played on a standard Xbox 360 controller. Ask any First-Person-Shooter (FPS) fan out there what method of control they find optimal, and you will find the resounding majority shout out mouse and keyboard! The days of getting your fingers in a twist while trying to grapple with those unfriendly analog sticks are over. The XFPS 3.0 Sniper Plus is here to help Xbox 360 gamers with the ultimate way to play FPS titles with a Mouse & Keyboard! The XFPS 3.0 Sniper Plus is the latest edition of this amazing device!
The XFPS 3.0 Sniper Plus is an innovative keyboard and mouse adapter for the Xbox 360 which allows you to have an unrivalled First Person Shooter (FPS) experience for the next-generation gaming console. Not only is the XFPS 3.0 Sniper Plus compatible with all standard PS/2 input devices but also modern USB keyboards and mice. The XFPS 3.0 Sniper Plus even makes traditional Playstation 2 Dual Shock 2 controllers compatible with the Xbox 360, as well as a multitude of other peripherals. This amazing device even manages to bring auto-fire to the Xbox 360.
Features :
- Compatible with 95% of the PS/2 or USB keyboard and mouse combinations
- Instant plug and play technology
- Ideal for use with all First Person Shooter titles such as Call of Duty and Halo series and more!
- Extremely durable Yellow coloured shell
- Brings auto-fire functionality to the Xbox 360
- Allows gamers to use Playstation 2 Dual-Shock 2 controllers on the Xbox 360
- Allows remapping of any Xbox 360 controller key (include both analog sticks) to any key of the keyboard.
- Compatible with the newest version of the Official Xbox 360 wired controllers.
- XFPS Sniper v3.0 Plus is the latest version of the XFPS Keyboard and Mouse Adapter!
Compatible with these PS2 products:
As already touched upon, the XFPS 3.0 Sniper Plus is compatible with Playstation 2 controllers but also the following Playstation 2 peripherals :
- PS2 Light Guns
- PS2 Racing Wheels
- PS2 Dancing mats
- PS2 Guitars
To configure your keyboard to act as an analog button for movement, simply set the switch from DEFAULT to SET, plug in your wired Xbox 360 controller and unplug your mouse. Press "P" to program. A red LED will light up. Move the left analog stick either left, right, up or down and press the key on the keyboard you want it as. Repeat until you have done this for all 4 directions. For the right analog stick, perform the same procedure.
To configure your mouse as the trigger, simply unplug your keyboard and connect the mouse. Like the keyboard, press "P" to program. Press the right trigger and than press the left mouse click. Now your mouse is configured to be the trigger. You can use the keyboard as your trigger as well. You can configure it however you like and which ever is more comfortable for your gaming style.
To set up rapid fire function, flip the switch, RT for Right Trigger and turbo is automatically enabled. So when you pull the trigger on the controller or press the left mouse click, your gun will fire rapidly.
The same mouse and keyboards will work on the Plus version. As mentioned, nothing has really changed except for color and minor tweaks.
Conclusion : Overall, the XCM XFPS Sniper Plus works like it should but do we really need all these different revisions? They should just make one product and have it be updated via firmware or something unless its a whole new redesign/product. I think XCM might be running out of colors of the rainbow. Clear colored shell would of been a lot nicer looking like the XCM XFPS RateUp for the PlayStation 3. If you already have the original Sniper version, stick with it. Not worth getting this unless you're rich and want the latest product.
Images via comments ...by Published on February 2nd, 2011 00:46- Categories:
- Xbox 360 News,
- DCEmu Reviews

DecalGirl Xbox 360 HD DVD Skin
Manufacturer: DecalGirl
Site: Buy from DecalGirl
Price: $14.99
Overview : Make your Xbox 360 HD-DVD player look as good as the movies it plays with a new full-color skin kit from DecalGirl. This three-piece kit covers the bland ivory panels with a vibrant DecalGirl skin design, digitally printed at art-quality resolution on the best materials money can buy. As with all of our full-color skins, the glossy finish won't fade, smudge or smear, and there's no residue left behind when you decide to change the skin.
Quality/Usability : With the HD DVD player add-on, there are no replacement cases for it for those looking to change the look or style. There have been people who have dyed the egg-white color casing of the HD DVD player to match their Xbox 360 Elite. Unfortunately, some people dont know how or are too afraid to mess it up. What is the next option? Skins. The DecalGirl Xbox 360 HD DVD Skin is made from vinyl. There are some out there on the market that gives you different designs but the quality are either limited to a certain amount, horrible or the quality is poorly made. Price is cheap but what you pay, is what you get.
With DecalGirl skins, you get the best of all worlds. Not only do you have a lot of selections to choose from but the quality is the best on the market and the price is very reasonable.
The Xbox 360 HD DVD Skin has three skins; top, bottom and side. All skins that you order from DecalGirl are all pre-cut to fit your desired device. Unlike the DecalGirl Nintendo DS Skin, you wont need a pen or sharp object to detach the skins from little pieces. Since the pieces are all huge skins, handling and applying the skins are very very easy.
To apply, I simply started by matching the corners of the skin to the corner of the HD DVD player for both the top and bottom. Once matched, I did it to the other 2 corners and left the fourth corner alone. There are a couple of ways to smooth out the skin. You can use a credit card or something similar, your fingers or a rag. I personally use my fingers first to set the skin in place and use a rag to flatten and smooth the skin out. I dont use a card because it has sharp edges/corners and if there is a small hard particle that got trapped underneath the skin, it can ruin the skin.
The side skin was a little different. It was cut and shaped differently since it curves. I had to line one side before before smoothing out the rest. If not lined up first, the skin would not fit perfectly on the player.
The only problem I had was the side skin (the smallest piece). The reason why was because it was actually bigger than the HD DVD itself. I had to take an x-acto knife to mark off where the excess skin is. Once marked off or kind of stenciled, I took a scissor and cut it off. Once cut off, the skin fit perfectly. DecalGirl might need to check their template. But its nothing major.
Conclusion : Overall, the DecalGirl Xbox 360 HD DVD Skin fits perfectly and looks great. Applying the skin was very easy and quick. As mentioned, the only minor problem was the slightly bigger side skin which was taken care of by simply cutting the excess skin off. Removing of the skin will not leave any sticky residue which is a big factor when applying anything to your devices. So if you dont like it or messed up, you can reapply it.
Images via comments ...- Search DCEmu
- Advert 3
 News Categories

- Links of Interest
 Sony Consoles News


- Nintendo Consoles News


- Sega Consoles News


- Apple & Android News
- Xbox Consoles News


- Open Source Consoles News
 DCEmu News Archive
- Advert
- Retro Consoles News


- PC News

- Latest DCEmu News


- DCEmu Network Sites
-
 Menu
Menu  Forum Stats
- What is the DCEmu Homebrew & Gaming Network
Catherine: Full Bodys English translation for the Vita