

 DCEmu Homebrew Emulation & Theme Park News
DCEmu Reviews
by Published on February 1st, 2011 23:16- Categories:
- Nintendo 64 News,
- DCEmu Reviews
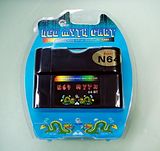
NEO N64 Myth Flash Cart SPEC v2
Manufacturer: NeoFlash
Site: Buy from IC2005
Price: $199.00
reviewed by wraggster
Overview : The Neo N64 Myth is a flash cart for your Nintendo 64 that lets you transfer games from your PC to a cart via USB. This features support for ROMs up to 512MB, all save types (it will even let you back up the saves on your PC), up to two games at the same time, and more.
Features:
- Support the N64 ROM size up to 512M
- Support all save type perfectly included the flash save, not need the same save type N64 game cart to work together
- Support 100% N64 games perfectly
- Download games from PC to NEO2 cart directly via USB port
- Upload/overwrite game save to PC via USB directly
- Multi-CIC support, can use any N64 cart to boot Neo Myth on N64 console
- Support Multi games, can download 2 games at the same time and swap the game via switch
- Can select the N64 menu run from Neo2 game cart or N64 inner menu flash (under developing still)
- Upgradeable! Support upgrade the N64 Myth cart CPLD logic core through the NDP upgrade kit
A Little about the reviewer
Ive been an emulation and homebrew fan for as many years as i can remember (since around 1996 i think) but nothing i repeat nothing is better than playing on the real hardware.
Back in the Megadrive (Genesis) and SNES days i owned a Super Wild Card and a Super Double Pro fighter, both cost about 300 pounds and ill admit that it was a great way to play games that i would never have been able to afford or because of stupid region lockouts.
So the day when Neoflash announced they were working on a Flash Cart for the Nintendo 64 called NEO Myth 64, i wanted one so badly, the chance to relive the best of the N64 and to play games I've never played was too much of a thrill to behold.
Now i must point out that being a webmaster of a homebrew site makes me no expert, I'm just as clueless as most newcomers, i like websites and i like posting news, i like to know that if i need a certain release i should be able to find it on my sites (hopefully :P).
Packaging: First off here's some screens of the N64 Flash Cart in and out its Packaging:
Front Side View in Packaging
Back Side view in Packaging
The NEO N64 Myth cart
Neo 2 Flash Cart - Which Holds SD Cards up to 8GB
The Neo n64 Myth Cart and the Neo 2 Cart split apart
The USB Lead
You also get a Mini CD with a load of Drivers on for all Neo Products.
Getting Started
The N64 Flash Cart did come with a Mini CD of drivers but sadly there was no actual drivers for the N64 Flash Cart, so first off you need to head on over to Neoflash Forum to download the latest version of the software, once you've downloaded it (15MB) then click on to install to the directory it wants to, pretty straightforward for anyone.
Clicking on the Neo 2 Ultra Menu Icon (look on your desktop or in new programs) will lead you onto a screen that looks like this:
Now get your Neo Myth N64 Flash Cart and making sure that the cart that says 512M is inserted (or the Neo 2 Card with an SD Card inserted), connect the USB Lead to the Cart and Plug it into your Laptop or PC.
It Should have no problems and automatically find drivers installed when you installed the software above, I had no problems using Windows Vista but with Windows XP Pro SP3 it wouldn't load the drivers properly, i did post a thread at Neoflash and was given instructions on how to fix this. (Try a different USB Lead it may be that)
Adding ROMS, etc.
Ok carrying on from the screenshot above if everything went ok you'll be able to start the juicy part, first off i did a quick format of the card, it took around 30 seconds to do, so no real biggie.
Next on the list was to add ROMS to the Cart (Homebrew ROMS and Emulators can be found at links Below)
Adding Roms is as easy as clicking the add ROM button and going to whereever your roms are, for some strange reason the cart/software at the moment only holds 2 ROMSbut i would think that will change in later versions of the firmware/software.
Once you have added the ROMS you require then click on N64 Burn, depending on how big your ROMS are will depend on how long it takes to copy to the cart, give it a few minutes, it also verifies each burn.
Now one thing to take into consideration is that if you have a USA N64, you will need a USA game plugged into the back of the N64 Myth Cart, If you have a Pal N64 youll need a Pal game plugged in.
I have both a USA and UK (Pal) N64 and thankfully the Power supplies/TV Leads are universal so im able to swap at pleasure.
Here's a pic of the Cart plugged into the N64
Now for Homebrew roms you dont need anything else to boot them but say you want to boot one of the games that requires the Expansion Pack
Games that need the Expansion Pack are the likes of Donkey Kong 64 and Zelda--The Majora's Mask and Perfect Dark, it also ups the resolution on many other games too.
Onto the Gaming
Ok you've burnt your games onto the Flash cart and you have the Flash Cart installed in the N64 with the correct region game in the back, now its time to turn on:
It loads automatically ...by Published on February 1st, 2011 23:15- Categories:
- DCEmu Reviews
Ultimate 2000 AX VGA-TV Converter
Manufacturer: Vtimage
Site: Buy from Goldenshop
Price: $49.99
Overview : Ultimate 2000 AX is a handed-size universal VGA to TV converter box. It supports resolution up to 1280x1024. Compact size, power from USB port, easy for carry. It is best for PC Game, PC DVD, Internet viewing on TV, Entertainment, Education and Presentation.
Features
- Pure hardware design, just Plug & Display
- No software driver required, compatible with any operation system
- Support 640x48@60/72/75/85Hz, 800x600@60/72/75/85Hz, 1027x768@60/70/75/85Hz, 1280x1024@60Hz display mode
- Switchable NTSC, NTSC-EIAJ (for Japan), PAL, PAL-M, PAL-N, PAL-combination-N and SECAM video system
- Supports Position control and MENU button
- MENU button supports HSIZE, VSIZE, BRIGHTNESS, CONTRAST, HUE, SATURATION, SHARPNESS, and OSD BACKGROUND color adjustment
- Support overscan and underscan function
- Simultaneous display on VGA monitor and TV
- Power from USB port
- 24bit, true color digitizer
- Supports IBM PC and MAC G4
- Compact form factor: 95mm(L)x55mm(W)x30mm(H)
Package Contents
- Ultimate 2000 AX (PC to TV converter box)
- User's Manual
- S-Video cable
- Video cable
- USB type power cable
- VGA cable for IBM PC & MAC G4
Quality/Usability : My video card on my PC has a VGA OUT I was able to watch movies on my 32" TV rather than my 17" PC monitor. This made viewing a lot easier for when I had company over. But having to my computer (motherboard died on me), I lost the ability to watch movies on my TV even though I am able to see my computer. So I had to look for another alternative.
Ultimate 2000 AX was that alternative solution. I tried the Ultimate 2000 AX both on my desktop as well as my IBM Thinkpad laptop that I got from my college. Installation was simple and basic. Connect a few cables whether it be VGA cables, S-Video cable or Video cable and the USB power cable and you're all set to go. Unfortunately, you'll have to play around with it as the manual that was included isnt really a manual. I had to go by the image that was printed on the back of the box.
On the front of the Ultimate 2000 AX are 6 buttons. LEFT, RIGHT, UP, DOWN, MENU and SIZE. LEFT, RIGHT, UP, DOWN are pretty much self explanatory. MENU brings up HSIZE, VSIZE, BRIGHTNESS, CONTRAST, HUE, SATURATION, SHARPNESS, and OSD BACKGROUND color adjustment. HSIZE allows you to adjust the height, VSIZE allows you to adjust the width. BRIGHTNESS, CONTRAST, HUE, SATURATION, SHARPNESS are all self explanatory. OSD Background lets you adjust the color of the text on the MENU selection to either white or black. SIZE allows you to choose various different sizes that will suit your viewing and size of TV.
The back has a VIDEO OUT to connect to TV, S-Video to connect your VCR and VGA OUT to connect to your PC monitor. The left side is VGA IN plug. On the right side of is the DC IN and a switch 1 & 2. Switch 1 & 2 lets you choose your TV standard whether it be NTSC or PAL. For NTSC, switch 1 is down (ON) and switch 2 is up (OFF). For PAL, both switches are down. Remember the "manual"? As mentioned, there was really no manual and I had to figure this out myself as when I first plugged in the Ultimate 2000 AX, I thought I did something wrong or it was broken.
Besides the lack of information in the "manual", I am impressed with the quality that is displayed. The quality is clear, colors are vibrant and the ability to adjust the size of display to fit on your TV is a great plus! This is perfect if you have movies stored on your computer and want to view it on your bigger TV. Its also great for your presentation for either work or school related. Since this only supports video, audio is still coming from your original source whether it be from your laptop or computer speakers.
Conclusion : Overall, the Ultimate 2000 AX VGA-TV Converter does its job great. At first, I was skeptic about the quality of the display coming from a no-name brand device. But after seeing this in action, I am no longer skeptic. It would have been nice if the "manual" was actually a manual rather than a piece of paper that lists product features, introduction, system requirements and package contents. Price is fairly reasonable at $49.99.
Images via comments ...by Published on February 1st, 2011 23:15- Categories:
- PSP News,
- PS3 News,
- PS2 News,
- PC News,
- Xbox 360 News,
- Nintendo Gamecube News,
- DCEmu Reviews

XCM 1080p Mega Cool VGA Box
Manufacturer: XCM
Site: Buy from Play-Asia / Buy from Divineo China / Buy from Divineo France / Buy from ConsoleSource / Buy from Amazon
Price: $79.90-120.00
Overview : Connect any Component Video source to any VGA monitor for the best resolution possible! Supports up to 1080p HDTV resolution! New sleek design.
Features :
- Supports PC video display resolutions up to UXGA (1600 x 1200 @ 75 Hz) or HD TV (up to 1920 x 1080)
- Supports 480i, 480p, 576i, 576p, 720p, 1080i, and 1080p
- Display pictures from your console (Game Cube, Playstation 2, Xbox, PSP Slim, Wii , Xbox 360, Playstation 3) on your PC monitor (up to 1600 x 1200) or HDTV (up to 1920 x 1080)
- Supports SDTV, HDTV, XGA, SXGA, and UXGA video formats.
- Works on both PAL & NTSC systems.
- Easy Plug and play installation.
- Connect any compatible YPbPr (component video) device to your VGA monitor via Integrated YPbPr to RGBHV converter.
- Applications: TFT LCD monitor, CRT monitor, Set-top box, Display projector
- Works on LCD TFT monitors
- Video output: VGA
- Automatic video source mode detection (film/graphic)
- Motion-adaptive interfiled de-interlacing
- Uses the power from your USB port, no extra power supply needed!
Quality/Usability : I dont like to have lots of wires dangling or have to constantly plug/unplug cables so I opted to use the XCM Multi-Console Component Cable v3. The XCM 1080p Mega Cool VGA Box is housed in a sturdy chrome casing with component cable input, VGA input and output, stereo speaker input and USB power input. The top of the XCM 1080p Mega Cool VGA Box contains a SOURCE button as well as directional pads. The SOURCE button lights up when in use (blue for component and green for VGA) and allows you to switch between your computer/laptop or consoles. The directional pads allows you to change resolution and frequency on your monitor.
Below is a video of the Mega Cool VGA Box being used with the Multi-Console Component Cable.
I connected my PSP Slim, Wii, PlayStation 3, Xbox 360 and Dell computer to the Mega Cool VGA Box and to my Dell 24" 1080p Widescreen monitor. All worked flawlessly without a problem. Pictures displayed just like it would on a TV/monitor. There were no lags or distortions. I liked that you were able to change the resolution and refresh rate from the VGA box rather than going through all the menus on your monitor/TV. What I dont like however is that it only supports 1 component cable. Luckily, I have the multi-console cable but others might not and this may be an annoyance.
When switching devices, it does not remember the display resolution. So you'll have to go and change it each time. Its not a big problem but would be nice if it remembered the previous setting. I like the fact that it gets it power through the USB. Having multiple consoles, TV, satellite box, computer and other devices plugged in, I am running out of sockets in the surge protector. So using a USB port from either the Xbox 360, Wii, PS3 or PC is a PLUS in my book. If you're not using that device that the VGA box is connected to, it wont be powered. So you'll have to turn it on.
Conclusion : Overall, the XCM 1080p Mega Cool VGA Box works great but as mentioned, it only allows for one component input. So if you have a PS3, Wii and Xbox 360, you can only connect one. If you want to play a different console, you'll have to unplug the cable and insert the other one. If you're like me and want to make your life easier, I suggest looking into XCM Multi-Console Component Cable v3. One cable that has all the connections for all consoles. When you want to use that console, just move the switch to that corresponding console and you're ready to go. No unplugging or plugging needed.
Would be nice if this was extended to incorporate additional component cables and turned into maybe a selector?
Images via comments ...by Published on February 1st, 2011 23:15- Categories:
- PS3 News,
- PS2 News,
- Nintendo Wii News,
- Xbox 360 News,
- Xbox News,
- Nintendo Gamecube News,
- DCEmu Reviews

XCM Universal YPbPr 1080p VGA Box
Manufacturer: XCM
Site: Buy from Play Asia / Buy from Divineo China / Buy from Amazon
Price: $59.00
Overview : A true universal VGA box compatible with the new generation consoles on todays market (Xbox 360, Playstation 3, Wii) and also with Xbox.
Compatible with both PAL and NTSC system, it is available with European or US power supply. A plug and play installation will give you Ypbpr input with all consoles, now with a 1080p resolution!
Features :
- High quality 3rd party product.
- Fully Compatible with all component devices - e.g. x-box, x-box 360, PSX3, Wii, DVD players, etc...
- Compatible with PAL or NTSC system.
- Double scan conversion (31.5KHz for NTSC, 31.25KHz for PAL,67.5KHz for 1080p).
- Output resolution ; up to 1080p
- Plug and play installation.
- Connect compatible YPbPr device to your VGA monitor.
- Integrated YPbPr to RGBHV converter.
- Supports 480p, 720p, 1080i, and 1080p.
- Applications: TFT LCD monitor, CRT monitor, Set-top box, Display projector.
- Works on LCD TFT monitors.
- Video output: VGA.
- Automatic video source mode detection (film/graphic).
- Motion-adaptive interfiled de-interlacing.
- Get the power from USB port of consoles or PC, no extra power supply needed.
- Comes with 3 component cables - PSX3, Wii & XB360.
Quality/Usability : The XCM 1080p allows you to hook up your PS3/Wii/Xbox360 computer monitor via VGA. With all the new consoles and the ability to output into high-definition, and the high costs of HDTV's, not everyone has them. But we actually do...our computer monitors.
Included in the package, you'll find the following items:
- XCM 1080p VGA box unit
- USB to USB-miniB cable
- Component cables:
- Wii (non-shielded)
- Xbox360 (shielded, includes optical digital audio connector)
- PS3 (shielded)
- Instruction booklet
Unfortunately, no VGA cable was included. This was probably due to cost factor. Had XCM included the cable, price of the product would of been higher. So to keep the price down, they didnt include the VGA cable.
Like all cables that XCM releases, they are sturdy and high quality cables. You will not be disappointed.
The VGA box itself is also sturdy and well built. The outer casing is made of opaque clear plastic. The connectors are standard quality and nothing special. Something caught my eye though. Under the VGA CARD slot, although the connection is a male connector, there was a female type connector. This connector uses the two screws similar to that when you're connecting your monitor to your video card on your PC. You can see it in the image below but on the mock up images, you dont see it. To fix this problem, simply remove the shield around it so that you can connect the cable.
Before purchasing this product, you must know that the VGA box does not change the output resolution. So you should check your monitor to see if it supports the resolution you are going to be used.
Connecting everything to the VGA box is fairly simple and is explained easily in the instruction manual. On top of the box is a switch that allows you to switch between VGA and COMPONENT. The front has a MONITOR and VGA CARD port. On the back, it has YPbPr inputs. To the left are SOUND IN, SPEAKER OUT and 480p~1080p/1080i switch. And on the right side is the USB POWER port to power the VGA box.
All images looked crisp and I didnt have a problem with any of the consoles. Just remember that the Wii can not upscale images as it is not capable of doing so.
Conclusion : Overall, the XCM Universal YPbPr 1080p VGA Box is a useful product for those who do not have HDTV. It would of been great if they included the VGA cable as the box allows you to switch video signals. So you can use video signal from your console or connect to your PC's video card to output to your monitor. Its understandable that they left it out to keep costs low. If you have an extra VGA cable around the house, you wont have to worry.
Images via comments ...by Published on February 1st, 2011 23:15- Categories:
- PS3 News,
- PS2 News,
- Nintendo Wii News,
- Xbox 360 News,
- DCEmu Reviews

DecalGirl Guitar Hero 3 Controller Skin
Manufacturer: DecalGirl
Site: Buy from DecalGirl
Price: $14.99 (available for Wii, Xbox 360 and PlayStation 3)
Overview : Dress up your Guitar Hero III Gibson Les Paul Guitar controller with a luscious, full-color guitar skin kit from DecalGirl! The brilliant, high resolution, full color design is digitally printed on premium adhesive-backed cast vinyl then covered with a clear protectant layer for the ultimate in durability! An innovative repositionable, removable adhesive means no air bubbles and a fast, easy and accurate installation. As always, the skin can be removed at any time without leaving any sticky residue! Each kit includes a head stock skin and (for Wii versions) a matching skin for the Wii remote controller.
Quality/Usability : With Guitar Hero 1 and Guitar Hero 2, you were unable to change the faceplate of the guitar. Only way to customize it was by doing it yourself with paint or other means. When Guitar Hero 3 came out, RedOctane allowed gamers to customize their guitar by being able to change the faceplates. Unfortunately, some faceplates were just hideous looking.
DecalGirl jumped on the Guitar Hero train and produced skins for the Wii and PS3/Xbox 360 guitars. DecalGirl is well-known for their high quality vinyl skins. Skins produced by DecalGirl are vibrant in color and durable. There are a lot of skins to choose from and there will be some that will catch your eyes. You can even match all your consoles such as DS, Wii, Xbox 360, etc. to have the same skin.
The Xbox 360 and PlayStation 3 guitars are similar in size and style. However, since the Wii guitar requires the Wiimote to be placed into the guitar and there is an opening in the faceplate, the Wii gets a skin for the controller as well to match. The vinyl skin comes all on one sheet. The sheet also includes the fret and fret dots.
To apply the console skin, I started with the biggest piece which was the faceplate. Considering its rounded all around, I didnt have a specific spot to start from. However, I did make sure that one side was aligned before smoothing out the remaining area. Considering the skins are fairly big, it should not be a problem applying the skin. There are a couple of ways to smooth out the skin. You can use a credit card or something similar, your fingers or a rag. I personally use my fingers first to set the skin in place and use a rag to flatten and smooth the skin out. I dont use a card because it has sharp edges/corners and if there is a small hard particle that got trapped underneath the skin, it can ruin the skin.
Applying the fret vinyl skin was also fairly easy. There are six small circles that you'll need to poke out. I started with the bottom of the fret and worked my way up (end). Once all the main pieces have been applied, you have the option of going all out and adding colored fret dot vinyl skins. There are nine colors to choose from and each has 6 dots.
Those who have the Wii version, installing the controller skin is very easy as well. Just start anywhere by matching up the corners and work your way around the controller and you should be set.
Conclusion : Overall, the DecalGirl Guitar Hero 3 Controller Skin gives the guitar a sweet look to it. Installation is very simple and clean. I love the fact that DecalGirl also includes vinyl skin for the fret and fret dots. It would of been nice if DecalGirl included maybe vinyl skins for the fret buttons as well.
Images via comments ...by Published on February 1st, 2011 23:15- Categories:
- DCEmu Reviews

Sumo Omni Bean Bag Chairs
Manufacturer: Sumo Lounge
Site: Buy from Sumo Lounge
Price: $149.00/£99 (Free shipping)
Overview :
OMNI Features:
- 10 colors to choose from
- 10 different positions
- Measures big - 4.5 X 5.5, but weighs little just 18lbs
- Space age rip-proof nylon, stays new looking easy to clean
- Filled with top quality sumo beads
Quality/Usability : I always wanted a Bean Bag chair, but I could never justify the cost to myself. You could easily buy 2 full priced games instead, and really is the couch/chair/floor really that bad?
Yes it is, compared to the Omni!
I have tried bean bag chairs before and seen their prices, and at £99 the Omni seemed to to be at the top end of the scale. But when it arrived I was surprised at the size of it, being a pessimist I thought they had used a smaller model for the PR shots. I'm not a small guy (not huge mind you) and I was very comfortable sitting many different positions in it and also laying it down flat me. It is not designed for two people but my girlfriend and I (she is smaller than me though) were comfortable on it (just about) and we could also sit side by side on it when its on its side.
It looks like a big pillow and when I read "10 different positions " I was like "whatever", but its true. I have thrown myself in the Omni many different ways and most are comfortable be it laying down, sitting upright for eating of the table (low table) or paying games.
The material is a thick, durable, comfortable nylon, that can be cleaned with a wet cloth (no stains that have not come off yet).
Unfortunately what I can't tell you (as I have only had it over a week) is how long it will keep its shape. We have all seen the old flat as a pancake bean bags, will the Omni end up the same?
Well according to their FAQ:
Does polystyrene decompress over time?
It can and it depends on usage. We use top quality high density virgin polystyrene foam. If you ever want more fill we sell it cheap at the following link: http://www.sumolounge.com/beads
Conclusion : The Omni Bean Bag Chair is by far the most comfortable and well made been bag chair I have ever seen/used, the $149/£99 price tag seems steep, but considering the quality and flexibility of the chair (and the free postage) I think its worth it.
Put it this way, a day has not passed since I got it that my butt has not been in it in some shape or form! ...by Published on February 1st, 2011 23:15- Categories:
- PS3 News,
- Xbox 360 News,
- DCEmu Reviews

Talismoon HDMI Auto Switch
Manufacturer: Talismoon
Site: Buy from Divineo US / Buy from Divineo China
Price: $29.95
Overview : Tired of Switching? Here is the solution. Talismoon HDMI Auto Switch lets you connect 3 HDMI devices to your screen and switches automatically to the device YOU want! For example, if no device is turned on and you power one on, it will automatically switch to it. Turn a second one on, and it will jump to that new device. Turn it off, it will go back to first one etc. No need to waste time finding the remote and switching back and forth all the time, the HDMI Auto Switch does the job for you.
A small (easy to hide) and smart HDMI 1.3 switch that make old HDMI switches pointless! Excellent performance characteristics allows source devices to be used with HDMI cables up to 15 meters away using AWG 28 HDMI cables at resolutions up to 1080P FULL HD!
This product is confirmed and tested to pass 1080p FULLHD and the new Dolby TrueHD and DTS-HD Master Audio loss-less audio formats found on Blu-ray.
Features :
- Compact in size (only 5cm x 5cm).
- 3 HDMI/DVI-D (hdcp) inputs.
- 1 HDMI/DVI-D (hdcp) output.
- HDCP compliant.
- No IR Remote needed.
- No Power Supply needed in most cases.
- Auto selects any active input signal from the three inputs to the single HDMI output.
- Manual selection button (for manually selecting an input if needed).
- Signaling rates up to 10.2Gbits in support of 1080P Full HD displays.
- Powerful receiver equalization to compensate for 15m HDMI cable losses.
- Pre-emphasis to compensate for PCB losses.
- Each HDMI port supports HDMI or DVI inputs.
- Dust covers provided for unused inputs.
- Smart Function (Auto Selection)
- HDMI signal to the display. As result of this functionality, user could use simple method of power off/on sources to choose the desired HDMI signal. If several sources are powered on, the last powered source will be chosen. This allows the switch to still be used with sources that are always on such as cable TV and satellite receivers.
Quality/Usability : Having my DirecTV, Xbox 360 and PlayStation 3 all hooked up via HDMI, it sometimes gets annoying and time consuming having to switch my video output between my 3 devices. Each device is connected to a HDMI port on my 32" Samsung. Luckily for me, I have 4 ports while for others, you may have 1 or 2 ports whether it be on your HDTV or computer monitor.
The Talismoon HDMI Auto Switch can help you give you additional HDMI ports and helps you switch between HDMI sources with a press of a button. As of late, I've been watching more TV than playing games so I have my DirecTV receiver plugged into INPUT1. So when a friend calls me up to hop online to play some games, all I would need to do is turn on my console and the HDMI Auto Switch will automatically select that INPUT and my console is now displayed on my HDTV. No need to go to the TV or to pick up the remote to change input. Simply turn on console and thats it. When you turn off your console, the HDMI Auto Switch will automatically switch back to the first device.
Next to the OUTPUT port, there is a small selector button. This allows you to cycle through the INPUTS if you have all 3 devices turned on. So I can have my 360, PS3 and DirecTV all turned on. I can be downloading a movie or an update on one system while playing online with the other. To check the status, I would just press the "SELECTION" button to select the input that I want to display.
The switching between inputs is fairly quick with minimal lag/delay.
Conclusion : Overall, the Talismoon HDMI Auto Switch is a great product if you have less than 2 HDMI ports on your TV or hate having to change the input on your TV. Each input port has a dust cover for when it is not in use. Its great that it automatically switches to the newest input and goes back to its original when the newest input is turned off. Its also nice that they included the ability to select your input if you have more than 1 device turned on.
Images via comments ...by Published on February 1st, 2011 23:15- Categories:
- Apple iPhone,
- DCEmu Reviews
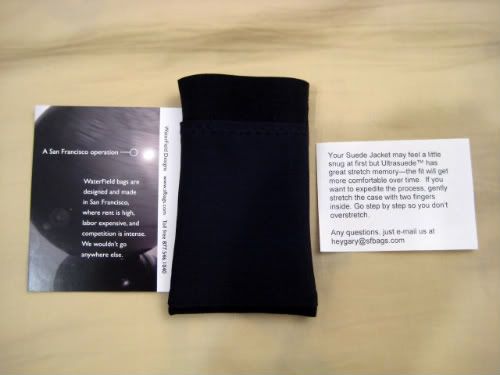
WaterField Designs Suede Jacket Cell Phone Case
Manufacturer: WaterField Designs
Site: Buy from WaterField Designs
Price: $9.00 (no pocket) / $13 (with pocket)
Overview : Keep 'em Together. It doesn't get any thinner than this! This Ultrasuede® slipcase prevents scratches on your cell phone. The elasticity of the pocket keeps it flat when empty and stretchy enough to hold your bluetooth or earbuds safely. Low profile slides easily into your shirt or jeans pocket. Comes in three sizes for a perfect fit on your Apple iPhone 3G/3GS, Samsung Instinct, HTC Touch Diamond, HTC Touch Pro, LG Dare, Blackberry Bold 9000, Blackberry Tour 9630, Blackberry Storm 9530/9550/9520, Blackberry Curve 8310/8320/8330, Palm Pre, Sony Ericsson Xperia X1, Nokia E71 or the Google Android G1. Available with or without the new pocket.
Suede Jacket Cell Phone Cases
- Available in multiple sizes:
- Apple iPhone 3G or 3GS / 2.5" x 4.6" / Size 30
- BlackBerry Bold / 4.5" x 2.6" x 0.6" / Size 51
- Blackberry Curve / 4.2" x 2.4" x 0.6" / Size 50
- Blackberry Storm / 4.4" x 2.5" x 0.6" / Size 52
- Google Android G1 / custom fit / Size 80
- HTC Touch Diamond / 4" x 2.0" x 0.6" / Size 65
- HTC Touch Pro / 4.1" x 2.2" x 0.5" / Size 70
- LG Dare / 4.1" x 2.2" x 0.5" / Size 70
- LG Dare Extended Battery / 4.1" x 2.2" x 0.5" / Size 71
- Nokia E71 / 4.49" x 2.24" x 0.39" / Size 60
- Palm Pre / 3.9" x 2.3" x 0.67" / Size 71
- Samsung Instinct / 4.6" x 2.2" x 0.5" / Size 60
- Sony Ericsson Xperia X1 / 4.4" x 2.1" x 0.7" / Size 80
Quality/Usability : This review is different from our usual reviews. As you can see, this has nothing to do with games but still has to do with electronics. Everyone these days carries a cellphone. Some prefer less bulk and rather go commando (phone naked with no protection) while others want 360° protection to keep that device minty clean and scratch free. So here is an alternative that adds barely no bulk and protection at the same time...
Having purchased a SEIDIO Innocase II and Innocase Holster for my Blackberry Tour, there may be times where I didnt feel like carrying my holster but wanted the slight protection for my screen. Even though I have a Clarivue Screen Protector on my screen since day one, I just don't like any screens on any of my phones to be exposed. I purchased a cheap soft drawstring pouch on eBay but it was a tight fit and I was barely able to close the pouch. I happened to stumble upon the WaterField Designs Suede Jacket Cell Phone case. The cell phone case is made out of a soft, scratch-free microfiber: Ultrasuede. Ultrasuede is a completely synthetic material. The suede is smooth as you expect and would not damage or scratch your phone/screen.
The suede jacket I received was size 51 for the Blackberry Bold 9000. A naked Blackberry Bold will fit perfectly inside the suede jacket (sorry no pics). However, if you have a Blackberry Bold with SEIDIO Innocase, it won't fit. A Blackberry Tour 9630 with SEIDIO Innocase is a perfect fit (just a wee bit snug). A naked Tour would be slightly loose inside the case. Of course, a naked Blackberry Curve 8330 would be a little loose inside the jacket as well.
For an additional charge of $4, you can add a pocket. The pocket is sewed onto the suede and is made of neoprene/spandex type material. This pocket stretches and allows you to insert your credit card, drivers license, money, business cards and other items. I was able to fit 11 cards with the ability to add more if I needed but who really has 11+ credit cards? Of course, adding this much will definitely add bulk. You can even use this pocket to store your stereo headset, handsfree headset, spare battery...pretty much anything you can think of that is small enough to fit.
Conclusion : Overall, the WaterField Designs Suede Jacket Cell Phone Case is a wonderful case. It protects your phone from scratches and minor bumps. Not only does it protect your phone, but you can also use it to clean your screen. Unlike the suede made from animals, this suede is 100% spot and machine washable. It would be nice if WaterField Designs included a drawstring on the opening and can be used as a universal case for other cellphones, accessories or other electronics like MP3.
PROS:
- Very affordable
- Protects phone from scratches and minor bumps
- Also able to clean screens
- Washable
- Optional pocket can store other items
CONS:
- No drawstring
- Different sizes for different devices. Not universal.
by Published on February 1st, 2011 23:15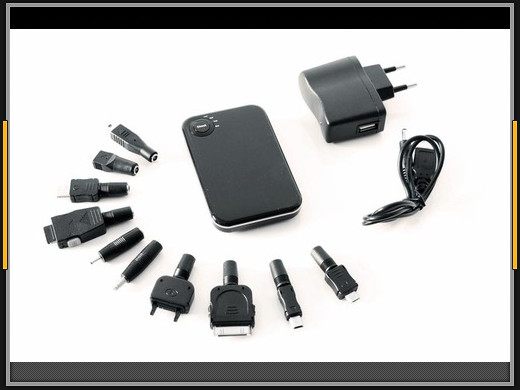
Talismoon Overlife Universal Charger
Manufacturer: Talismoon
Site: Buy from Divineo US
Price: $30.99
Universal Travel Charger (for non-EU users)
USB Power Travel Charger with Plug Converters / Travel All-in-One Universal AC Adapter with USB Power / Universal Travel AC Adapter Plug
Overview : More than a universal all in one charger, the Overlife will store energy to reload any devices independently. It is your ideal nomad companion. Overlife is a small, black shiny design nomad battery.
Just plug it to any USB port or wall plug, and you can directly charge any Motorola - Samsung - Nokia - Sony Ericsson - Samsung - iPhone - iPod - Mini USB - NDSL - NDSi and all PSP models. You can also store energy in, so you can charge any of your devices on the go.
A blue LED indicator shows you the level of charge and the charging status.
This perfect nomad companion will avoid you traveling with numerous bulky chargers, and provide emergency power in any situation.
Features:
- High capacity Lithium-ion rechargeable battery pack style
- Charge anywhere, recharge anything - standard USB input and output
- Inter-changeable connector heads charging different mobile phones, MP3/MP4 player, iPod, iPhone, PSP, NDS, etc.
- Power indicator LED shows battery capacity level.
- Impressive 2500mAh storage (recharge your devices and gadgets several times)
- None memory effect, short circuit protection
- Powerful power supply is enough for even the most power-hungry mobile devices.
Specifications:
- Battery Type: Lithium-ion polymer rechargeable battery
- Capacity: 2500mAh
- Input Voltage: AC 100V-240V/50Hz-60Hz DC 5V / 1A
- Output Current: 1000mA (Max)
- Output Volts: 5.4V (+/-0.2V)
- Output Current: 1000mA (Max)
- Charging time: 3 ~ 3.5 Hours.
- Cycle Life: At least 500 times
- Operating Temperature: -10°C / 40°C
- Storage and Transportation Temperature: -20°C / 50°C
- Dimension: 92.5 * 57.3 * 13.8 mm
- Weight: 80g
Quality/Usability : Sometimes I forget to charge my PSP, DS, iPod and most importantly, my Blackberry cellphone. Its worse when you're not near a wall outlet, computer or have your charger on you. These days, majority of portable devices can be charged via USB. Talismoon has developed a product to help give you enough power to beat that boss on the last level or to help you get through you long commute with your music/movie or even that last minute call to your wife/mother.
The Talismoon Overlife Charger has a nice piano black gloss casing but can be a potential to be a fingerprint magnet and scratches. The front has a "CHECK" button. Around this button are 4 LEDs. When you press the "CHECK" button, blue LEDs will light up that will display whether the battery is LOW, HALF or FULL. If Overlife is fully charged, all three blue LEDs will be lit up. As the charge slowly dissipates from charging other products, the LED next to FULL will get dimmer and dimmer. As more charge is drained from Overlife, the LED will get dimmer until it is fully discharged. The fourth LED is when the Overlife is in use (USE) and lights up blue as well.
I personally dont know why Talismoon choose this method of display when you check the status of battery. I would of preferred a single LED to tell me if its full, half or low. Having the LEDs dim can get a little confusing considering its a little hard to tell by the brightness of the LEDs. Or even a single LED that changes color to let me know how much power is left.
The charge time on this is a little disappointing. It takes about 3 hours from a drained Overlife to a fully charge Overlife. I can live with 1.5-2 hour charge but 3 hours is a very long time. To charge the Overlife, you can use the included USB cable. However, this USB cable has two purposes...one is to charge the Overlife and one is to charge other devices. Simply connect the USB cord into the USB out port at the top of Overlife, attach one of the heads to the other end of the USB cable and start charging! The USB out port has a rubber cover to protect it. Unfortunately, this cover doesnt come out or pull out. You will have to pull it back. Sometimes, this can get in the way. Would have been nice if it came out further.
I've tried charging a completely dead Sony PSP using the interchangeable head and Overlife, the charging indicator on both the PSP and Overlife constantly blinked on and off. I charged the PSP and at 10%, the Overlife still blinked and the power status light on the PSP didnt change orange but stayed green but you can slightly see orange blink. Despite the LED indicators, the PSP's power source now stated "external" but was not charging (when PSP is turned on). So it seems that Overlife is not powerful enough to charge a completely dead PSP since it probably requires more power in the beginning. You only get a steady orange light is if the PSP is on, you connect the charging cable and you put the PSP to sleep. If you turn on the PSP, it turns on and than turns off. You'll have to unplug the charging cable in order to turn the ...by Published on February 1st, 2011 23:15- Categories:
- PSP News,
- PS3 News,
- PS2 News,
- Nintendo Wii News,
- Xbox 360 News,
- Nintendo Gamecube News,
- DCEmu Reviews

XCM HDMI Blaster Converter
Manufacturer: XCM
Site: Buy from Play-Asia / Buy from Divineo China / Buy from Divineo France / Buy from Amazon
Price: $99.99
Overview : The XCM HDMI Blaster will allow you to connect any Component Video Source to your HDTV via HDMI inputs to save those valuable Component Video Inputs for other devices or for use with sets that do not have component video inputs but do have HDMI inputs.
Features :
- Finally an HDMI converter for older (hdmi-less) consoles that brings the analog signal into the digital age.
- Converts your old analog signal to the new High Definition standard digital signal (HDMI).
- Compatible with Wii, PS 2, Original Xbox consoles, Gamecube, PSP Slim and more.
- Also compatible with any component (YbPbR) signal (ie: DVD Player, DVB, Cable Box, Satellite Receiver, etc).
- Experience the Brilliant, Colorful and Sharp video output on your HDTV.
- Supports any device with VGA output. Input resolution for vga is 800x600, 1024x768.
- Works on any HDTV or Monitor with HDMI or DVI inputs.
- Fully automatic power supply management. When there is no input signal, the power supply will shut off automatically for energy savings.
- Includes DVI to HDMI adapter.
Quality/Usability : XCM has been pumping out a lot of audio/video adapters for video game consoles whether it be VGA or DVI/HDMI. The newest product from XCM is the HDMI Blaster. The HDMI Blaster lets you converter analog signal to digital signal. It claims to be compatible with the PS2, Original Xbox, GameCube, PSP Slim and many more. However, older consoles dont have HDMI so you'll need a YPbPR (Component) cable. Since older consoles never came with these, you would have to purchase them separately whether they be OEM cables or XCM Multi-Console Component Cable v3.
In the package, you'll get the HDMI Blaster, HDMI Male/Male cable, HDMI to DVI Converter, Power cord and supply and instruction manual. Since I rarely read the manual to any of my electronics, hooking up the HDMI Blaster was pretty much straight forward and simple. You simply plug the component cable to the HDMI Blaster, plug the power to the wall and turn on your video game system and HDTV. The top of the HDMI Blaster contains a switch. This switch lets you toggle between Component output and VGA.
Component signals are outputted at 720p and resolution of 1024x768 on VGA. Although low even though you might have a display/console that can output 1080i/p, the quality is excellent. Since I got rid of my launch PS2 and original Xbox, I had to go and borrow one from a friend who actually likes to keep everything. I did however, have some games left since the PS3 and Xbox 360 are backwards compatible.
The colors were vibrant. From a normal and distant distance, the quality looks great. Of course, if you look up close, you will see jagged lines and pixels. Some will say that component will give just as good of a visual but if you're connecting component cable to the HDMI Blaster and connecting it via HDMI to the monitor, the quality is actually improved and better.
Since I was testing some older consoles, I thought I would try the Wii since it outputs at 480p. Yes, I can use component but wondered how it would look. After connecting the Wii to the HDMI Blaster, the quality was a lot better just like the older consoles. I was impressed. The PSP also produced great quality but was hampered with the length of the cord so you would be sitting close to the display.
Those looking to use VGA on this or computer monitor, I would not recommend this option. Using VGA would result in the quality being blurry and stretched out. If you're looking for a VGA adapter, I suggest taking a look at XCM 1080p Mega-Cool VGA Box. I would solely use the HDMI Blaster for component and DVI/HDMI.
Here is a video of the HDMI Blaster Converter in action...
Conclusion : Overall, the XCM HDMI Blaster is a great product for those looking to connect their old consoles and Wii via HDMI. Consoles connected via component will look great coming out of the HDMI Blaster. Unfortunately, the highest output for the HDMI Blaster is 720p and resolution of 1024x768 on VGA regardless if your console or monitor can display 1080i/p. Hopefully, XCM will release a 1080p version of this.
Images via comments. ...- Search DCEmu
- Advert 3
 News Categories

- Links of Interest
 Sony Consoles News


- Nintendo Consoles News


- Sega Consoles News


- Apple & Android News
- Xbox Consoles News


- Open Source Consoles News
 DCEmu News Archive
- Advert
- Retro Consoles News


- PC News

- Latest DCEmu News


- DCEmu Network Sites
-
 Menu
Menu  Forum Stats
- What is the DCEmu Homebrew & Gaming Network
Catherine: Full Bodys English translation for the Vita