

 DCEmu Homebrew Emulation & Theme Park News
PS3 News
by Published on February 2nd, 2011 16:09- Categories:
- PS3 News,
- DCEmu Reviews
PlayStation Move Motion and Navigation Controller
*Imported accessories work on all consoles/regions. i.e. NTSC-J (JPN) accessories will work on NTSC-U (US) systems.
PS3 Move Controller
Manufacturer: Sony
Site: Buy from Play-Asia (JPN) / Buy from Play-Asia (US) / Buy from Play-Asia (Asia) / Buy from Amazon / Buy from Amazon (with PS3 Eye Bundle) / Buy from VolumeRate (with PS3 Eye Bundle) / Buy from LighTake (with PS3 Eye Bundle)
Price: $50.00 (Move Controller) / $99.99 (Move Controller + PS3 Eye Camera Bundle)
PS3 Move Navigation Controller
Manufacturer: Sony
Site: Buy from Play-Asia (JPN) / Buy from Play-Asia (US) / Buy from Amazon
Price: $30.00
PlayStation 3 Eye USB 2.0 Camera
Manufacturer: Sony
Site: Buy from Play-Asia (JPN) / Buy from Play-Asia (US) / Buy from Play-Asia (Asia) / Buy from Amazon
Price: $40.00
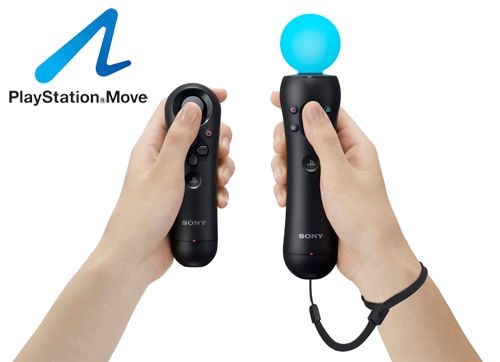
PlayStation Move Overview : PlayStation®Move redefines motion gaming with the most immersive and realistic gaming experience only possible on the PlayStation®3 system. The simple, easy-to-use controller captures a full range of motion giving you ultimate control over how you play the game. With a diverse selection of games and new ones launching all the time, you can enjoy hours of fun with friends and family.
The PlayStation®Move is a combination of the PlayStation®3 system, the PlayStation®Eye camera and the PlayStation®Move motion controller. The motion gaming technology is housed in the pairing of the motion controller and the eye camera. The sphere at the end of the motion controller allows the eye camera to pinpoint your every movement and position within the room. This tracking is translated, with absolute precision, into gameplay. So when you hit that bullseye, it wont be a fluke.
PS3 Move Controller Overview : The cornerstone of the PlayStation Move system, the PlayStation Move motion controller combines advanced motion sensors, a dynamic color changing sphere, vibration feedback, and an easy to use button interface to provide the ultimate in motion-based gaming. Equipped with a three axis gyroscope, a three axis accelerometer and terrestrial magnetic field sensor, PlayStation Move motion controller tracks the precise movements and the angle of the controller. The PS3 system also detects the absolute position of the controller in 3D space by using PlayStation Eye camera. Highly sensitive movement tracking can be accurately traced back to the game, allowing intuitive gameplay as if the player is within the game. The PlayStation Move also features the familiar PlayStation controller button orientation, for seamless play from the very first use.
PS3 Move Controller Features :
- Works with PlayStation Eye camera to accurately track player position.
- Includes action buttons of DualShock 3 and Sixaxis wireless controller for direct input.
- Sleek and Wireless.
- Built-in rechargeable Li-ion battery.
- Advanced motion sensors in the controller precisely track both fast and subtle movements.
- Color of the sphere's light provides visual feedback during gameplay.
- Vibration feedback is felt during specific actions.
- Bluetooth technology supports wireless gaming.
- Simultaneously use up to four motion controllers with a PS3 system.
- Charge the controller and automatically pair it with the PS3 system via a USB cable (Type A - Mini-B).
* Users will need to use the PlayStation Eye camera to enjoy PlayStation Move motion controller on PS3.
Quality/Usability : First thing to pop into everyone's mind when we first heard about the PlayStation 3 Move Controller is that it's a copy of the Wiimote. Although the concept is the same (two motion controllers), the Wii detects movement with its built-in accelerometers pointed at a sensor bar whereas the Move can be tracked precisely within real 3D space using a camera. With the Wii, its all controlled with a flick of the wrist (literally). With the Move, its more...it requires complete movement.
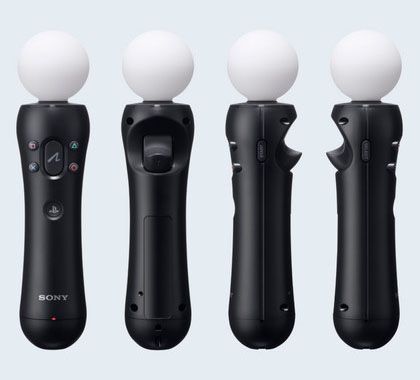
The Move has four familiar buttons that we are all accustomed to when it comes to PlayStation. These four buttons surround the Move button which acts as the OK/Accept command input. Below the Move button is the PS button that takes you back to the XMB (same found on normal controllers such as the Dual Shock 3). On the back is a T trigger and on the butt (bottom) are two ports: a mini-USB for charging and syncing and an additional "extension connector" as well as connectors. These connectors allows you to place the Move controller on a charging dock. The extension connector allows buttons to be placed on attachments such as Sony's PlayStation Move Sharp Shooter Attachment for easier accessibility, so you do not have to press the buttons on the Move controller itself. Out of the package, a wrist strap is already attached to the Move controller. As for the white sphere at the top, it's made of opaque rubber that lights up when you're playing a Move compatible game.
The Move Controller is comfortable to hold in the hands as its contoured. All the buttons are easily accessible and within reach. But as you can see from the picture above and what you have read so far from our review, there's no mention of directional pad. That leads us to our second part of the review...the Move Navigation Controller.
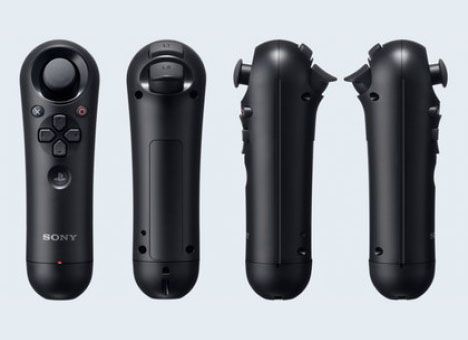
PS3 Move Navigation Controller Overview : The PlayStation Move Navigation Controller is a supplementary controller developed to further expand the experience that PlayStation Move games can offer. It can be used in most PlayStation Move games that require navigating an in-game character as it replicates the control features of the left side of DualShock 3 or Sixaxis wireless controllers into one's PlayStation Move experience.** The PlayStation Move Navigation Controller adds an analog stick, directional buttons and two face buttons into the PlayStation Move's control scheme. In addition, the Move Navigation Controller contains the L1 button, L2 button and L3 button for actions and commands common in advanced gaming.
PS3 Move Navigation Controller Features :
- Wireless control adding to, but completely untethered from PlayStation Move motion controller.
- Intuitive navigation of in-game characters.
- Easy and intuitive XMB menu navigation.
- Built-in rechargeable Li-ion battery.
- Charge the controller and automatically pair it with the PS3 system via a USB cable (Type A - Mini-B).
- Sleek curved body design that easily pairs with the Move motion controller.
* Users will need to use the PlayStation Eye camera to enjoy PlayStation Move motion controller on PS3.
** DualShock 3 and Sixaxis wireless controllers can be used in place of the Navigation controller for all games that are compatible with the Navigation Controller.
Quality/Usability : So the Move is about motion but what about if you're playing a game and need to navigate/move? In comes the Move Navigation Controller. The Nav controller has all your traditional analog controls such as the joystick and directional pad underneath. Right in-between the joystick and d-pad are usually the main buttons X and O. These two buttons are usually used for ACCEPT and CANCEL in games, respectively. Below the directional pad is the same PS button found on the Move controller that takes you to the XMB. On the underside near the top are two buttons; L1 and L2. The butt (bottom) also has a mini-USB to charge the Navigation controller if you prefer to use a mini-USB cable. There are also connectors on the bottom that allows you to place the Nav controller on a charging dock.
Like the Move controller, the Navigation controller also has a slight contour design to it that makes it fit into your hand comfortably. Buttons are also easily accessible.
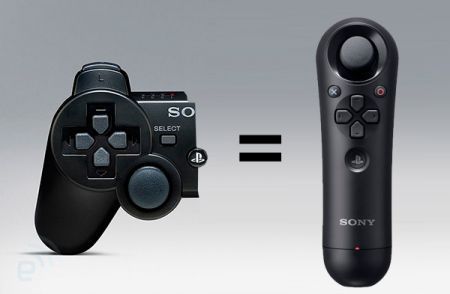
Why didn't Sony include the Navigation controller? Well, its technically not required. Why you ask? Well, you can actually use your Dual Shock 3 controller as a Navigation controller. If you look at majority of the buttons on the Nav controller, its found on the left half of the DS3 controller; joystick, directional pad, L1 and L2. But with the Navigation controller ($30), it makes playing a bit more convenient and more comfortable.
Conclusion : Overall, the PlayStation Move Motion and Navigation Controller is a must own accessory. As newer games are released, they will support the Move and Navigation controllers. With these two controllers or even just the Move controller, it gives gaming a new experience instead of the typical controller. The Move controller comes in a different variety. You can purchase just the Move controller for $50, purchase a bundle which includes the Move controller, PS3 Eye Camera and a game (depends on your region) or if don't own a PS3 yet and plan on picking one up, they have a PS3 bundle that includes the console, Dual Shock 3 controller, PS3 Eye Camera and Move controller.
Some games require two..yes, TWO Move controllers. That's $100 worth of Move controllers alone. If you have friends/family to play with, you'll need to pick up an extra Move controller regardless. But if you don't and you usually play alone, this is something you'll have to factor in plus the cost of one or two Navigation controllers.
Images via commentsby Published on February 2nd, 2011 16:09- Categories:
- PS3 News,
- DCEmu Reviews

PS3 Move Light Gun Controller Shell
Manufacturer: Fomis Electronic
Model: TP3-385
Site: Buy from LighTake
Price: $14.79
Overview : PS3 MOVE light gun is a product designed and developed according to the PS3 console shooting games, It can enhance the simulation effect of the games. Just insert the PS3 MOVE left and right controller into the shell of the gun and then you can use it. In addition, it completely does not affect the relevant operations of PS3 MOVE controller and the access of other accessories. Also, it is attractive in appearance, original in pattern and fully complies with the ergonomic design principles.
Features :
- Brand New Ergonomic Plastic Light Gun for Sony PS3 Move Controller
- Suitable for the PS3 gun shooting games in PS3 Move technology
- Realistic shape design and it brings users the best gaming experience
- Unlock the button of pistol and uncover the controller lid
- Insert PS3 move controller into the corresponding area of light gun
- You may feel super-shock game effect when using the gun
Quality/Usability : When there's controller, expect 3rd party accessories for those controllers. When the Nintendo Wii was released there was a flood of accessories for the motion controllers such as the first ever review of the Wii boxing gloves, Controller Grip, Sport Controller Extensions and it's accessory attachments isn't complete unless you have Light Gun.
When Sony showed off the PS3 MOVE and Navigation controller at E3 2010, they showed some of their own accessories and attachments. When there's money to be made, 3rd party manufacturers will be right on top of releasing their own. Today, we have the Ergonomic Plastic Light Gun.
Unlike Sony's light gun attachment and some other 3rd party light gun shells, the MOVE controller goes on top and the Navigation controller goes on the back of the grip. At first look, the gun looks pretty big. It looks like a gun used for laser tag.
Lets start with the MOVE controller. The MOVE controller fits snugly in its spot and is held in place with a plastic "buckle" that goes over it to keep it from falling out. No need to worry about the wrist strap on the MOVE controller as it still fits into the shell. To the left and right of the shell near the tip are buttons for the SELECT and START button. At the very front is a big button. This pulls the T trigger. What's nice about this huge area is the ability to put your hand underneath for support and grip. It's kind of like holding a shotgun.
For the Navigation controller, it is held in place by a wishbone type "clamp" that also acts as the sight for aiming. There's really no easy way of lifting it up except for pulling from one of the edges. The trigger inside the grip is used to pull the L2 trigger on the Navigation controller. The top near the sight are two black buttons (one of the left and right). They both push the L1 button but makes things easier depending if you're a righty or lefty. If you have your left hand towards the front and your right hand holding the grip, you can have your middle finger pulling the L2 trigger while you have your index finger (pointer), pressing the L1 button. Your thumb can control the joystick, directional buttons or X/O buttons
Conclusion : Overall, the PS3 Move Light Gun Controller Shell is a bit big for a light gun shell but better than holding the MOVE light gun shell in one hand and the Navigation controller in the other. With this shell, the placement of buttons and the way you hold the shell feels more natural in your hands. Placements of buttons are easily accessible but the grip is little big for my liking. The size of the Navigation controller is perfect so adding a plastic shell around it makes it thicker.
Images via comments ...by Published on February 2nd, 2011 16:08- Categories:
- PS3 News,
- DCEmu Reviews
AVRKey AVR Key USB PSGroove Dongle
Manufacturer: AVRKey (by PS3Key)
Site: Buy from AVRKey Distributors
Price: $49.99
Overview : The AVRKey is PS3Key's open source solution similar to that of Teensy's and AT90USB's. It will not break your warranty seal and is compatible with all PS3 models, both Fat and Slim. Easy-to-use software for backing up, managing, and playing games from external USB Hard Drive. The AVRKey will supports installing homebrew application on PS3 and external USB media. AVRKey supports PSGroove .hex files. THIS DOES NOT WORK ON FIRMWARES 3.42 OR ABOVE UNTIL A NEW EXPLOIT/METHOD IS FOUND!
Requirements :
- PS3 Console (fat or slim)
- Console (firmware) version 3.41 only
- Remove all discs from the drive
- Do not connect any devices to the console via USB
- IMPORTANT: The console must be completely switched off before using AVRKey. For fat versions, use the switch at the rear. For slim versions, simply remove the power cable. This is extremely important for the process to work correctly when you start the console.
Features :
- USB Plug and Play solution that installs in seconds without any need to open up the PS3.
- Does not break your warranty seal.
- Compatible with all PS3 models*, both Fat and Slim.
- Supports all regions: USA, JAP, PAL and KOREA.
- Fully updatable via USB on your PC using an encrypted bootloader
- 32KB onboard flash (most competing products only have 16KB flash)
- Disables forced software updates and will never brick your console.
- Supports most games and homebrew applications.
- Easy-to-use software for backing up, managing, and playing games from external USB Hard Drive.
- Playing games from HDD is much more enjoyable, benefiting from greatly enhanced seek and loading times.
- Supports installing homebrew application on PS3 and external USB media.
- AVRKey are shipped blank allowing you to install your own .hex files.
* Currently not compatible with 3.42 firmware
Quality/Usability : Also read our PS3Key review.
There has been a lot of confusion between consumers and retailers since retailers are naming it AVR PS3Key or something along those lines. So lets start off by clearing the confusion. AVRKey and PS3Key are made by the same people, both look identical and both use the same hardware but are BOTH different products. The BIG difference between the two is that PS3Key comes shipped with their own proprietary firmware (.upd) file, own software that reads/loads .upd files. AVRKey are shipped blank...as in nothing. With AVRKey, you install your own HEX files (.hex)..the same files as PSGroove.
IMPORTANT : PS3Key comes with YELLOW sticker. AVRKey comes with GREEN sticker. This is how you will know what you received.
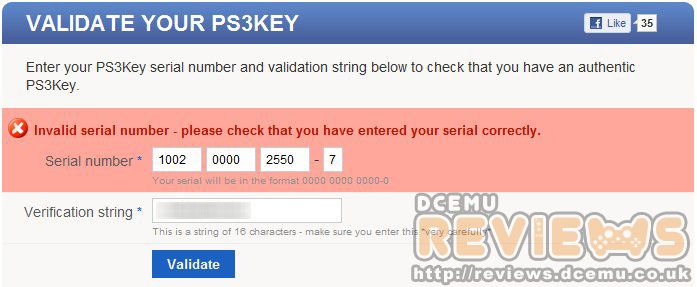
The AVRKey comes in an anti-static bag and on this bag is also a GREEN sticker. This sticker is your serial number and verification string. Unfortunately, there is no URL to enter this to see whether or not it is authentic or whatever the real purpose of it is for at the moment. Entering the serial and verification string at http://www.ps3key.com/en/validate/ will result in an error. This goes to show that AVRKey and PS3Key are two different products.
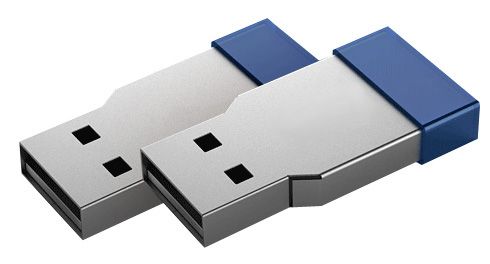
The AVRKey is housed in a metal casing that looks exactly like PS Jailbreaks and PS3Key. There is also no writing or logo on the housing to prevent any problems with distribution. I personally would have liked AVRKey printed on it as it is a USB development board and is shipped blank. This also distinguishs the difference between AVRKey and PS3Key. The AVRKey measures approximately 1.25" (length) x 0.50" (wide). On the end of the dongle is a blue rubber cap. This protects the board from being exposed and prevent dust and other particles from entering as well as softens the brightness of the LED lights. Like PS3Key, AVRKey dongle is running on ATMEL MEGA32U2 (ATMEGA32U2) and is upgradeable via USB port. When I first received my AVRKey, the USB board was bent. It could not be inserted into a USB port on my computer. So I had to take off the blue rubber cap, pull back on the 2 pins (they are very fragile and can break off if played with too much) and pull the board out. When the soldering was done to the USB and chipset, it was not leveled. I had to bend the USB down so that it was leveled with the board. I was afraid I would break it but didnt. Put it back into the metal housing, slowly closed up the pin and put back the rubber cap.
Instructions on How to Load HEX Files :
Required files:
- ATMEL FLIP Software or AVRKey's simple GUI program
- PSGroove HEX (.hex - Teensy) or "open" version of PS3Key
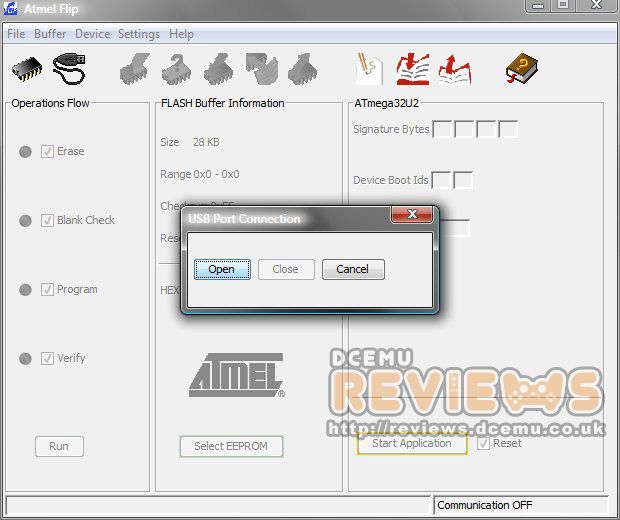
Before you start, download ATMEL's FLIP software via link above (at time of review, AVRKey's GUI program was not available. Review will be updated when available). To get the AVRKey into Update Mode, you must perform the same method as the PS3Key, which is remove and insert the dongle 3-4 times in your computers USB port. When it enters into update mode, the red and blue LEDs will be lit up on the dongle and you will be shown this image:
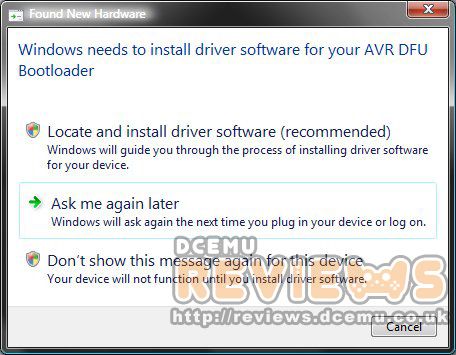
In order for the AVRKey to be recognized, you need to have driver installed. Click on "Locate and install driver software (recommended)"
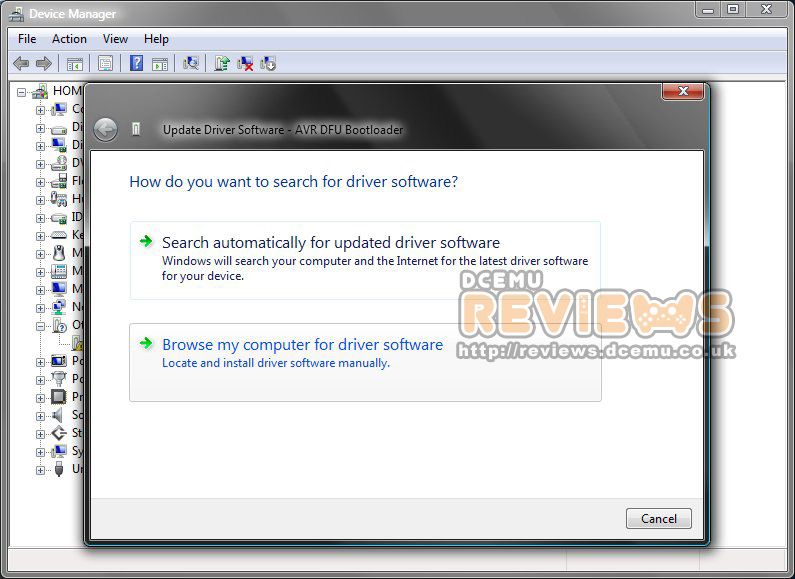
To locate the driver, click on "Browse my computer for driver software"
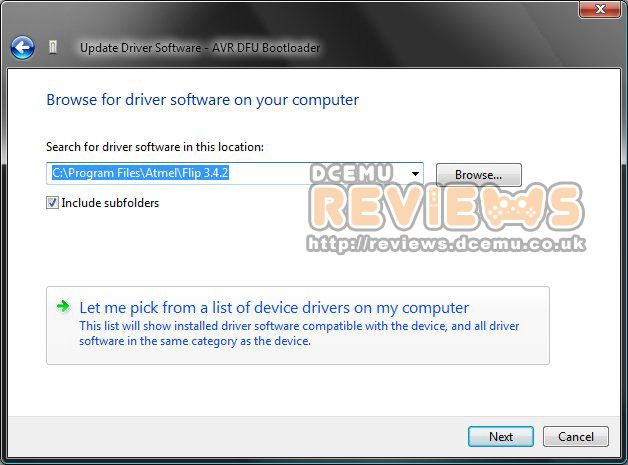
Once you have FLIP downloaded, browse to where FLIP is located on your computer.
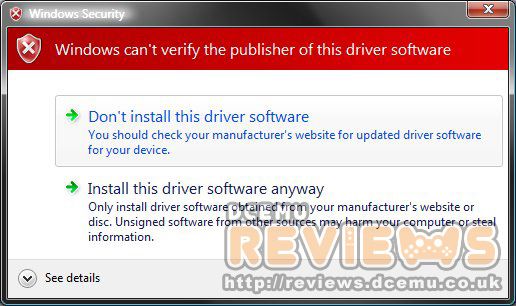
Windows Security may pop up with a warning message saying it can not verify the publisher. Ignore this and click on "Install this driver software anyway"
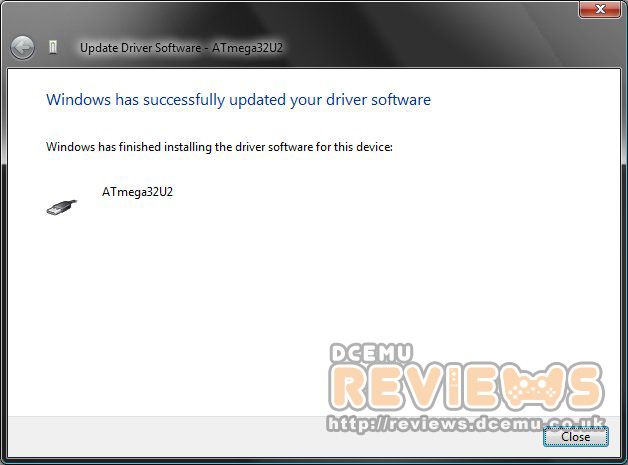
Once completed, you will get this screen
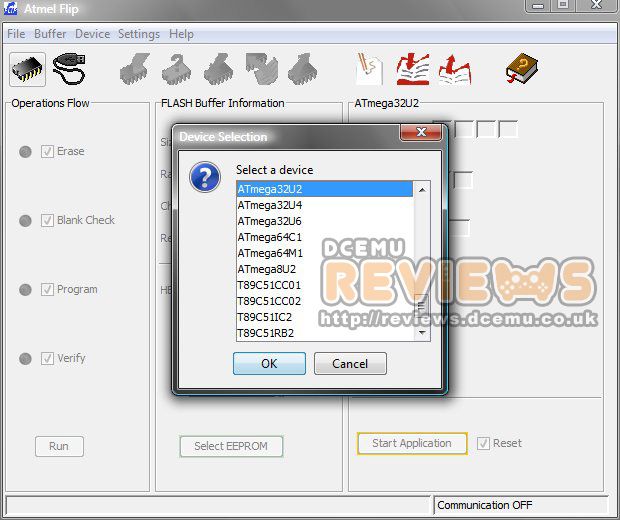
1. Start the FLIP program and click on 'Select a Target Device' (image of PIC chip next to USB cable).
2. A new window will show up showing a bunch of devices
3. Select "ATmega32U2" and click "OK"
1. Click on 'Select a Communication Medium' (image of USB cable) and a drop down will display
2. Click on USB and a new window will open.
3. Click on "OPEN"
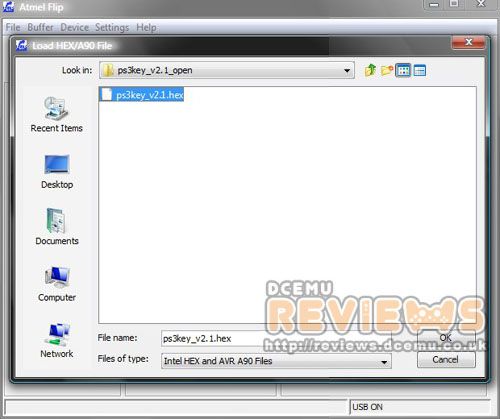
1. Click on FILE and "Load HEX File..."
2. A browser window will open and locate where you saved your HEX file.

Click on RUN and the program will start to load the HEX and update the AVRKey
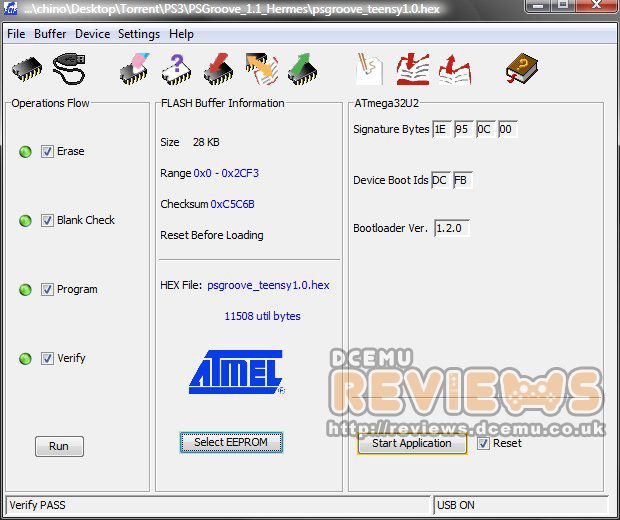
When completed and successful, the bottom status bar will say "Verify PASS". Remove dongle and insert into PS3.
Operation :
Once the power to your console is completely disconnected:
- Turn on the console (PS3 Fat with the switch, PS3 Slim connecting the power cable)
- Insert AVRKey into a USB port on the PS3.
- Start up the PS3 and press the EJECT button.
- If the above process worked, there will be a link to Install Package File in the game menu.
In order to make sure the AVRKey dongle worked flawlessly, I had to uninstall all my homebrew applications that I had originally installed. To install applications or any homebrew applications, you will need to download and save the .pkg files to a USB drive such as thumbdrive or harddrive. To install, simply insert USB drive to the PS3 and navigate to "INSTALL PACKAGE FILES" on the XMB under GAME. Select the file you want to install by pressing X and it will automatically install the file. All applications installed and loaded without any problems.
There are no other files or programs available to download from www.avrkey.com. Since AVRKey uses PSGroove .hex files, I don't think there will be much released from AVRKey's website. As of 10/1/2010, PS3Key has released an "open" version of the PS3Key firmware as a HEX file which can be used with other generic USB dongle devices and can be downloaded at http://www.ps3key.com/en/members/downloads/.
Conclusion : Overall, the AVRKey AVR Key USB PSGroove Dongle is a great alternative to the Teensy's or AT90USB's...and probably better looking. The dongle is compact and light in weight. What's great is that you can install any HEX file whether it be PSGroove's (Teensy) or PS3Key's "open" version. But is a bit pricey. The AVRKey is priced the same as that of the PS3Key. My only complaint is that there is no logo or indication that its a AVRKey. It looks completely identical to the PS3Key. If you were to remove both from its anti-static bag and mix them up, you wouldn't know which one is which until you inserted it into the PS3 or computer. Depending on the HEX file and how it was compiled, there may not be any LEDs lit up that changes from red to blue to let you know it loaded successfully upon PS3 boot up. If you install PS3Key's "open" version (http://www.ps3key.com/en/members/downloads/), LED will be enabled.
Please note that none of the "upgrade" products listed in this site are endorsed by Nintendo, Sony and/or Microsoft. DCEmu Reviews and DCEmu Network does not condone piracy. The primary functions of a "modchip" and/or "flashcart" are to allow you to play imported games and homebrew software that you legally own or simply just for experimenting with hardware. We in no way endorse piracy, and encourage all users to do the right thing and support the developers/manufacturers that support them. We do not take any responsibilities for any use outside of these parameters or where the use of such a device is illegal.
Images via commentsby Published on February 2nd, 2011 16:08- Categories:
- PS3 News,
- DCEmu Reviews
P3Free Max-Pic USB Trainer Board
Manufacturer: Max-Pic (by Wii-Clip)
Site: Buy from LighTake / Buy from IC2005 / Buy Max-Pic + Serial Programmer from IC2005 / Buy Max-Pic + Max-Prog Add-On from IC2005
Price: $39.90 (Max-Pic) / $49.90 (+ Serial Programmer) / $49.90 (+ Max-Prog Add-On)
Overview : The last Max-Pic is one very powerful universal PIC trainer board for every firmware and work at 12Mhz! THIS DOES NOT WORK ON FIRMWARE 3.42 OR ABOVE UNTIL A NEW EXPLOIT/METHOD IS FOUND!
Specifications :
- Use PIC18F2455/2550 MCU chip
- Comes with HID Boot Loader, you can upgrade via USB port directly
- Comes with the 8pin FPC port,you can program any compatible firmware to PIC chip via FPC programmer
- Comes with one standard 6pin ICSP port, you can program any compatible firmware with any ICSP programmer
- Comes with one RESET/BTL combo button, can use to reset the PIC or enter BTL mode for upgrade
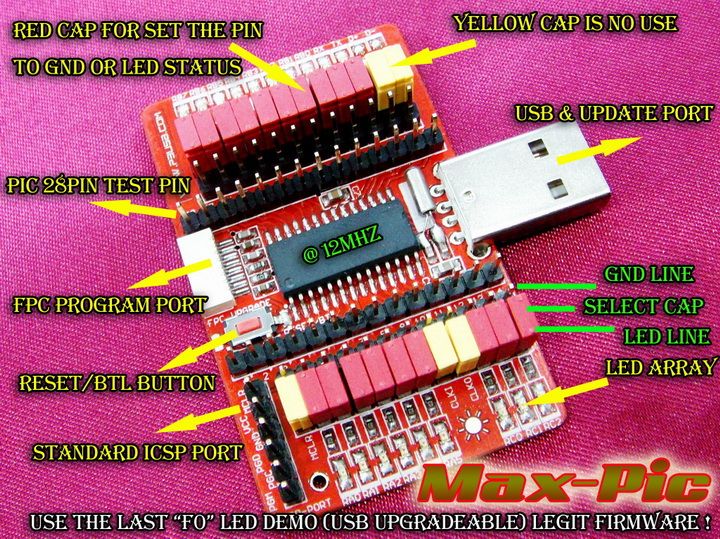
- Comes with 28pin testing pin, very easy to link to the PIC chip with every pin and test
- Comes with 24 pin selector array, you can set almost PIC pin to LED status or pull down to GND
- Comes with 19 LEDs display array, you can see these pins working status
- Comes with the last "F0" LED demo firmware
Quality/Usability : The Max-Pic is not your average and normal looking PS3 USB Jailbreak dongle. The Max-Pic is actually a PlayStation 3 jailbreak device and much much more. Not only can you jailbreak your PS3 with ANY .hex file, but you're also able to reprogram the Pic-Fun (if it ever gets corrupted), use it as a Xbox 360 SPI NAND flasher (more info below) and for various USB/LED projects that you may have.
The quality of the dongle is very well made. Even if you were to screw up and corrupt Max-Pic, you can reprogram it and fix it. With other jailbreak dongles, you're unable to do this.
Required Files :
- Latest iLLNESS PIC Hex files (http://psx-scene.com/forums/546948-post3.html - If using USB HID Bootloader)
- P3Free_Updater_[Nov.17th 2010].rar (or latest file)
With the new P3Free Updater, you no longer need to download any .NET or .DLL files.
How to Update Max-Pic :
- Insert Max-Pic into USB port of your computer
- Now just press the RED RESET/BTL button once which puts the Max-Pic into bootloader mode
- P3Free Updater should detect your kit
- Click the "Open Hex File", select the right HEX and open it
- Now click the "Program" button, when you see "Verify Started", then mean it's upgrade complete
- You should see the Max-Pic will auto reset and start to run the LEDs demo code
- All done!
How to Softflash Pic-Fun and Max-Pic : (courtesy of frankreynolds1)
How to Hardflash Pic-Fun and Max-Pic : (courtesy of frankreynolds1)
If for whatever reason that your Max-Pic no longer works, you can use the Serial Programmer to reprogram it. The instructions are as follows:
Click here to download the PICPgm v1420 PC program
How to program ANY firmware to your Max-Pic :
[1] Insert the Serial programmer to Serial Port of your PC and click the "Search" button, to see if it can find programmer or not.
If can't auto detect, then means your serial port has a problem. Please check it or change to another PC and try again, until to it can auto detect JDM hardware.

[2] Now link to your PIC kit and click the "Search" button again, it should can auto detect the PIC chip.
If not, maybe you insert the FPC cable in a wrong side.

[3] When everything is ready, click the "Browse" button to select Bootloader_USBHIDC18_P3Free_V1.0_12MHz_BTL-pin1_MCLRon_LVPoff_F0_Version.hex.

[4] Then click the "Program" button

[5] It will start to burn and the progress bar will stop to respond, it may seem like it froze but its still programming.

[6] After program complete, this green window will show 3 seconds and auto close, now the new firmware is ready for test, all done!

But not everyone has a serial port on their PC. So the Max-Pic (P3Free) team has released a Max-Prog Add-On which attaches tot he top of the Max-Pic and a Max-Prog 2-in-1 which is a Max-Pic and Pic-Fun together. This connects on top of the Max-Pic.
Conclusion : Overall, the P3Free Max-Pic USB Trainer Board is a very powerful USB device that can do many things. Not only can it be used for jailbreaking the PS3 and fixing Pic-Fun dongles, it can also be used as a Xbox 360 SPI NAND flasher (more info here). If you're into USB development, this would also be great for your USB/LED projects. Even if you're trying out stuff for the PS3, this would be the perfect board to try all your experiments without the fear or damaging your dongle. However, if using this on a PS3 as a jailbreak device, there are many other options available. The size of the dongle is very big in width and will cover other USB ports on the console. To "fix" this, you'll need a USB extension cable.
Please note that none of the "upgrade" products listed in this site are endorsed by Nintendo, Sony and/or Microsoft. DCEmu Reviews and DCEmu Network does not condone piracy. The primary functions of a "modchip" and/or "flashcart" are to allow you to play imported games and homebrew software that you legally own or simply just for experimenting with hardware. We in no way endorse piracy, and encourage all users to do the right thing and support the developers/manufacturers that support them. We do not take any responsibilities for any use outside of these parameters or where the use of such a device is illegal.
Images via commentsby Published on February 2nd, 2011 16:08- Categories:
- PS3 News,
- DCEmu Reviews

4-Port USB Hub SD Card Reader Slim
Manufacturer: N/A
Site: Buy from LighTake
Price: $8.60
Overview : This item is only suitable for Sony PS3 Slim; it has two USB interfaces, four USB ports and one SD card slot, really a useful and multifunctional item.
Features :
- Dedicated to expand the USB port of the PS3-Slim console and also enhance its card reader functions
- It looks exquisite and is quite convenient to use
- Just insert two USB plug into the corresponding USB interface of the console, and then you can use it
- In addition, when playing games, you can insert and charge four original controllers simultaneously
- Also, you can insert the SD card into the SD interface to use on the PS3-Slim console
- It is very easy, convenient and indeed a necessity for gamers
Quality/Usability : Whenever there is a new smaller model of the console, not only is cost of manufacturing cheaper but somethings are also removed to keep costs down. In the case of the PlayStation 3, the Phat version (earlier models) started off having 4 USB ports and a card reader. With the PS3 Slim, its down to 2 USB ports and no card reader at all. With 2 USB ports, there is not much you can do if you have to charge more than 2 electronic devices.
In comes a 4-port USB Hub with SD Card Reader for the PS3 Slim. Since the PS3 Slim only has 2 USB ports, the hub occupies both ports. Essentially, you're only gaining 2 additional USB ports. The SD card slot allows you to view and/or transfer music, video and pictures. Unfortunately, you still can not charge your controller or electronic device through USB unless the PS3 is fully turned on. No more wire mess or tangled wires since the hub blends in with the PS3 Slim pretty well.
The USB hub does not fit completely in the PS3 Phat as the bottom of the PS3 Phat (when laid horizontal) gets in the way. If it did fit, the 3rd USB port is blocked, leaving only the 4th USB port free to be used.
Instructions :
- First ensure that your PS3 Slim console is powered off.
- Insert the 4-Port USB Hub SD Card Reader Slim into the USB port on the console, and the buckle position is upward, press it gently and pull outward when removing it.
- When using the USB cord to power your PS3 wireless controller, please give priority to use the USB 1 interface.
- You can have multiple USB controllers plugged in during a game.
- When using the SD card reader, you can store file(s) inside the SD card onto the PS3 Slim console. You can also copy the file(s) onto the SD card.
Conclusion : Overall, the 4-Port USB Hub SD Card Reader Slim adds 2 additional USB ports and a SD Card Reader to the PlayStation 3. PS3 Phat owners do not need to look at this since there is no need for this. This is a great addition for those looking for additional USB ports without wires coming out of the USB port. The USB hub is perfect for Rockband and Guitar Hero gamers looking for additional USB ports. It would have been nice if it only occupied 1 USB port leaving the 2nd port free for additional use. 2 additional USB ports may not be much but its 2 more than what you had before.
Images via comments ...by Published on February 2nd, 2011 16:06- Categories:
- PS3 News,
- Xbox 360 News,
- Joypad News

Chances are, a lot of people will be looking to buy an arcade stick with Marvel vs. Capcom 3 next week. Mad Catz, anticipating this obvious interest, is producing one just for such an occasion.
The "Marvel vs. Capcom 3 Arcade FightStick Tournament Edition" keeps the hardware design and Sanwa Denshi brand arcade components from previous Street Fighter IV Tournament Edition FightSticks and adds new, surprisingly restrained Marvel vs. Capcom 3 artwork to the top panel of the stick. Like the most recent iterations of the FightStick, it also includes a locking mechanism to prevent accidental use of the turbo switches.
5,000 MvC3 FightSticks are being produced and will be available from Mad Catz's online store. No price has been named, but previous Tournament Edition sticks have retailed for around $150.
http://www.joystiq.com/2011/02/01/ma...-for-the-game/ ...by Published on February 2nd, 2011 15:58- Categories:
- PS3 News,
- DCEmu Reviews
PS3Key USB PSGroove Jailbreak ATMEL
Manufacturer: PS3Key (by WiiKey)
Site: Buy from Acekard.ca / Buy from LighTake / Buy from Divineo Spain / Buy from PS3Key Distributors
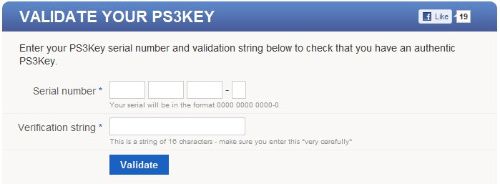
Validate your PS3Key: Validate Here (Enter Serial Number and Verification String on yellow sticker)
Price: $49.99

Overview : The PS3Key is Team WiiKey's first product in the PS3 market. They decided to release a clone of the PS Jailbreak, a USB Plug and Play solution that installs in seconds without any need to open up the PS3. It will not break your warranty seal and is compatible with all PS3 models, both Fat and Slim. Easy-to-use software for backing up, managing, and playing games from external USB Hard Drive. The PS3Key will supports installing homebrew application on PS3 and external USB media. THIS DOES NOT WORK ON FIRMWARE 3.42 OR ABOVE UNTIL A NEW EXPLOIT/METHOD IS FOUND!
Requirements :
- PS3 Console (fat or slim)
- Console (firmware) version 3.41 only
- Remove all discs from the drive
- Do not connect any devices to the console via USB
- IMPORTANT: The console must be completely switched off before using PS3Key. For fat versions, use the switch at the rear. For slim versions, simply remove the power cable. This is extremely important for the process to work correctly when you start the console.
Features :
- USB Plug and Play solution that installs in seconds without any need to open up the PS3.
- Does not break your warranty seal.
- Compatible with all PS3 models*, both Fat and Slim.
- Supports all regions: USA, JAP, PAL and KOREA.
- Fully updatable via USB on your PC using an encrypted bootloader
- 32KB onboard flash (most competing products only have 16KB flash)
- Disables forced software updates and will never brick your console.
- Supports most games and homebrew applications.
- Easy-to-use software for backing up, managing, and playing games from external USB Hard Drive.
- Playing games from HDD is much more enjoyable, benefiting from greatly enhanced seek and loading times.
- Supports installing homebrew application on PS3 and external USB media.
- Optionally PS3Key can be supplied with an "open" firmware which does not support backup loading. Users would then have to download a firmware update for PS3Key to get full functionality.
* Currently not compatible with 3.42 firmware and up
Quality/Usability : Also read our AVRKey review.
There has been a lot of confusion between consumers and retailers since retailers are naming it AVR PS3Key or something along those lines. So lets start off by clearing the confusion. AVRKey and PS3Key are made by the same people, both look identical and both use the same hardware but are BOTH different products. The BIG difference between the two is that PS3Key comes shipped with their own proprietary firmware (.upd) file, own software that reads/loads .upd files. AVRKey are shipped blank...as in nothing. With AVRKey, you install your own HEX files (.hex)..the same files as PSGroove.
IMPORTANT : PS3Key comes with YELLOW sticker. AVRKey comes with GREEN sticker. This is how you will know what you received.
Some are probably saying to themselves "Oh great..another clone to hit the PS3 scene". Yes, that is true but this from a team that has a great track record and been in the video game scene. The name PS3Key kind of gives it away. Want to take a guess? Still cant figure it out? The team behind PS3Key is none other than WiiKey...the same people behind the WiiKey modchip and WiiKey Fusion for the Wii. So you know they won't be leaving us gamers high and dry.
The PS3Key comes in an anti-static bag and on this bag is also a yellow sticker. This sticker is your serial number and verification string. This allows you to verify and validate if the PS3Key that you purchased is authentic. For the verification string, it must be typed as shown. Capital letters must be typed with CAPS and lowercase letters must be lowercase. Failure to do so will give an error message. The team is serious about combating PS3Key clones.
The PS3Key is housed in a metal casing that looks exactly like PS Jailbreaks. There is also no writing or logo on the housing to prevent any problems with distribution and measures approximately 1.25" (length) x 0.50" (wide). On the end of the PS3Key is a blue rubber cap. This protects the board from being exposed and prevent dust and other particles from entering as well as softens the brightness of the LED lights. The PS3Key dongle is running on ATMEL MEGA32U2 (ATMEGA32U2) and is upgradeable via USB port. Installation is simple. Since the encrypted bootloader and files are preinstalled, just insert the PS3Key into the USB port of your PS3. The files installed the PS3Key are proprietary. Getting it to run the exploit is the same as all other Jailbreaks and you can remove it after its been loaded successfully.
Operation :
Once the power to your console is completely disconnected:
- Turn on the console (PS3 Fat with the switch, PS3 Slim connecting the power cable)
- Insert PS3Key into a USB port on the PS3.
- Start up the PS3 and press the EJECT button.
- The LED (which should have been red initially) will change to blue.
- If the above process worked, there will be a link to Install Package File in the game menu.
In order to make sure the PS3Key dongle worked flawlessly, I had to uninstall all my homebrew applications that I had originally installed. To install applications or any homebrew applications, you will need to download and save the .pkg files to a USB drive such as thumbdrive or harddrive. To install, simply insert USB drive to the PS3 and navigate to "INSTALL PACKAGE FILES" on the XMB under GAME. Select the file you want to install by pressing X and it will automatically install the file. All applications installed and loaded without any problems.
There are no other files or programs available to download from www.ps3key.com. But it seems PS3Key is in the process of making their own backup manager known as PS3Key Loader. However, upon loading this, there is nothing except for a message saying "The key has been turned..". Inserting a different Jailbreak device and running this file resulted in a failure. So it seems that PS3Key Loader checks to see if the PS3Key is inserted.
When a new update or application is released for the PS3Key, you can download the latest files at http://www.ps3key.com/en/members/downloads/. Here, you will need to log in (if you aren't logged in or registered already). In order to download files, you will need to enter the serial number and verification string to authenticate your PS3Key. Once logged in and the file you want to download is selected, your serial number is displayed. Before the "DOWNLOAD" button turns from un-clickable gray button to a clickable blue button, you will have to ACCEPT their Terms and Conditions...
Terms & Conditions
By using this PS3Key update you agree to the following terms and conditions. If you do not agree with such terms and conditions; do not use or apply the update.
The PS3Key Team grants you a non-exclusive license to use such software with the PS3Key hardware product only; provided your PS3Key hardware product is a genuine product of the PS3Key Team. The update may not work with, or may cause damage to, any non-genuine PS3Key product.
The export and re-export of PS3Key updates are not controlled by the United States Export Administration Regulations. As such, software may be exported or re-exported to Cuba; Iran; Iraq; Libya; North Korea; Sudan; or Syria or any country to which the United States embargoes goods.
DISCLAIMER OF WARRANTIES: YOU AGREE THAT THE PS3KEY TEAM HAS MADE NO EXPRESS WARRANTIES TO YOU REGARDING THE SOFTWARE AND THAT THE SOFTWARE IS BEING PROVIDED TO YOU "AS IS" WITHOUT WARRANTY OF ANY KIND. THE PS3KEY TEAM DISCLAIMS ALL WARRANTIES WITH REGARD TO THE SOFTWARE.
LIMIT OF LIABILITY: IN NO EVENT WILL THE PS3KEY TEAM BE LIABLE TO YOU FOR ANY LOSS OF USE; INTERRUPTION OF BUSINESS; OR ANY DIRECT; INDIRECT; SPECIAL; INCIDENTAL; OR CONSEQUENTIAL DAMAGES OF ANY KIND (INCLUDING LOST PROFITS; SLEEP; SANITY) REGARDLESS OF THE FORM OF ACTION WHETHER IN CONTRACT; TORT (INCLUDING NEGLIGENCE); STRICT PRODUCT LIABILITY OR OTHERWISE; EVEN IF THE PS3KEY TEAM HAS BEEN ADVISED OF THE POSSIBILITY OF SUCH DAMAGES.
Just inserting the PS3Key into a USB port of the computer causes it to be recognized but nothing really happens nor does it show up as a removable drive. All you hear are dings. But I inserted and removed it 4 times in a row within 10 seconds and a pop up did show up on my Windows Vista saying that the Generic USB Device has been installed successfully and can be used (wont show up all the time..only when first initiated). Performing this method will put the PS3Key into Update Mode and the both blue and red LED will be lit (purplish look with cap on). This will now allow you to update the PS3Key with any new files the team has released. I know some gamers are wondering if you can flash PSGroove hex files onto the PS3Key. I haven't tried it myself but Team PS3Key has informed me that you can erase the files on the PS3Key and install something else (such as PSGroove), but then you would not be able to put PS3Key code back onto it again. So if you're looking to buy a PS3Key to load your own files, I suggest not doing so. If you don't care about future PS3Key updates and want to install HEX files, you can install HEX files onto PS3Key by erasing the PS3Key bootloader using the ATMEL programming software. Just remember that it's a one-way process and you won't be able to make it into a PS3Key again afterwards! Overwriting PS3Key's proprietary file would be pointless since you lose all future features and updates that PS3Key would release in the future. There are plenty of other USB development boards at a cheaper price if you wanted to load PSGroove files such as AVRKey. AVRKey is also developed by Team PS3Key but the difference between the two is that AVRKey gives you the ability to load your own files where as PS3Key has it preinstalled and both have the same hardware. PS3Key updates are protected with TEA Encryption and not serial number specific. However, its best to download directly from PS3Key's website so you know that the files are not tampered with and you have full support from the PS3Key team, if needed.
Instructions on How to Install Update :
- Run the PS3KeyUpdater.exe application in Windows*. (REQUIRED for ATMEL based PS3Key)
- Connect PS3Key to your PC in update mode. To do this, simply insert it and remove it a few (3-4) times in until both of the LEDs (both red and blue...looks purplish) light up at the same time.
- Choose "File" and "Open" and then select the update file (i.e. ps3key_v2.upd).
- Click "Update Now" at the top of the screen. This will only be active when the PS3Key is connected to your PC and both the red and blue LEDs are lit.
- That's it! The progress bar will indicate when the update has been applied.
- It is now safe to remove PS3Key from your PC and continue to enjoy using it with the new features!
* Since my computer is running Windows Vista, for some reason, it didnt want to install the updated file. The progress bar didnt do anything (like the image above). But I decided to right click and choose "Properties" on the application itself (.exe) and clicked on the "Compatibility" tab and enable "Run this program in compatibility mode for: "with Windows XP (Service Pack 2)". You may also need to go under "Privilege Level" select "Run this program as an administrator". This is when the program would actually load the file. It may not be required but if you can't get it to load the new file, this is an option.
*UPDATE* 10/18/10
There are two versions of PS3Key. There is a ATMEL version and SiliconLabs version. ATMEL-based PS3Key require the use of PS3Key Updater to update the PS3Key. If you have a SiliconLabs-based PS3Key (4th digit of the serial number is a 4 or 5) then you do not need this application as it is possible to drag-and-drop the update directly onto the dongle in Windows. If you have already entered your serial number, you can check YOUR PS3KEYS and it will tell you which version you have. If you have not entered your serial or never got one (you should contact the site you purchased from and get one), the only way to find out is if you remove the board. Unfortunately, I do not know how the SiliconLabs (Silabs) version looks like.
I insert my PS3Key and nothing happens. No lights, nothing! What's wrong?
Unfortunately, a small number of PS3Keys (estimated at less than 1% of the total produced so far) were shipped with a little less insulating tape than they should have been. This is causing the metal contacts on the bottom of the circuit board to short circuit on the metal case. This isn't a fatal short circuit, your PS3Key has not been damaged.
If you're part of the 1%, to remedy this problem, simply remove the PCB and affix extra tape, as shown below: (this has been corrected at manufacturing plant)
1) Remove the blue plastic cap and bend the small metal clamps open:

2) Slide the circuit board out of the metal case:

3) Flip the circuit board over and affix a nice big piece of insulating tape. If your tape is quite thin, use 2 layers just to be sure:

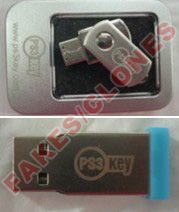
Conclusion : Overall, the PS3Key USB PSGroove Jailbreak ATMEL looks very sleek. With Team WiiKey showing their continued support and products on the Nintendo Wii, we will see the same commitment on the PS3. They have demonstrated the capability to create and compile their own codes and are most than likely able to create a new their own version of the backup manager. Those looking to install their own files, I suggest not purchasing the PS3Key as you lose all features and future updates that PS3Key has to offer. Instead, look into purchasing the AVRKey which is also from the PS3Key team but AVRKey lets you install your own files. If you purchased a PS3Key and it did not have a yellow sticker on the anti-static bag, contact the seller you purchased it from and ask for it. If they can not supply it, you more than likely received a clone/fake (PS3Key do not have logo printed on them and caps are thick blue..not thin teal caps). Also, the image below shows two versions of fakes. These were NOT made by PS3Key nor ever was.
Please note that none of the "upgrade" products listed in this site are endorsed by Nintendo, Sony and/or Microsoft. DCEmu Reviews and DCEmu Network does not condone piracy. The primary functions of a "modchip" and/or "flashcart" are to allow you to play imported games and homebrew software that you legally own or simply just for experimenting with hardware. We in no way endorse piracy, and encourage all users to do the right thing and support the developers/manufacturers that support them. We do not take any responsibilities for any use outside of these parameters or where the use of such a device is illegal.
Images via commentsby Published on February 2nd, 2011 15:58- Categories:
- PS3 News,
- DCEmu Reviews
Original PS Downgrade PSDowngrade
Manufacturer: PS Jailbreak / PS Downgrade
Site: Buy from HolidayCarts

Price: FREE and unlimited when you own an authentic PS Jailbreak
Overview for PS Jailbreak : The worlds first PS3 Modchip is here PSJailbreak! Using just a USB drive and a software exploit, the PS Jailbreak apparently does what so many have tried doing before it: allowing homebrew software to run on the PS3. It only works on 3.41 firmware.
If you want it to work on 3.50 or 3.42 you need to downgrade the PS3. You can do this by using PS Jailbreaks program called "PSDowngrade" which is FREE and unlimited with all PS Jailbreaks! You MUST have an original PS Jailbreak to use this software. Each dongle has a special serial number that is verified during the process of downgrading.
Only the original PS Jailbreak will support official new features and software exploits, don't get caught out with a clone, buy the original real deal today! THIS DOES NOT WORK ON FIRMWARE 3.42 OR ABOVE UNTIL A NEW EXPLOIT/METHOD IS FOUND!
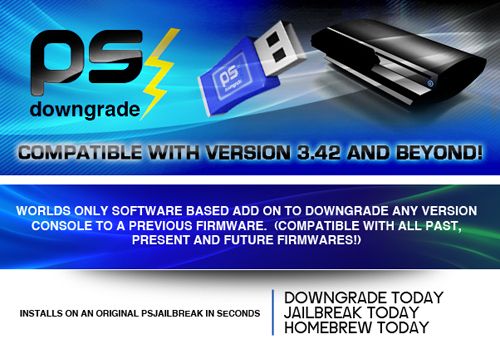
Overview for PS Downgrade : The wait is finally over! New users above 3.41 fw its time to join in on the fun. Thanks to PS Downgrade, PS Jailbreak is now available for all 44 million users.
PS Downgrade is a software add on that connects with your existing PS Jailbreak device. In 1 minute or less you can downgrade your consoles firmware to any previous firmware.
Simple to install; just plug PS Jailbreak into your pc and follow the gui to install PS Downgrade. Works with all past, present and future firmwares!
Turn back your console to 3.41 to jailbreak with the worlds original PS Jailbreak, or even go as far back as 3.12 to enjoy Other OS (yes LINUX is back). Completely safe to use, and does not void your warranty. PS Downgrade is completely undetecable by manufacturer, there is no history or log of your downgrade. Please note: PS Downgrade is ONLY compatible with original PS Jailbreak, no clones or inferior USB dongles.
Specifications :
- PS Downgrade is a software add on that connects with your existing PS Jailbreak device. In 1 minute or less you can downgrade your consoles firmware to any previous firmware.
- Simple to install; just plug PS Jailbreak into your pc and follow the gui to install PS Downgrade. Works with all past, present and future firmwares!
- Turn back your console to 3.41 to jailbreak with the worlds original PS Jailbreak, or even go as far back as 3.12 to enjoy Other OS (yes LINUX is back). Completely safe to use, and does not void your warranty. PS Downgrade is completely undetectable by manufacturer, there is no history or log of your downgrade.
Please note: PS Downgrade is ONLY compatible with original PS Jailbreak, no clones or inferior USB dongles.
Quality/Usability : I will be splitting this review into two parts. First part will be about the PS Jailbreak itself and the second part will be about the PS Downgrade. This does not work on Sony's new firmware 3.55.
Requirements for PS Updater Setup :
- MUST own an original PS Jailbreak USB Dongle
- PSJailbreak Updater - PSJailbreak or PS Downgrade
- Internet connection
How to install PS Updater :
- Download PSUpdater.zip
- (Optional) Click START button and type in the search bar "UAC" and click on User Account Control Settings. Inside this menu please lower the settings to lowest priority. Save and restart the computer
- Unrar/Unzip PSUpdater.zip and click on "setup.exe"
- Follow the steps by clicking "Next" until you reach to the point of setup where it asks you to plug in your device
- Plug the PS Jailbreak device into a USB port on your computer and click "Next"
- Choose "Unknown Device #1" from the list and click "Next"
- Click "Save" to save the .ini file
- Click "Install Now.." and complete installation
How to use PS Updater :
- Open PS Updater application that installed a shortcut on to your desktop
- Click on "Download Updates" tab and then click on "Download updates"
- It will download the 2 files over the internet and a message will pop up telling you it saved them into the folder where you saved your .ini file:
- prog_SerialNumber.fla which is PS Jailbreak
- downgrader_SerialNumber.fla which is your downgrader
- Click "Update Now" tab and click "Click here to select file..."
- Choose the downgrader file (downgrader_SerialNumber.fla) and click "Apply Update"
- If flashed successfully, PS Jailbreak dongle will have green LED
- After using PS Downgrade to lower your firmware (see below for instructions), please follow the above steps this time choosing to apply update file "prog_SerialNumber.fla"
- Now your PS Jailbreak is back to a USB jailbreak modchip
Requirements for Downgrade :
- MUST own an original PS Jailbreak USB Dongle that is reprogrammed for PS Downgrade
- (1) Blank FAT32 formatted USB flash drive
- 3.42, 3.50 or above firmware must be installed on the console (Fat or Slim)
- Modified 3.41 PUP, Lv2Diag.self (File 1), Lv2Diag.self (File 2) - these can be found via Google search
How to downgrade firmware 3.42/3.50 or above to firmware 3.41 with PS Downgrade :
* Downgrade will not reformat some PS3 Fat consoles (i.e. launch) but it WILL reformat PS3 Slim consoles. It's best to backup all files via System Settings
- Insert PS Jailbreak device that has been reprogrammed as PS Downgrade into your console
- Turn on the console using the same boot method as PS Jailbreak: Press power then immediately press eject. Your console will turn on and PS Jailbreak will light up with red/green LEDs followed by green only, then the PS3 will turn off.
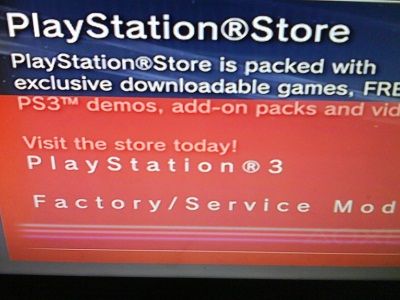
- Remove PS Jailbreak dongle and turn on console to make sure you are in Factory Service Mode. You will see a huge red box on the screen saying Factory Service Mode.
- Load any blank FAT32 USB flash drive device with 2 files in the root directory:
- Modified 3.41 PUP
- Lv2Diag.self (File 1)
- These must be the only files on the USB key and must be placed in the main (root) directory.
- Insert flash drive into the last USB port to the right the first USB port in from the right side if youre facing the console. Turn the PS3 on and you will see black screen but the PS3 HDD light will flash.
- The process takes 3-4 minutes for the system to install the old firmware. Towards the end, the power button on the console will start flashing green and then your console will power off.
- Remove the flash drive and turn on the console, you will still be in Factory Service Mode. Please verify you have downgraded successfully to version 3.41 by going to "System Information".
- (Optional) If you wish to downgrade to any older firmware (such as 3.15) you can follow step 4, 5, 6 using any regular firmware PUP. (You do not need to use modified custom firmware now that you are on 3.41).
- Insert USB flash drive back into your PC and delete the PUP and Lv2Diag.self file (File 1) and copy the other Lv2Diag.self (File 2) to the root of the flash drive.
- Insert USB flash drive back into the same USB port on the PS3 and power on your PS3. After 10 seconds it will power off.
- Remove USB flash drive and turn on your console again. You will be out of factory service mode and back in retail mode with your chosen firmware version installed. You will need to go through setting up settings configuration.
With this youre able to downgrade any PS3 running firmware 3.42 or 3.50. If you currently own or use to own a PSP, this is kind of similar to that of the Pandora Battery where you take a Sony battery (or compatible battery), load some files onto a memory stick and both combined, you're able to unbrick your PSP. PS Jailbreak was originally charging $40 for a one-time downgrade. So if you wanted to downgrade another PS3, you would have to pay another $40. A lot of people did not like this idea and a couple of weeks later, the team decided to release the downgrade with unlimited use. This means you can downgrade as many PS3 systems as you want without paying additional.
Conclusion : Overall, the Original PS Downgrade PSDowngrade is the first downgrader to hit the hacking scene for the PlayStation 3. Not only does it allow you to downgrade 3.42, 3.50 to 3.41, but you're also able to downgrade to 3.15 and bring back OtherOS. In order to downgrade, you'll need to own an authentic PS Jailbreak and it will cost you a whopping $99 (use to be $180-$150). Pretty hefty for a jailbreak device but that's the price you pay to be the first. PSJB team was originally charging $40 for a one-time use coupon to downgrade a PS3, once. So if you wanted to downgrade another PS3, you would have to fork over another $40. But after many complaints and dislike for this pricing (maybe also because a free solution was soon to be released), PSJB team decided to lower the price of the PS Jailbreak and included unlimited downgrades.
Even though PS Updater v1.3 was suppose to fix problems for those running on Windows 7 64bit, I still ended up having problems. Installation and driver installation was all successful and I was able to get the .fla files but when it came to updating my dongle with either .fla files, I got a "FLASH FAILED" error message. I've tried everything I could possibly think of, even using a ProxyPS method and it could not open the .fla file. However, performing the same installation on a Windows Vista 32bit, I had no problem at all and the flash was successful. Luckily, I had an extra computer running Vista in the house. So this may be a problem if you encounter a problem and don't have another computer with Vista. The PS Updater program only works on Window's OS. I would like to see some support for other operating systems as not everyone owns a PC.
*NOTE: As of 12/6/2010, Sony released a new firmware 3.55 that blocks the use of the downgrader. The Lv2Diag.self File 1 has been revoked. However, if you were unaware of this and tried to downgrade, Sony left Lv2Diag.self File 2 alone so users can get out of FACTORY SERVICE MODE and back to normal state so you can continue to play your games and access PSN. If you own 3.42-3.50 firmware, this still works.
Please note that none of the "upgrade" products listed in this site are endorsed by Nintendo, Sony and/or Microsoft. DCEmu Reviews and DCEmu Network does not condone piracy. The primary functions of a "modchip" and/or "flashcart" are to allow you to play imported games and homebrew software that you legally own or simply just for experimenting with hardware. We in no way endorse piracy, and encourage all users to do the right thing and support the developers/manufacturers that support them. We do not take any responsibilities for any use outside of these parameters or where the use of such a device is illegal.
Images via commentsby Published on February 2nd, 2011 15:58- Categories:
- PS3 News,
- Xbox 360 News,
- DCEmu Reviews
PlayStation Eye Camera Mounting Clip
Manufacturer: PDP
Site: Buy from Amazon
Price: $9.99-12.99
Cheaper alternative ($5.81):

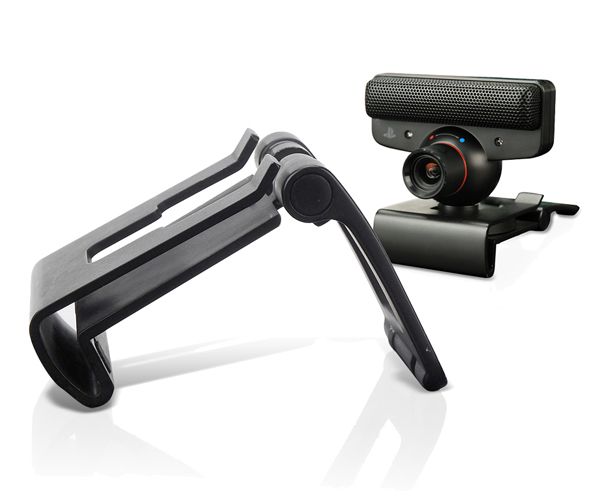
Overview : The officially licensed PS3 Eye Camera Mounting Clip conveniently mounts the PlayStation Eye camera on flat panel televisions. The clip holds the EYE camera in perfect position for Move gameplay and features a wide range of adjustable settings for various flat-panel HDTV shapes. The Mounting Clip is easy to use straight out of the box with no need to use any adhesive. PlayStation Move and PlayStation Eye Camera each sold separately.
Features :
- Adjustable to fit variance among monitor profiles
- Clip holds your PS3 Eye Camera securely in place
- Mounting Clip is officially licensed by Sony
Quality/Usability : With all the new TV's and monitors on the market, they are no longer thick or even have a flat top. So trying to put a device on top would be hard. PDP (Peripheral Designed Products) has released a product to solve this problem and its officially licensed by Sony.
The top has a clip that allows you to slide the base of the PS3 Eye Camera in and secures it in place. An "arm" folds down and can be adjusted to any size based on the size of your screen. The "arm" clicks into place so you won't have to worry about it moving and causing your camera to fall off. It also acts as a prop if the back of your display slopes. The bottom has rubber padding to prevent any slipping and to provide some grip when placed on top of your display. The mounting clip can be used on rear projection, LCD and Plasma TV. It's even able to work with newer, extra slim TV's such as LED.
However, if your TV is wall mounted, depending on how much room you have between the back of the TV to the wall and how thin the TV is, it may not fit.
You can even use the PS Eye Mounting Clip to be used with Microsoft's Xbox 360 Live Vision Camera and Microsoft's new Kinect. The 360 Live Vision camera's base is slightly thicker so the clip will be raised slightly higher. For the Xbox 360 Kinect, it wont fit in the clip but it would provide a flat base for the Kinect to rest on. This is a cheap alternative if you're not looking to spend over $40 for a Kinect compatible stand. If you use this for the Kinect, just remember to add some tape or something to secure it so it does not fall when you're jumping up and down.
Since you can use the PlayStation Eye Camera as a webcam, you can use the clip on your laptop/netbook as well.
Conclusion : Overall, the PlayStation Eye Camera Mounting Clip is a must have if you own a flat panel display. This is the perfect solution for a clear look and for a clutter-free space. The price of the mounting clip is very affordable and won't make a dent in your wallet.
I also like the fact that the Xbox 360 Live Vision camera fits and you can use the clip as a platform for the Xbox 360 Kinect to rest on. Just remember to secure the Kinect to the mounting clip with tape or something as the Kinect's base does not fit inside the clip.
A cheaper solution would be aftermarket product from LighTake.
Images via commentsby Published on February 2nd, 2011 15:57- Categories:
- PS3 News,
- DCEmu Reviews
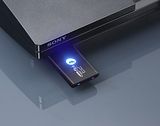
P3Go G-Switch Power ON/OFF Slim
Manufacturer: G-Team
Site: Buy from DealExtreme / Buy from VolumeRates / Buy from LighTake / Buy from PriceAngels
Price: $4.18-$5.99
P3Go GT-Break II USB microSD SDHC:
Site: Buy from DealExtreme / Buy from LighTake / Buy from PriceAngels
Price: $24.00-26.00 (dongle and switch)
Overview : Prevent wear and tear from constantly plugging and unplugging power cable on the back of your PS3 Slim.
Features for G-Switch :
- Supports only PS3 Slim from any region. (USA, JAP, PAL and KOREA)
- One time installation Plug & Play and forget.
- Allows you to recycle power on your PS3 Slim without the need of unplugging the cable from the back of your console.
- Made out of high resistance polymer which is fireproof and has been built to last.
Quality/Usability : In order to jailbreak your console, the PlayStation 3 console needs to be cold booted. That means you'll either have to turn the switch off and on, on the back of a fat PS3 or unplug and plug the power cord on the PS3 Slim. PS3 fat users got it easy but for Slim owners, it can be a hassle especially if your PS3 is in an entertainment center or in a spot that is hard to reach.
G-Team has found a solution for all you PS3 Slim owners. They have released a switch that plugs in-between the PS3 Slim console and power cord thus giving you a dedicated ON/OFF switch without the need of constantly unplugging the power cord. However, the G-Switch actually comes included with their P3Go GT-Break II USB Jailbreak dongle but not everyone needs the dongle, so some retailers are selling just the switch alone.
The G-Switch is a simple plug and play solution. Simply unplug the power cord from the PS3 Slim (this would be the last time you'll need to do this unless you're packing up your PS3). Insert the G-Switch into the back of your PS3 Slim and than attach the power cord to the G-Switch. The G-Switch is now in-between the cord and console. Now, rather than unplugging the power cord from the console, just flip the switch. To get power, just flip the switch to the ON position.
The G-Switch worked as it should however, upon opening it up, the soldering job didn't look like it was done by machines at the manufacturing plant but by a worker instead. The switch worked as it should as I have constantly flipped the switch on and off but the soldering job wasn't as clean. Maybe they needed to include it with the dongles or maybe their manufacturing plant wasn't capable or soldering the switch due to design?
Conclusion : Overall, the P3Go G-Switch Power ON/OFF Slim is a much needed accessory for anyone jailbreaking their console. The quality of the switch is very good but the soldering job could have been better and cleaner. Than again, what average user will go ahead and open up a product to see the inside? So as long it works and doesn't break, that's all that matters, right? The price is very affordable and online retailers offer FREE shipping for those who already have their preferred jailbreak device but is looking for a ON/OFF switch.
Images via comments- Search DCEmu
- Advert 3
 News Categories

- Links of Interest
 Sony Consoles News


- Nintendo Consoles News


- Sega Consoles News


- Apple & Android News
- Xbox Consoles News


- Open Source Consoles News
 DCEmu News Archive
- Advert
- Retro Consoles News


- PC News

- Latest DCEmu News


- DCEmu Network Sites
-
 Menu
Menu  Forum Stats
- What is the DCEmu Homebrew & Gaming Network
Catherine: Full Bodys English translation for the Vita