


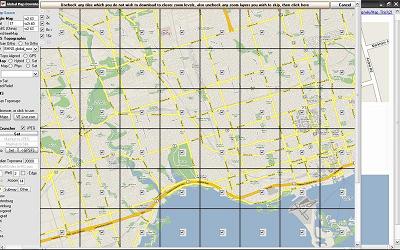
 To reduce the size of the map file uncheck any tiles that you don’t want available on the map, for example I just uncheck the ones that contain only water. Then uncheck the Zoom levels that you don’t need, all zoom levels are checked by default. When you’re done click on the ‘Uncheck any tiles which you do not wish to download to closer zoom levels, also uncheck any zoom layers you wish to skip, then click here’ button (longest button I’ve ever seen). It should take you back to the main window and go on the preview tab. The download progress is displayed on the Title bar of the window:
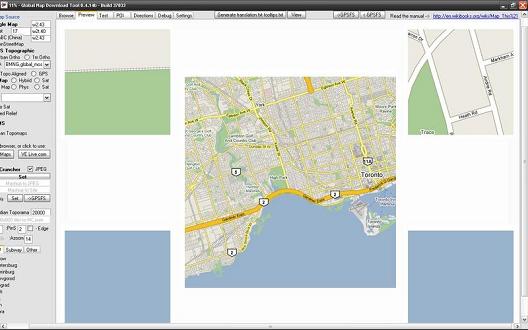

 Reply With Quote
I trade a lot on eBay under my retrohavencom nick but still rarely think of buying there myself.Originally Posted by outsider

So, ta for prodding me to look - one PSP-290 all bought and paid for @ just under £40 inc. shipping.
Results 11 to 20 of 333
-
April 18th, 2007, 22:42 #11DCEmu Newbie


- Join Date
- Apr 2007
- Posts
- 1
- Rep Power
- 0
 I need H E L P !
i ask for a big favor.....who can help me! i am a not good with that stuff...so my problem is that i can't set it up for Greece can any one create o folder with all the requested stuff and send it to me, so i just copy and paste to my psp and work? i know you might think i am crazy but i have the sony receiver for about a mounth and i just watching it getting old...(i just want to copy and paste the folder...i getting comfused with copying that extract that copy and replace that...just one move)so if some one can help me i will appreciate allot...thanks from Greece
Originally Posted by outsider
-
April 18th, 2007, 22:44 #12DCEmu Rookie

- Join Date
- Nov 2006
- Location
- Looe
- Posts
- 148
- Rep Power
- 0

-
April 18th, 2007, 22:47 #13DCEmu Pro

- Join Date
- Oct 2006
- Location
- with ur sister
- Age
- 33
- Posts
- 580
- Rep Power
- 87

man nice work +rep for u
-
April 18th, 2007, 23:34 #14DCEmu Newbie

- Join Date
- Dec 2006
- Location
- Gurabo Puerto Rico
- Posts
- 45
- Rep Power
- 0
Wow this is just great! Too bad map services don't have too much information about Puerto Rico

EDIT: ok my bad seems like the map services improved a lot since I last checked, still it takes a lot of time to make the maps
-
April 18th, 2007, 23:35 #15DCEmu Newbie

- Join Date
- Apr 2007
- Posts
- 16
- Rep Power
- 0
Dude , something you may wish to check and/or add to your Tut...
To ensure you are getting exactly the area you want, you get the map to the approximate area you want, then click on the 'Preview 1x' button - That will show you what you will actually be getting on your PSP.
However, it is a bit odd - for example if I check it on Preview 1x, and everything is a bit too far to the right, you might then presume that to go and drag the map to the left a little would fix it. But if you check the Preview 1x after doing so, you will find that the map actually may have moved a great deal further to the left, or perhaps not at all. This is likely due to the square 'blocks' which the maps are made up of, and it 'snaps' to the nearest.
It would be awesome if there was a way to address this in future versions of GMDL... Slightly better accuracy, as I find it hard to get exactly the area I want when getting maps for slightly larger areas - the only way would be to take it to a lower zoom level, but that would make the map unreasonably large and too long to download.
Would also be cool if there was a way to download maps only at a wide zoom level - so you can download a broad road map of a large area, or to give an overview of a country.
-
April 18th, 2007, 23:57 #16DCEmu Pro

- Join Date
- Aug 2005
- Location
- here or there
- Posts
- 777
- Rep Power
- 78
This is exciting news!
I could really use this.
I hope GMDL just gets better...
Finally a reason to own the GPS receiver.
-
April 19th, 2007, 00:07 #17DCEmu Rookie
- Join Date
- Nov 2006
- Location
- Looe
- Posts
- 148
- Rep Power
- 0
I been meaning to get a GPS for ages as I drive out to customers every day.
My GF is always amused as I can navigate 100% in waaaay too many games but ask me to get to a place 10 miles from my house and i'm lost in 2.
-
April 19th, 2007, 00:26 #18DCEmu Newbie
- Join Date
- Dec 2006
- Posts
- 33
- Rep Power
- 0
Yea, i think somethings wrng with gmdl in that aspect, i guess we'll have to wait for future releases to find out. i edited my tutorial, thanks for teh suggestion. Originally Posted by pkunk
-
April 19th, 2007, 01:09 #19DCEmu Newbie

- Join Date
- Dec 2005
- Posts
- 66
- Rep Power
- 0
has anyone got this to work in the UK?????, i would go ahead any buy a GPS Reciever if i thought i cud get it to work
plz reply
-
April 19th, 2007, 01:28 #20DCEmu Newbie
- Join Date
- Dec 2006
- Posts
- 33
- Rep Power
- 0
I saw someone from the uk post in this forum b4 and he had it runnng fine.
Thread Information
Users Browsing this Thread
There are currently 1 users browsing this thread. (0 members and 1 guests)

Bookmarks