

 DCEmu Homebrew Emulation & Theme Park News
-
DCEmu Featured News Articles
by Published on February 2nd, 2011 15:57- Categories:
- PS3 News,
- DCEmu Reviews
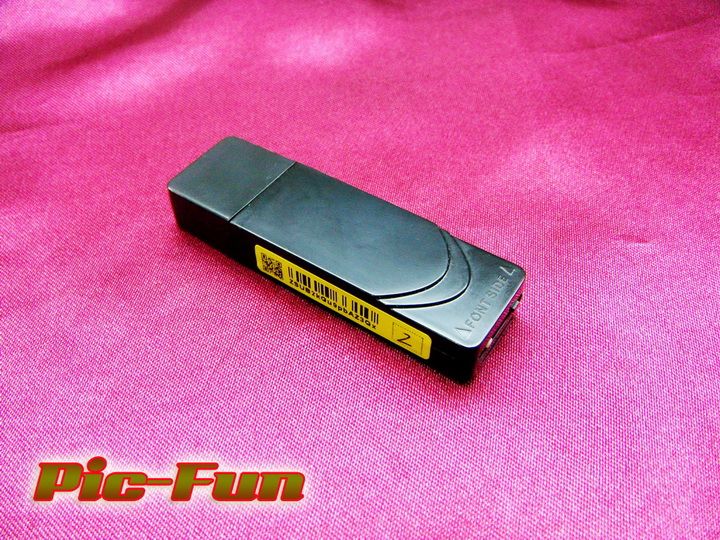
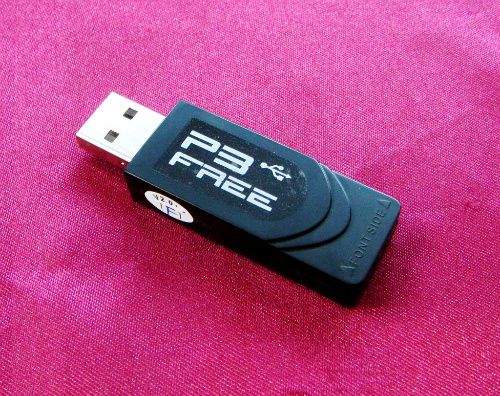
P3Free Pic-Fun USB Jailbreak Dongle
Manufacturer: P3Free (by Wii-Clip)
Site: Buy from DealExtreme / Buy from VolumeRates / Buy from LighTake / Buy from PriceAngels / Buy from IC2005 / Buy Serial Programmer from IC2005 / Buy Pic-Fun + Serial Programmer from IC2005
Price: $16.50-$29.90 / $29.00 (Serial Programmer) / $39.90 (Pic-Fun + Serial Programmer)
Overview : PS Jailbreak/PSGroove clone that takes advantage of PS3 firmware 3.41 exploit and allows you to install homebrew applications. THIS DOES NOT WORK ON FIRMWARE 3.42 OR ABOVE UNTIL A NEW EXPLOIT/METHOD IS FOUND!
Features :
- Use PIC18F2455/2550/4455/4550 MCU chip
- Come with HID BTL, can upgrade via USB port directly
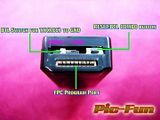
- Come with the 8pin FPC port, can program any firmware to PIC chip via our FPC programmer
- It can program by any programmer that build in standard ICSP port after use the ICSP swap board
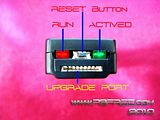
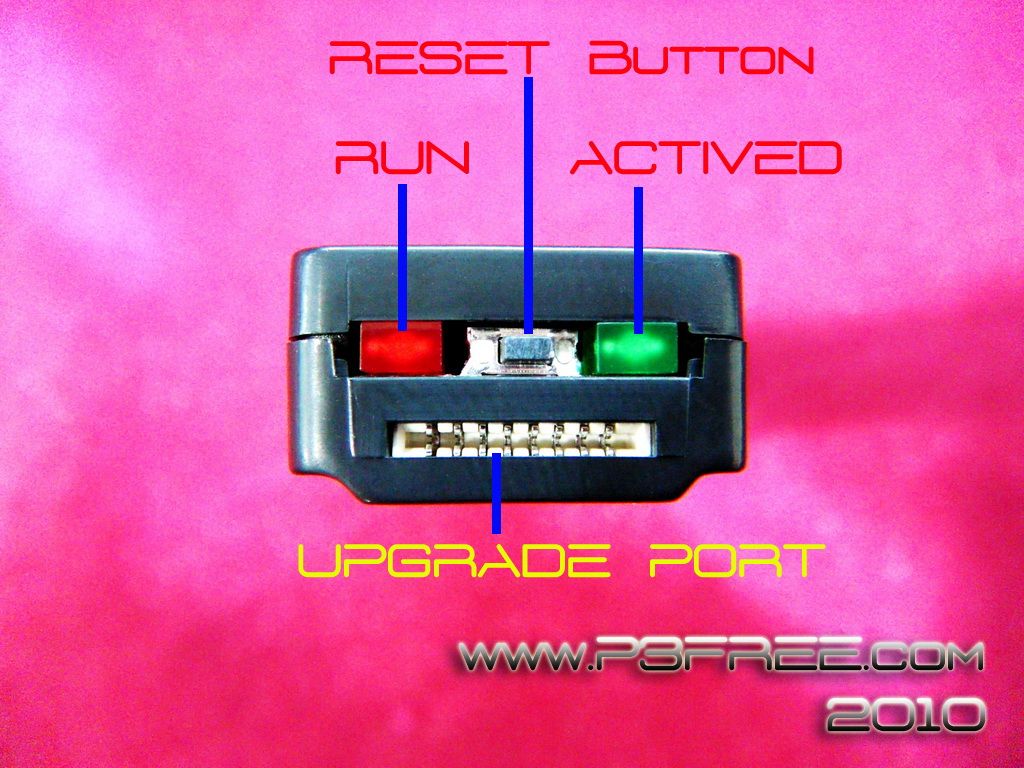
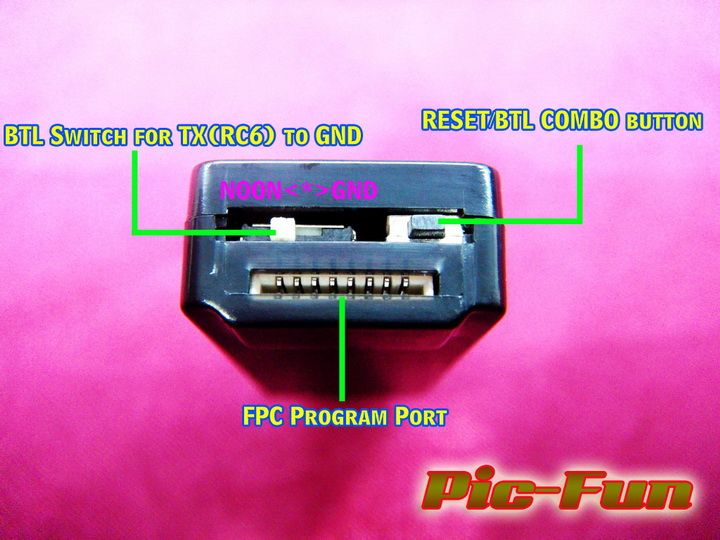
- Come with one RESET/BTL combo button, can use for reset the PIC or enter BTL mode for upgrade
- Come with one switch for set the RC6(TX) to GND, for enter the BTL mode with some firmware
- Come with 2 LEDs to display the working status
- Come with the last "F0" LED demo legit firmware
Quality/Usability : This review is a version and comparison of P3Free PIC Serial Programmer USB. Both are the same with a few slight differences.
[Left: P3Free and Right: Pic-Fun]
As you can see, the noticeable difference between P3Free and its predecessor, Pic-Fun, is LED, buttons and sticker placement. They both have FPC port but is not really needed for Pic-Fun unless you brick it. On the P3Free, the LEDs are visible and on the Pic-Fun, the LEDs are located inside the casing. The switch locations are also different. On the P3Free, the RESET button is in the middle where as the Pic-Fun, the RESET button is on the right side. The newest addition to the Pic-Fun is a switch [RC6/TX to GND] and a yellow unique serial code label. RC6/TX allows you to go into bootloader mode with some firmwares.
Before you start, you'll need these files :
- Microsoft .Net Framework V4.0: http://www.microsoft.com/downloads/e...displaylang=es
- Microsoft VC++ 2010 (x86): http://www.microsoft.com/downloads/e...3-37bf0912db84
- HID_Bootloader_2.6B
- Latest P3Free HEX files
Once you have downloaded all the necessary files, you can begin to load the latest HEX files onto the Pic-Fun. Make sure that the switch is on the far left. Loading files via USB is known as "softflashing".
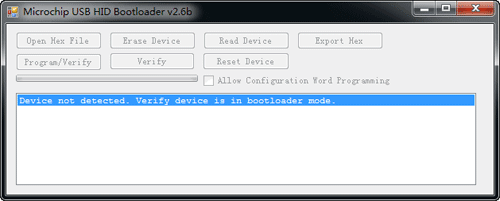
- Insert Pic-Fun into USB port of your computer
- Now just press the RED RESET/BTL button once
- HID_Bootloader should detect your kit
- Click the "Open Hex File", select the right HEX and open it
- Now click the "Program/Verify" button, when you see "Verify Started", then mean it's upgrade complete
Now, if you ever brick your Pic-Fun by loading the wrong hex or something, you can load it back using a FPC Serial PIC Programmer. This is known as "hardflashing". The FPC Serial PIC Programmer is not included with Pic-Fun and can be purchased separately ($29.00). This is not really necessary unless your Pic-Fun is no longer operational and bricked.
If you ever need use the Serial Programmer, the instructions are as follows:
Click here to download the PICPgm v1420 PC program
How to burn the firmware to the PIC chip :
[1] Insert the Serial programmer to Serial Port of your PC and click the "Search" button, to see if it can find programmer or not.
If can't auto detect, then means your serial port has a problem. Please check it or change to another PC and try again, until to it can auto detect JDM hardware.

[2] Now link to your P3Free kit and click the "Search" button again, it should can auto detect the PIC chip.
If not, maybe you insert the FPC cable in a wrong side.

[3] When everything is ready, click the "Browse" button to select Bootloader_USBHIDC18_P3Free_V1.0_12MHz_BTL-pin1_MCLRon_LVPoff_F0_Version.hex.

[4] Then click the "Program" button

[5] It will start to burn and the progress bar will stop to respond, it may seem like it froze but its still programming.

[6] After program complete, this green window will show 3 seconds and auto close, now the new firmware is ready for test, all done!

The process is the same as the PSGroove and requires 3.41 firmware. Anything above this will NOT work as Sony has blocked off this method. Anything under 3.41 will cause some problems.
The P3Free boot step :
- Remove the AC power cable from your SLIM PS3, or turn off the AC switch with your FAT PS3;
- Insert the Pic-Fun, and remove other USB device if you inset it before, and eject the disk from BD drive if exist;
- Insert the AC power cable to your SLIM PS3, or turn on the AC switch with your FAT PS3;
- Touch the PS3 power button to active PS3, then touch the EJECT button quickly;
- You will hear some "beep beep" sound from PS3, then the Pic-Fun's RED LED will start to blink, after a while, the RED LED will turn off and the GREEN LED will turn on. When you see the GREEN LED turn on, it means the Pic-Fun is successfully active, now you can take out the Pic-Fun if you want.
The video shows how to insert the P3Free but the same applies to the Pic-Fun:
In order to make sure the Pic-Fun dongle worked flawlessly, I had to uninstall all my homebrew applications that I had originally installed. To install applications or any homebrew applications, you will need to download and save the .pkg files to a USB drive such as thumbdrive or harddrive. To install, simply insert USB drive to the PS3 and navigate to "INSTALL PACKAGE FILES" on the XMB under GAME. Select the file you want to install by pressing X and it will automatically install the file. All applications installed and loaded without any problems.
Conclusion : Overall, the P3Free Pic-Fun USB Jailbreak Dongle is essentially what the P3Free should have been when it first released. Its USB updatable out of the package. Pic-Fun comes with FPC cable to use with Serial PIC Programmer. But the cable is not even needed if it doesnt even come with the programmer. Even if you were to purchase the programmer, it comes with the cable. The ability to reload the bootloader if it gets erased or corrupted is a big PLUS. Other clones or jailbreak devices does not allow you to do so. The only site that sells the serial programmer that I know at the moment is IC2005. They charge $29 for the programmer. Pic-Fun itself costs $25 at LighTake and $29.90 at IC2005. If you're interested in Pic-Fun and the Serial Programmer, you're better off purchasing the bundle from IC2005 ($39.90). So essentially, you're paying only $10 for the Serial Programmer from IC2005.
Please note that none of the "upgrade" products listed in this site are endorsed by Nintendo, Sony and/or Microsoft. DCEmu Reviews and DCEmu Network does not condone piracy. The primary functions of a "modchip" and/or "flashcart" are to allow you to play imported games and homebrew software that you legally own or simply just for experimenting with hardware. We in no way endorse piracy, and encourage all users to do the right thing and support the developers/manufacturers that support them. We do not take any responsibilities for any use outside of these parameters or where the use of such a device is illegal.
Images via commentsby Published on February 2nd, 2011 15:57- Categories:
- PS3 News,
- DCEmu Reviews
E3 Card Reader microSDHC PSGroove
Manufacturer: E3 Card
Site: Buy from Acekard.ca / Buy from LighTake / Buy from PriceAngels / Buy from VolumeRates / Buy from NDSCardSale
Price: $17.00-25.00
MicroSD(HC)/TF (Required to switch between payloads)
Site: Buy from DealExtreme (1GB) / Buy from DealExtreme (2GB) / Buy from LighTake (2GB) / Buy from DealExtreme (4GB) / Buy from LighTake (4GB) / Buy from DealExtreme (8GB) / Buy from VolumeRates (8GB) / Buy from LighTake (8GB) / Buy from DealExtreme (16GB) / Buy from VolumeRates (16GB) / Buy from LighTake (16GB) / Buy from VolumeRates (32GB)
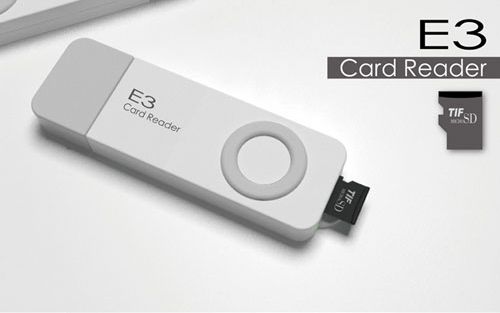
Overview : E3card Reader is a personal mass-storage security assistant. It works as a multi-function SD card reader for users. It’s your own file security expert. In basic mode, a normal SD card once accessed by the E3card reader will not recognize by normal PCs or other normal card readers. For meeting various requirements coming from different kinds of customers, lots of encryption algorithm will be released and all of them are easy to download from our official website. In general, from preschooler to senior, if you have digital security requirement, the E3 would be the best choice.
Our products are easy to upgrade. Even for children (DO NOT let children under 6-years-older use this product, as they could accidentally eat the card reader and/or the SD cards) they just need to copy a file into a removable driver which named E3Upgrader by a simply Drag-and-Drop access, and then everything is done.
Drag-and-Drop is a well accepted standard used by most of the desktop-based operation-system such as Windows, Mac OS (coming from Apple) and lots of Linux system. No dedicated application need to download, No complex access need to learn, and No differences among different environments, to accomplish these objects, using the Drag-and-Drop upgrading mode seems to be the only way for us to make a very friendly tools for our precious customers.
Armed with an internal 4M memory stick, the ability to read/write various type of SD cards, E3 team have been trying to supply more and more functions but not only the personal file security services. We have licensing some impressive teams to get lots of good works available for our customer. And we welcome teams all around world to join us to create an exciting product. About the third-party application, please refer to our official website www.e3-card.com.
E3 makes Everything Easy and Efficient.
Features :
- 32bit processor with 128K flash, has strong processing rate and high expand space.
- MicroSD SDHC supported and can load software and game from it.
- Multi-System supported and includes WinXP/Vista/Win7/Mac OS/Linux. This means you can upgrade and use E3 Card Reader in most OS.
- 4MB FLASH on-board, so you can save any PS3 software very conveniently. For example, you can copy any homebrew application.
- Super-Drag-Plug upgrade mode. Just copy BIN file and paste into E3 Card, finishes upgrading in 1 second. No need for any extra upgrader.
- Dual firmware booting mode. The latest Hermes v4b and KaKaRoTo firmware is integrated into one code and you can use any of them by yourself. No need to re-flash code.
- Supports any free PSGroove files like Hermes & KaKaRoTo.
- E3 Card Reader has CE, FCC and RoHS certification. It is a safer and environmental product and comes with 2 year warranty.
Requirements :
- PS3 Console (fat or slim)
- Console (firmware) version 3.41 only
- Remove all discs from the drive
- Do not connect any devices to the console via USB
IMPORTANT: The console must be completely switched off before using E3 Card Reader. For fat versions, use the switch at the rear. For slim versions, unplug power cable. This is extremely important for the process to work correctly when you start the console.
Quality/Usability : The newest jailbreak device to hit the market is E3 Card Reader but they don't advertise it as one (smart). They aim it towards a card reader/storage device. The first thing to pop into you head is...it looks just like an iPod Shuffle, but it's not. It has 128k flash, works on WinXP/vista/Win7/MacOS/Linux and 4MB of programmable on-board flash.
The device is made of good quality plastic. Unlike some, the E3 Card's casing consists of two pieces...front and back. They are both snapped together. So with a little force, you can easily separate both of them and expose the innards.
The moment you insert your E3 Card reader, you're given three drives:
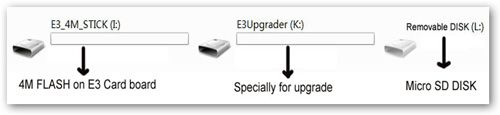
What is E3_4M_STICK, E3Upgrader and Removable DISK?
- E3_4M_STICK is 4MB flash on-board memory. You can save software like managers and homebrew games onto it and then install onto PS3.
- E3Upgrader is specifically for upgrading. You can save E3 Card firmwares onto it and generally needs only 1 second to upgrade.
- Removable DISK is microSD(HC) slot shown on PC. After you insert a microSD(HC) into E3 Card Reader, the PC will show it is microSD(HC) card and then you can save any software and/or game onto it and run them on the PS3.
For the 4MB on-board flash memory, not only can you load software but this is where you load ANY pre-compiled HEX file you want from any USB board whether it be Hermes or KaKaRoTo PL3. But in order for them to work, you have to rename them. For Hermes payload, you need to rename the file to "h.hex" and for KaKaRoTo's PL3, you'll rename it to "k.hex".
**UPDATE 12/16/10** HEX files should now be named as "free.hex" regardless of payload.
The above information was pulled from their site. However, it says that for the Removable DISK, you can "save any software and/or game onto it and run them on the PS3". I've tried leaving the microSD in while jailbreaking (causing it to load PL3) and none of the files I stored on the microSD showed up. I tried jailbreaking it first (loads Hermes by default) and than inserted the microSD and nothing showed up. Removing E3 Card Reader and than reinserting it back into the PS3 gives an unrecognized USB error message.
How to update E3 Card Reader?

- Download E3 Card Reader firmware from download page.
- Plug E3 Card Reader into PC and it will show "E3_4M_STICK", "E3Upgrader" and "Removable DISK".
- Drag and drop "E3Upgrader.bin" firmware into "E3Upgrader". After you drop it in, a red LED will blink and then the blue LED on E3 Card Reader will light up and this means the upgrade is complete.
- Plug E3 Card Reader into PS3 just like any other jailbreak device.
Operation :
- Cut off the power of your PS3. For the fat PS3, press the power off button on the back. If you own the slim, disconnect the power cable from the system.
- If you want to load Hermes payload, plug your E3 Card Reader into any of the PS3 USB slots. Be sure that NO microSD(HC) is in the slot.
- If you want to load PL3 payload, you will need to insert a microSD(HC) into the slot or else it will automatically boot into Hermes.
- Turn on your PS3 and press the Eject button very quick (most important).
- While booting E3 Card Reader, it will light up and flash blue and red. When the blue light is on instead of flashing, it means booting progress is over and the jailbreak is successful. You will also see “Install Package File” in the game menu.
So the process is pretty much the same as all others. In order to take advantage of the dual boot, if you want Hermes payload, do NOT have a microSD(HC) inserted. If you want PL3 payload, make sure you have a microSD(HC) inserted before you boot up the PS3.
Conclusion : Overall, the E3 Card Reader microSDHC PSGroove is a nice thin jailbreak device. I think the design of the dongle could have been a little better or something more unique. The 4MB of space may be a bit small especially if you're the type to hold and store a lot of files. It can fill up quickly especially in the future once developers start to get a hang of the PS3 and start to develop more for it, files will get bigger. You'll be seeing more and more new jailbreak devices with support for dual boot and microSD slot. However, now that Hermes is no longer working on payloads, dual boot may no longer be needed once there is a standard payload. Of course, you'll need a microSD(HC) in order to activate the dual boot. By now, everyone should have at least one TransFlash card whether it be from their camera, DS flashcart or cellphone. Even if you don't have one, its fairly cheap to get one and I have provided links as to where you can get them. I would of liked a spring loaded microSD slot for easy removal of SD card as I had some trouble trying to get the microSD card out with my big fingers.
Once of the information provided from the E3 Card site was that you were able to save any software and/or game and run them on the PS3. I was unable to get this to work and tried many different methods. None of my files showed up. This was the same for the P3Go GT-Break II that I reviewed.
*UPDATE* 12/3/2010
E3 team has released their own downgrader! You can read more about this great news and download files can be found HERE!
Please note that none of the "upgrade" products listed in this site are endorsed by Nintendo, Sony and/or Microsoft. DCEmu Reviews and DCEmu Network does not condone piracy. The primary functions of a "modchip" and/or "flashcart" are to allow you to play imported games and homebrew software that you legally own or simply just for experimenting with hardware. We in no way endorse piracy, and encourage all users to do the right thing and support the developers/manufacturers that support them. We do not take any responsibilities for any use outside of these parameters or where the use of such a device is illegal.
Images via commentsby Published on February 2nd, 2011 15:57- Categories:
- PS3 News,
- DCEmu Reviews
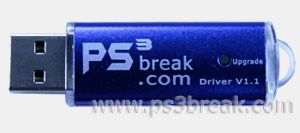
PS3Break PS3 Break v1.1 USB Dongle
Manufacturer: PS3Break
Site: Buy from DealExtreme (v1.2) / Buy from VolumeRates (v1.1) / Buy from VolumeRates (v1.2) / Buy from LighTake (v1.1) / Buy from LighTake (v1.2) / Buy from PriceAngels (v1.1) / Buy from PriceAngels (v1.2) / Buy from AceKard.ca
Price: $18.00-$32.99
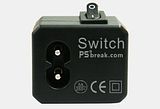
PS3Break ON/OFF Switch (not included with PS3Break but posted for those who own PS3 Slim and is interested)
Site: Buy from DealExtreme / Buy from LighTake / Buy from VolumeRates / Buy from PriceAngels
Price: $3.99-$6.00
Overview : The PS3break Team presents a new design PS3break with Mini pocket-size package, which is out of the original model, the introduction of modern design, so that the items are more attractive and competitive. Let’s review more exciting news here.
Features :
- 100% Upgradeable hardware firmware with V1.1 thoroughly!
- The key “Upgrade” for software upgrading and avoids to be blocked by SONY. Users can also upgrade the updated software through computer.
- Reading speed will be 2 times faster and it makes users to play more smoothly.
- Games can be copied and saved to internal or external hard disk, in this way, the expensive blue-ray driver and disc can be abandoned.
- Plug & play USB port, the installation will be finished in a few seconds.
- Homebrew software is supported.
- Simple and clear illustrations will guide you to install step by step.
- PS3 Break is compatible with all fat and slim model.
- Support Upgrade function by press the upgrade key (With Firmware V1.1) of the item.
- No need Original BD booting-disc any more, Users can play the PS3 games directly.
- Programmable USB freely.
Quality/Usability : There has been nothing but floods of jailbreak clones in the PlayStation 3 scene. But who's to complain? More options to choose from and more reasonably priced devices.
PS3Break released their original v1.0 and left early adopters hanging as their bootloader did not allow users to update their PS3Break. This left a sour taste in buyers mouth. But like any business/manufacturer, they released a new product and in comes v1.1. PS3Break v1.1 comes in a plastic case with TRUTH INQUIRY (more info about this below) and a light blue strap. The PS3Break itself is in an aluminum casing and has a UPGRADE button on side of the case. The UPGRADE button is for when you want to update the PS3Break with the latest files, it puts the PS3Break into update mode.
PS3Break is one of the clones that is being cloned with fakes. To combat this and protecting PS3Break users, PS3Break has included a "TRUTH INQUIRY" sticker on their cases. The concept is becoming a tend for identifying fakes. To confirm that its authentic, you would need to scratch up the sticker like a scratch off lottery ticket and then enter the 20-digit code on their website, then click CHECK.

Instructions on How to Load PS3Break files :
Required files:
- PS3Break Burner Tool v1.1
- dotNetFx40_Full_x86_x64.exe (included with Burner Tool)
- vcredist_x86.exe (included with Burner Tool)
- PS3break Burner file
Rather than giving you more things to read about and directions on how to setup and update the PS3Break v1.1, we've made a video as well as how to operate it.
Since making the video, PS3Break now directs you to a different site to download the necessary files. It now tells you to go to GOGSoftware.

I had no problems installing FTP program, SNES homebrew application, homebrew games and Open Manager. In order for me to fully test, I had to remove what I had already installed. PS3Break has released their own version of Open Manager but its really nothing different than the one released by moh.sakhaii. All they did was change logos and replaced it with their own. I personally would just stick with the original as you'll have a quicker and better support.
Conclusion : Overall, the PS3Break PS3 Break v1.1 USB Dongle worked like any other jailbreak device on the market. However, with Sony going on a suing spree and doing everything they can to stop these type of devices, PS3Break is one of them. The reason is because it uses the words "PS3". Not to mention, it makes it easier for customs to stop and cease PS3Breaks with Sony winning court rulings. In order to put the PS3Break into update mode, you needed to use a sharp object whether it be a pen, pencil or paperclip to press on the UPDATE button. This got annoying trying to scrounge for something. I guess PS3Break kind of noticed this too and released v1.2 and the UPDATE button is now easily accessible. Yes, if you bought v1.0 or v1.1, you'll have to go out and buy a new PS3Break v1.2. I don't know of any other manufacturer that has released this many revisions. Its great that they are improving the aesthetic look and external functions but these are things that should of been present from the beginning.
PS3Break has also released their on ON/OFF switch for PS3 Slim owners. Unfortunately, I do not have one to review but thought I would provide a link to online sellers for those who are interested in getting one for their PS3 Slim.
Please note that none of the "upgrade" products listed in this site are endorsed by Nintendo, Sony and/or Microsoft. DCEmu Reviews and DCEmu Network does not condone piracy. The primary functions of a "modchip" and/or "flashcart" are to allow you to play imported games and homebrew software that you legally own or simply just for experimenting with hardware. We in no way endorse piracy, and encourage all users to do the right thing and support the developers/manufacturers that support them. We do not take any responsibilities for any use outside of these parameters or where the use of such a device is illegal.
Images via commentsby Published on February 2nd, 2011 15:56- Categories:
- PS3 News,
- DCEmu Reviews
P3Free Pic-Fun Serial Programmer USB
Manufacturer: P3Free (by Wii-Clip)
Site*: Buy from DealExtreme / Buy from VolumeRates / Buy from LighTake / Buy from Price Angels / Buy from IC2005 / Buy Serial Programmer from IC2005 / Buy Pic-Fun + Serial Programmer from IC2005
*ALL P3Free's are now known as Pic-Fun and are USB updatable. Online retailers may still call it P3Free.
Price: $16.50-$29.90 / $29.00 (Serial Programmer) / $39.90 (Pic-Fun + Serial Programmer)
Overview : PS Jailbreak/PSGroove clone that takes advantage of PS3 firmware 3.41 exploit and allows you to install homebrew applications. THIS DOES NOT WORK ON FIRMWARE 3.42 OR ABOVE UNTIL A NEW EXPLOIT/METHOD IS FOUND!
Features :
- Supports all PS3 models, Fat and Slim all regions
- After booting the P3Free you can remove the device from the PS3 and continue your homebrew
- Support all homebrew
- Supports network transfers, FTP transfer your data between PC and PS3
- Fully upgradeable, supports FPC ICPS port upgrade
- Contains a build-in bootloader
- Has a hardware RESET button to reset the device when needed
Quality/Usability : The first batch of P3Free's when it was released were only updatable with serial programmer as the USB bootloader was not loaded. All new and current P3Free's that are USB updatable are now known as Pic-Fun. Pic-Fun's do not require serial programmer for updating. It is ONLY needed if you bricked/need to hardflash bootloader on to Pic-Fun.
With Sony going after PS Jailbreak, backordered Teensy's and ATMEL chips all thanks to PSGroove (open source) and clones flooding the scene. P3Free is one of those open source clones that is made by the team behind the solderless Wii-Clip for the Nintendo Wii. Upon receiving the package, the P3Free comes in a anti-static bag and 8-pin FPC cable. Unfortunately, P3Free Team rushed the P3Free just to make it for shipping and did not have a PIC Programmer completed. So those who received the first batch of P3Free (marked with [F]) can not upgrade until the PIC Programmer is completed (more info about situation and solution below). Luckily, the files are preinstalled with "PSGrooPIC1.4_wUSBHIDC18-BTL_LEDG-B4_MCLR_12MHz.hex" so no need to load them yourselves. When the PIC Programmer is finally available, you can update the P3Free with similar file. Simply plug-and-play and is compatible with Original PS3 and PS3 Slim.
Unlike some clones, P3Free logo is not printed on the casing but instead labeled with a sticker. Printed on one end of the casing is "FONT SIDE". When I first saw this, I thought typical Chinese misspelling when it was suppose to be spelled "FRONT SIDE". Eventually I found out that its to let you know how to insert the FPC cable. The FPC cable has writing on one side while the other side does not. So the side with writing will be facing up. On the end of the P3Free is a RED LED, GREEN LED, RESET button and slot to insert FPC cable. The case itself feels sturdy and looks well built. Since the files are already loaded, lets get to knowing how to use it. The process is the same as the PSGroove and requires 3.41 firmware. Anything above this will NOT work as Sony has blocked off this method. Anything under 3.41 will cause some problems.
The P3Free boot step :
- Remove the AC power cable from your SLIM PS3, or turn off the AC switch with your FAT PS3;
- Insert the P3Free, and remove other USB device if you inset it before, and eject the disk from BD drive if exist;
- Insert the AC power cable to your SLIM PS3, or turn on the AC switch with your FAT PS3;
- Touch the PS3 power button to active PS3, then touch the EJECT button quickly;
- You will hear some "beep beep" sound from PS3, then the P3Free's RED LED will start to blink, after a while, the RED LED will turn off and the GREEN LED will turn on. When you see the GREEN LED turn on, it means the P3Free is successfully active, now you can take out the P3Free if you want.
Video of how to boot P3Free :
Having successfully getting the P3Free to load on the first try, I thought I would try it out by installing some homebrew files such as FTP Server, Snes9x and Backup Manager. To install these applications or any homebrew applications, you will need to download and save the .pkg files to a USB drive such as thumbdrive or harddrive. To install, simply insert USB drive to the PS3 and navigate to "INSTALL PACKAGE FILES" on the XMB under GAME. Select the file you want to install by pressing X and it will automatically install the file. All applications installed and loaded without any problems.
As we mentioned above that P3Free Team rushed P3Free just to make shipping so here is what they have to say about the situation...
NOTE FROM P3FREE
when the first batch goods ship out, the bootloader code is not ready yet, so we burn the stable v1.4 code in it, to make it can shipping at first time.
now we work with one new code that come with bootloader, and will teach user how to DIY the p3free to come with USB upgrade function.
in fact it's very simple, just SOLDER ONE SWITCH to p3free, and use any PIC programmer that come with ICSP port to burn the new code to p3free.
maybe is not easy for some new user, but anyway it's one solution still for who want to upgrade their p3free.
P3Free Team are giving those from the first batch an option for those not comfortable with soldering a switch. They can ship a new P3Free kit that will be USB upgradeable or get one printer port PIC programmer. So don't worry, you're not stuck with an un-updatable device.
*UPDATED* 10/22/10
We finally received our Serial PIC programmer.
If you have the 'F' version or messed up your bootloader then you need to install the USBHID bootloader on your device. I have attached the P3Free bootloader hex file (Bootloader_USBHIDC18_P3Free_V1.0_12MHz_BTL-pin1_MCLRon_LVPoff_F0_Version.rar) which reflects the 'F0' firmware. You need to hardflash this hex file by using a PIC programmer in order to make the P3Free USB updatable.
Click here to download the PICPgm v1420 PC program
How to burn the firmware to the PIC chip :
[1] Insert the Serial programmer to Serial Port of your PC and click the "Search" button, to see if it can find programmer or not.
If can't auto detect, then means your serial port has a problem. Please check it or change to another PC and try again, until to it can auto detect JDM hardware.
[2] Now link to your P3Free kit and click the "Search" button again, it should can auto detect the PIC chip.
If not, maybe you insert the FPC cable in a wrong side.
[3] When everything is ready, click the "Browse" button to select Bootloader_USBHIDC18_P3Free_V1.0_12MHz_BTL-pin1_MCLRon_LVPoff_F0_Version.hex.
[4] Then click the "Program" button
[5] It will start to burn and the progress bar will stop to respond, it may seem like it froze but its still programming.
[6] After program complete, this green window will show 3 seconds and auto close, now the new firmware is ready for test, all done!
Now your PIC programmable P3Free is now officially USB upgradeable. No more need for the Serial PIC programmer. Now you'll need to download P3FREE_Updater_V1.0.rar and the latest iLLNESS P3Free HEX file. Insert the P3Free into the USB port of your PC and press the RESET button. The app will now detect the P3Free. Click the "Open Hex File", select the right firmware and open it. Now click the "Program/Verify" button and when you see "Verify Started" that means the upgrade complete. Now the P3Free should auto reset and you will see one "Generic USB Hub" device appear in the hardware manager.
Conclusion : Overall, the P3Free Pic-Fun Serial Programmer USB worked like it should by taking advantage of the PS3 USB exploit that allows you to install homebrew applications. Unfortunately, those who purchased and received the first batch is left with a non-USB updatable P3Free. The only way to update is by using a PIC Programmer but even this is not available at time of this review. But the USB updatable version is available and will be shipping instead (label will be marked in blue color "F" and red color "1"). If you received the first batch, you can contact P3Free and they'll send you the new USB version as well as the PIC Programmer when its finally available.
*UPDATED* 10/22/10
After being able to finally update to make the P3Free to be USB updatable, the P3Free is now more convenient to use and to update. My Dell PC did not have a serial port, none of my laptops had a serial port either. Luckily, I had an old PC that I still use and that had a serial port and was able to use this to update the P3Free. If you can't find a serial port, you may need to purchase a serial port adapter. Unfortunately, a USB-to-Serial adapter will not work. All new P3Free's are now known as Pic-Fun and are USB upgradeable. You have an option of purchasing the Serial PIC programmer for an additional cost. This would come in handy if you brick your dongle and need to reload the bootloader. Majority if not all other jailbreak dongles dont allow you to.
The Serial Programmer is no longer required as all P3Free is now known as Pic-Fun and is USB updatable. Click HERE for a full review on the Pic-Fun.
Please note that none of the "upgrade" products listed in this site are endorsed by Nintendo, Sony and/or Microsoft. DCEmu Reviews and DCEmu Network does not condone piracy. The primary functions of a "modchip" and/or "flashcart" are to allow you to play imported games and homebrew software that you legally own or simply just for experimenting with hardware. We in no way endorse piracy, and encourage all users to do the right thing and support the developers/manufacturers that support them. We do not take any responsibilities for any use outside of these parameters or where the use of such a device is illegal.
Images via commentsby Published on February 2nd, 2011 15:56- Categories:
- PS3 News,
- DCEmu Reviews
Prankster AVR PS3 USB Dongle ecliPS3
Manufacturer: Prankster AVR
Site: Buy from OzModChips / Buy from ModchipCentral
Price: $39.95-$44.99
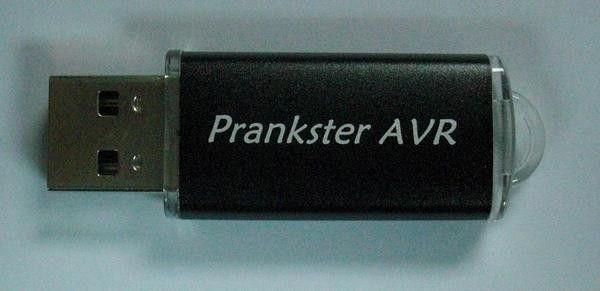
Overview : Prankster AVR is a small USB stick device which can be easily programmed with custom code to prank your friends. It uses the ATmega family for its internal IC. This means it can be programmed very easily with a simple click of an exe file from your PC.
The code that will ship with the device emulates a CAPs lock key being switched on and off every couple of seconds:
tHE DEviCE JuST LookS LiKE a noRMAL uSb StiCK, So IT MIght TAke SoMEone a WHile to FIguRE ouT whAT is GoING on.
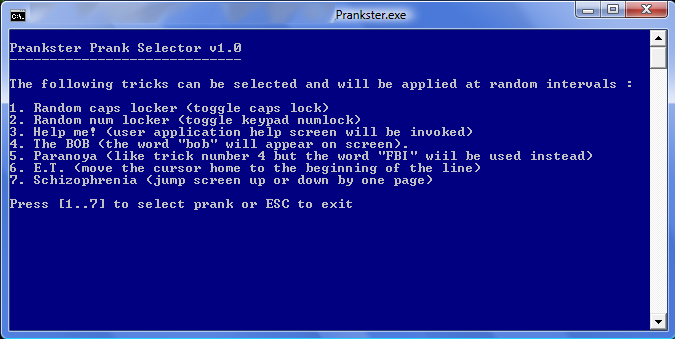
Features :
- Caps Locker - Will toggle the caps lock key on the keyboard
- Numlocker - Will toggle the NumLock key on the keyboard
- Help me! - Will press F1, which will bring up the help screen on your PC
- Who is BOB? - Will write "BOB" on the screen if you are in a text editor (word etc). Who is bob?!
- FBI - Same as above, but with the words FBI
- ET phone home! - Will press the Home key and move the cursor to start of the line
- Schizophrenia - Will Page up or down!
Quality/Usability : This thumbdrive looks like an ordinary thumbdrive but its not. This device is meant to prank your friends and/or family. When the dongle is inserted, it plays all kinds of tricks such as toggling CAPS lock, NUM lock, cause the screen to move up and down and many other new tricks. First, you'll need to download the Prankster application. This allows you to choose the prank of your choice. To load the prank, insert the Prankster AVR into a USB on your computer and open up the .exe file you just downloaded and extracted.
Once the program is open, you're given a few selections to choose from.
Once you've chosen which prank you want, it will give you a new window with the intervals of how often you want the prank to be played.
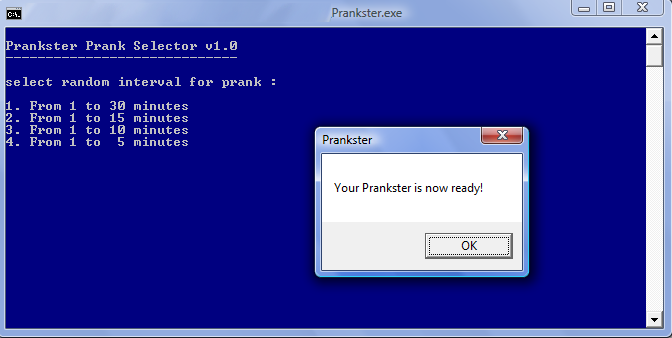
*Note: Your CAPS lock and NUM lock will toggle. So you will need to make sure that CAPS lock is not ON and NUM lock is not off.
From there, there isnt much left. Pretty much just give it to your target, sit back and laugh. Pretty lame huh? Considering it says "Prankster AVR" on the stick itself and its not a storage device. But if you own a PlayStation 3, you're in for a treat! The Prankster AVR's bootloader was actually "hacked" by a 3rd party (code by Charlie Brown; main reversing by syph0r) to be able to run HEX files and to match the bootloader of the ecliPS3 (another Jailbreak USB clone device). However, once you convert this into jailbreak device, you're unable to go back to a pranking device as the original bootloader has been overwritten with that of the ecliPS3. But now that crappy bootloader is now overwritten with ecliPS3's, basically any PSGroove or PSFreedom based hex file for any board type can now be imported (both AVR and PIC based boards are supported). However, should this review be now turned into a ecliPS3 review?
Requirements :
- PS3 Console (fat or slim)
- Console (firmware) version 3.41 only
- Remove all discs from the drive
- Do not connect any devices to the console via USB
- IMPORTANT: The console must be completely switched off before using Prankster AVR. For fat versions, use the switch at the rear. For slim versions, simply remove the power cable. This is extremely important for the process to work correctly when you start the console.
ecliPS3 Features :
- Fully updatable via USB on your PC using an encrypted bootloader
- USB Plug and Play solution that installs in seconds without any need to open up the PS3.
- Supports any available type of firmware for the PS3. PSGroove, PSFreedom and so on.
- Can load directly PSGroove .hex files and Payloads .BIN files
- Can be removed once started. No need to have the USB key always into your PS3!
- Does not break your warranty seal.
- Compatible with all PS3 models, both Fat and Slim.
- Supports all regions: USA, JAP, PAL and KOREA.
- Optimized and enhanced code (most competing products simply use available code)
- Disables forced software updates and will never brick your console.
- Supports most games and homebrew applications.
- Easy-to-use software for backing up, managing, and playing games from external USB Hard Drive.
- Playing games from HDD is much more enjoyable, benefiting from greatly enhanced seek and loading times.
- Supports installing homebrew application on PS3 and external USB media.
- Simple and clear illustrations will guide you to install step by step.
- ecliPS3 is supplied blank. Users can download the latest “Firmware Manager” from our website and choose what firmware they prefer to install from the many available!
Instructions on How to Load ecliPS3 firmware, HEX (.hex) Files, Import Payloads (.bin) or ERASE files :
Required files:
- PrHackster.exe (attached - this is what hacks the Prankster AVR)
- Microsoft Visual C++ 2010 Redistributable Package (x86)
- Eclipse Firmware Manager
- PSGroove HEX (.hex) or Payloads (.bin)

You must "hack" the Prankster AVR by using PrHackster.exe. If you used the Prankster.exe to try out the prank, its best if you remove the dongle and reinsert it back into the USB. Double click on the PrHackster.exe and it will toggle the Scroll and NUM lock. This overwrites the Prankster bootloader and replaces it with ecliPS3's bootloader. If successful, it will display a message saying that activation is done which will now be recognizable with Eclipse's Firmware Manager and to launch ecliPS3 Upgrader (Firmware Manager). Before you launch the firmware manager, you MUST download Microsoft's Visual C++. Without this, Eclipse's Firmware Manager will not work and will give an error when you try and open it.
Eclipse's Firmware Manager looks similar to that of PS Samurai's.
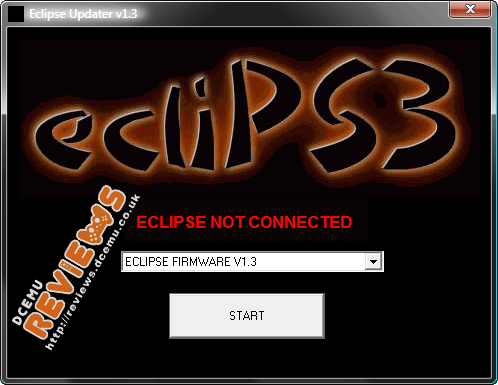
On the Upgrader software, you're able to load their own proprietary file (ecliPS3 FIRMWARE), PSGroove HEX (.hex) files, Import payload (.bin) files or ERASE the files on the Prankster AVR. So, if you want the latest updates, you can simply load the HEX files and than load ecliPS3 files when it becomes available if you wanted to. To load the files, select the method you want to load your files whether it be ecliPS3's firmware, HEX files or importing payloads and select the file you want to load. Once selected, click on START and the software will begin to upgrade the dongle with the file you selected. Once completed, it will pop up with a message and click OK. Now, you're able to remove the dongle from the computer and into the PS3.
What makes the ecliPS3 bootloader different from some of those on the market is that no matter what HEX file you use, it will work (at least for the ones I've tested). So there is no need to be afraid if you load the wrong HEX and that it will damage the dongle or corrupt the bootloader.
Tested HEX files : (HEX collections)
- Arduino
- AT90USBKEY
- ATAVRXPLAIN
- AVROPENDOUS
- Benito
- Blackcat USB
- iLLNESS P3Free
- Maximus AVR USB
- Minimus AVR USB
- Olimex
- Open Kubus
- PS3Key Open Version (for AVRKey)
- Teensy 1.0
- Teensy 2.0
- Teensy++ 1.0
- Teensy++ 2.0
I've tested pretty much every HEX file available with both Hermes v4b and Karatoko's PL3. All HEX's were ranged from 8MHz to 16MHz and all worked with no problems and even the LEDs worked as well. I was unable to remove the USB from the case as its glued but was informed that it contains a 16kb chip.
Operation :
Once the power to your console is completely disconnected:
- Turn on the console (PS3 Fat with the switch, PS3 Slim connecting the power cable)
- Insert Prankster AVR into a USB port on the PS3
- Start up the PS3 and press the EJECT button.
- The LED (which should have been red initially) will change to green.
- If the above process worked, there will be a link to “Install Package File” in the game menu.
In order to make sure the Prankster AVR dongle worked flawlessly, I had to uninstall all my homebrew applications that I had originally installed. To install applications or any homebrew applications, you will need to download and save the .pkg files to a USB drive such as thumbdrive or harddrive. To install, simply insert USB drive to the PS3 and navigate to "INSTALL PACKAGE FILES" on the XMB under GAME. Select the file you want to install by pressing X and it will automatically install the file. All applications installed and loaded without any problems.
Conclusion : Overall, I dont know what to call this product or even consider this review as. Prankster AVR, where its an actual pranking device? Prankster AVR, where its just another jailbreaking device? Or ecliPS3, since once the Prankster AVR is hacked, that's the bootloader that is installed. I'm so confused! None-the-less, Prankster AVR is another jailbreaking device (if you intend it to be) but is able to load any...and I mean ANY HEX files you install without the fear of it corrupting or bricking. Since it accepts all HEX files from any board, you won't have to wait for a specific HEX file to be compiled when a new update is released. Whichever comes out first, you're able to use it. If you're the type that likes to experiment and try new things, you can even use this to see if the compiled HEX works before loading it on the actual device. Since the product is a pranking device and the idea is to prank someone, it's best if the words/logo "Prankster AVR" wasn't printed on the casing. Kind of defeats the purpose.
Please note that none of the "upgrade" products listed in this site are endorsed by Nintendo, Sony and/or Microsoft. DCEmu Reviews and DCEmu Network does not condone piracy. The primary functions of a "modchip" and/or "flashcart" are to allow you to play imported games and homebrew software that you legally own or simply just for experimenting with hardware. We in no way endorse piracy, and encourage all users to do the right thing and support the developers/manufacturers that support them. We do not take any responsibilities for any use outside of these parameters or where the use of such a device is illegal.
Images via commentsby Published on February 2nd, 2011 15:51- Categories:
- Nintendo Wii News
"This partnership helps offer a point of difference to the retailer"
UK publisher Funbox Media has teamed up with accessories firm Imp Gaming to produce Combo Packs for Wii.
Each product combines one of Funbox’s Wii titles with an appropriate Imp peripheral, such as steering wheels and fishing rod controllers. Titles in the deal include Chicken Blaster, Speed, Wild West Shootout and Reel Fishing: Angler’s Dream.
Imp has also told MCV it is working on similar bundles for DS, Xbox 360 and PS3.
“This partnership helps offer a point of difference to the retailer, but more importantly to the consumer, who is looking for extra value in these austere times,” said Funbox Media’s sales manager Mark Clemens.
http://www.mcvuk.com/news/42837/Funb...or-Wii-bundles ...by Published on February 2nd, 2011 15:46- Categories:
- PS3 News,
- DCEmu Reviews
Gioteck PS3 Sixaxis Real Triggers
Manufacturer: Gioteck
Site: Buy from Amazon
Price: $4.99
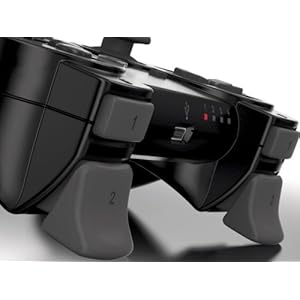
Overview : JUST A LITTLE TO THE LEFT AND...HAHA! OWNED!
How many times have your fingers slipped off the L2 and R2, and always at a crucial moment in the game? RealTriggers put a stop to that happening ever again!
Simply put... if you use a Sony™ PS3 Controller, and your serious about your gaming, you should be using these!
Quality/Usability : The Gioteck Real Triggers isnt really new. Its been available for sometime exclusively in Europe. The Real Triggers are made of two plastic pieces that clip over the L2 and R2 triggers on the PS3 controller. By doing so, this makes the triggers bigger and provides a ledge.
The Real Trigger has the same color, texture and feel as the actual trigger itself. This makes it feel like it was originally on the controller and not a cheap plastic 3rd party attachment. It doesnt feel out of place at all.
Having tested it with a couple of racing games and shooters, there was an improvement in my controls as well as the comfort when I hold the Dual Shock.
Conclusion : Overall, the Gioteck PS3 Sixaxis Real Triggers improves the L2 and R2 triggers on the PS3 controller. Whether you have a Sixaxis or Dual Shock controller, the Real Trigger will fit. This seems to be available only in Europe (at the moment) but it seems that Gioteck plans to release it globally. When? No idea but they should release it soon. The price is very very reasonable but hopefully the shipping doesnt cost as much as the triggers themselves.
Images via comments ...by Published on February 2nd, 2011 15:40- Categories:
- Playstation Vita News
With the announcement of the Sony NGP (or PSP2 for those not down with the new acronym) gamers are in somewhat of a awkward position.
At long last we've got one of those bittersweet decisions to make again. We have an important choice, between the undeniably impressive Nintendo 3DS and Sony's new juggernaut of a handheld.
Unless you're a lifelong Sony or Nintendo faithful fan, and are willing to drop the cash for their respective handheld without considering the competition - or able to pick up both - you're going to be doing a lot of thinking about which of the two to splash out on.
This is where the launch games usually strut their stuff. Usually.
We say it's an awkward position because Nintendo's launch line-up is...well, it's not exactly blowing anyone away. Sure, Street Fighter looks ace, PES 2011 is shaping up to be the best portable footy title yet and Steel Diver has generated some buzz, but the early offerings lack Nintendo's wow factor.
The chirpy plumber, sword wielding Elf and Pokemon are all noticeably absent from the 3DS launch line-up, and this will no doubt be a bit of a bummer for a lot of people.
Sony isn't in much of a better position either. Although it's dazzled us with impressive specs, gleaming hardware and videos of games such as Uncharted, Resistance and Killzone - all looking surprisingly similar to their PS3 counterparts - it hasn't said whether any of these titles will be part of its launch line-up.
In this respect Sony is in a position where it could get the edge. With no games currently confirmed for release, the NGP has the perfect chance to come out with its big guns blazing.
With that said we're turning to you: what games would get you on board with Sony's new handheld?
Be they first-party exclusives, returning franchises, third-party titles or even PlayStation Minis - what in particular would make you part with your hard-earned?
http://www.computerandvideogames.com...VG-General-RSS ...by Published on February 2nd, 2011 15:18- Categories:
- Android News
We've gotten a bunch of tips in the past hour or so that the Android Market is doing weird things, and we can corroborate this on our Nexus S here -- we're just not able to download stuff. Apps look like they're starting to download, then they suddenly vanish into thin air without a trace and without an error message. Our Droid 2 is still fully functional, though, so this definitely isn't consistent; really, we're just wondering if this outage might have something to do with tomorrow's Android-themed festivities at the Google campus, which -- naturally -- we'll be attending. So how is everyone faring out there tonight?
http://www.engadget.com/2011/02/01/a...o-tomorrows-e/ ...by Published on February 2nd, 2011 15:16- Categories:
- Apple iPad

Do you believe what you're seeing? 9to5Mac along with iFixYouri repair say they've got the new iPad 2 display. Better yet, they've got the purported part number: LP097X02-SLN1, compared to the original iPad's LP097X02-SLA3 display. It's said to be lighter and more than 1-mm thinner than the original while featuring a thinner bezel as well -- right, just as the rumors and our own sources have said. Such a display would also enable some tapering of the edges in line with those milled aluminum dummies we've seen. The big mystery is still the resolution. A 9to5Mac commenter claims to have deciphered the part number to reveal its LG Phillips 9.7-inch XGA 1024 x 768 H-IPS display origins (same resolution as the current iPad, if true). Unfortunately, we have no way to confirm this. One more pic of the part number details after the break.
http://www.engadget.com/2011/02/02/i...isplay-leaked/ ...
- Search DCEmu
- Advert 3
 News Categories

- Links of Interest
 Sony Consoles News


- Nintendo Consoles News

- Sega Consoles News


- Apple & Android News
- Xbox Consoles News


- Open Source Consoles News
 DCEmu News Archive
- Advert
- Retro Consoles News


- PC News

- Latest DCEmu News


- DCEmu Network Sites
-
 Menu
Menu  Forum Stats
- What is the DCEmu Homebrew & Gaming Network
Catherine: Full Body’s English translation for the Vita