

 DCEmu Homebrew Emulation & Theme Park News
Nintendo Wii News
by Published on February 2nd, 2011 12:12- Categories:
- Nintendo Wii News,
- DCEmu Reviews
CycloWiz Modchip v2 (DMS/D2A/D2B)
Manufacturer: Team Cyclops
Site: Buy from Divineo
Price: $30.00-$40.00
Overview : The CycloWiz Wii Mod Chip has been updated to be universally compatible with all current Wii drive chipsets including DMS, D2A and D2B.
The amazing CycloWiz Mod Chip for the Nintendo Wii has arrived! The CycloWiz is possibly the easiest modchip to install on any system. A quicksolder pattern on the PCB board removes the need for wires. All you need to do us solder onto the designated parts and the installation is complete.
Not only is the CycloWiz easy to install, but this ModChip also has amazing features including Stealth Mode, the ability to play both WII and Gamecube backups, GameCube homebrew and imports. The CycloWiz also has an optional LED to let you know when the Mod Chip is ON or OFF.
Features :
- Compatible with all current Wii chipsets including the DMS, D2A and D2B
- Fully upgradable via DVD
- Easy installation(5 solder points / no wires required)
- Stealth Mode to keep the Mod Chip from ever being detected by the current Wii firmware
- Play both Wii and GameCube backup copies
- Play GameCube homebrew and Imports
- Built In audio-fix for GameCube backup copies
- Multidisc GameCube game support
- Supports both 8cm and 12cm discs
- Optional disable feature to turn the Mod Chip ON or OFF
- Multipurpose LED to let you know that the CycloWiz Mod Chip is on and working, if there is an error, or if it is off
Quality/Usability : This review is an updated review based off of our CycloWiz v1 (DMS/D2A) - 3.0B FW review that worked only on DMS and D2A chipsets. This review is based on a North American (NTSC-US) Wii. All games tested during this review, we own the original games. This modchip is only compatible with Wii's that have a DMS, D2A or D2B chipset. This will NOT work on a D2C chipset.
Like CycloWiz v1, this modchip will work on DMS, D2A and now, D2B chipsets. This will not work on D2C chipsets as the structure has changed and did not allow the use of modchips. If you bought your Wii after June 2007, it probably contains a D2C chipset. You can find out what your Wii probably has by using this Wii Tracker.
The CycloWiz comes in a ESD bag but does not provide any protection during shipping (unless retailer protects it). The CycloWiz is basically a chip on a small thin PCB. The solder pads allows you to either quick soldering or wire installation. Wire installation is the best way to go because if for whatever reason you need to remove it, it is a lot easier and cleaner. Team Cyclops also started to include a switch with all CycloWiz's
Installation : Before installing the CycloWiz, you must have at least some experience with soldering and have read their instruction manual which can be downloaded from here. As for me, I dont have any experience with soldering, so I had a friend install this for me. In order to install the CycloWiz onto your Wii, you must take it apart. Here is a tutorial on how to dismantle your Wii. You can also find other tutorials or even videos on the web.
Once you have dismantled the Wii, you must locate the points outlined in their installation manual. These points are where you will connect the soldering between the Wii and the CycloWiz. When soldering, you must remember to stay within the points and not to use too much solder or you may risk shorting out the chip as well as the Wii. When soldering the CycloWiz, you also have the option of installing 3 more wires which is then connected to a switch. The switch that is included is a flip switch but any type of switch will do whether it be a push-in switch or a flip switch but the smaller the better. You can install the switch anywhere you want. It can be in the vent at the bottom of the Wii or you can drill a hole into the casing of the Wii, whichever is more convenient to you. This switch will enable you to upgrade your CycloWiz via DVD.
On the CycloWiz, there is an LED that will light up if you’ve installed the chip correctly. You would want to try the Wii out before closing it up by hooking the Wii back together without the casing or you will not be able to view the LED. This is a great way to tell you whether or not your installation was successful or not without having to reopen your Wii later on.
Wii Compatibility : With Team Cyclops constantly improving the CycloWiz, game compatibility has improved dramatically. There were less and less DRE's (Disk Read Errors), sometimes even none at all. Playing imports is still a hit or miss when it comes to playing on a different region. Some games will work and some games will not. But if you're playing in the same region such as NTSC-US (North America) and NTSC-J (Japan), there is not problem.
Homebrew Compatibility : Loading homebrew is still the same as v1. There are three ways to load GameCube homebrew; bootable disc, SDLoad and GCOS. Loading via SDLoad, you will need a SD Gecko adapter as well as an SD card. If using GCOS or a bootable disc, you can load the emulators ...by Published on February 2nd, 2011 12:12- Categories:
- Nintendo Wii News,
- DCEmu Reviews
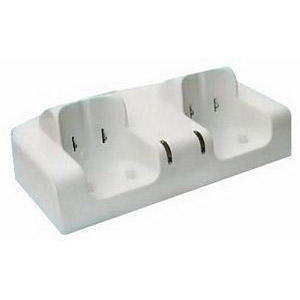
Double Wiimote Power Pack with Charger Stand
Review by: wraggster
Provided by: DCEmu Reviews
Manufacturer: Dragon
Site: Buy from GameInfinity
Price: $19.95
Overview : Stop wasting money on batteries and easily charge a set of Wiimotes with the Dragon Double Wiimote Power Pack with Charger Stand! A light indicator will let you know once remote controllers are fully charged, and you are ready to play again with many hours after around 2 hours of charging.
Easily charge and store your Wii Remotes with this Charge Station for Wii. It includes 2 NiMH rechargeable batteries, exclusively designed for the Wii Remote, each providing up to 25 hours of play time.
Features :
- 2 hours quick charge function
- Full charge auto detect function
- High quality and efficient product
- Remote controller stand function
- Rechargeable AAA size dry batteries compatible
- 4 * AAA size rechargeable batteries are included
- Power charge cable is included
- Normal alkaline AAA size dry batteries compatible
- Simultaneously charge 2 Wii-remote controllers
Quality/Usability : The Dragon Double Wiimote Power Pack with Charger Stand consists of a USB Cable to get the power, A Base Deck for the actual charging with 2 points to charge your WiiMotes, you also get 4 750MAH AAA Batteries and the plastic casing they fit in which gives you the ability to charge the Wiimotes without having to take the batteries out every time.
The review sample came with no instructions but it is very simple to most people
Firstly make sure you put the batteries the right way around in the plastic battery casing, failure to do so could cause problems and well its not going to work.
The USB Cable can be connected to your Nintendo Wii or any USB Compatible Device, if you have a PC or Laptop i suggest using them over using your Nintendo Wii, put simply the less stress on the Nintendo Wii causes less problems with over heating. Once the USB Cable is connected to both Base Charging Unit and USB Host you can then put your Wiimotes onto the Base Unit.
Once you have connected the Wiimotes (with the plastic casing/rechargeable batteries) correctly, the light will light up to let you know its charging. Once the Wiimotes are charged the red light will go out. Now your ready for Wii Gaming
As the Wii is more a casual console its very hard to test how long the batteries are before they run out but being rechargeable you should easily get a day out of them before charging.
Conclusion : Overall, with the Wiimote being a bit on the hungry side with batteries its a great idea to use rechargeables and the ability to recharge without taking the batteries out every time is very handy The AAA batteries arent as powerful as 2 2500MAH AA Batteries but the ability to recharge without taking it all apart is a major plus. The only problem with this method is that you'll need to sync the Wiimote before using the Double Wiimote Power Pack. The charging of the Wiimotes took me longer than 2 hours but that may be down to my laptop I used to charge.
Do I recommend this product? Yes, very much so if your still using normal batteries then get one now.
Images via comments ...by Published on February 2nd, 2011 12:12- Categories:
- Nintendo Wii News,
- DCEmu Reviews

Joytech Sharp Shooter Gun
Manufacturer: Joytech
Site:
Price: $27.95
Overview : Lock and load with the Sharp Shooter™ from JOYTECH. Fully compatible with all forms of TV's and displays including plasma and LCD, the Sharp Shooter brings Wii™ shooting games to life with amazing realism. Connecting quickly and safely to the Wii™ Remote and Nunchuck, the Sharp Shooter™ is lightweight, simple to use and requires no batteries, no leads and no worries! Shoot to thrill!
Features :
- Convert your Wii Remote and Nunchuk into a precision shooter
- Easy-load and Quick-Eject design connects and dismantles to the Wii Remote and Nunchuk in seconds
- Maintains full access to the Wii Remote and Nunchuk controls
Quality/Usability : While us gamers wait for Nintendo to release the Wii Zapper, we have to resort to 3rd party peripherals to fill in that void. There have been various different types of light gun attachments on the market. Before the Wii Zapper was announced, the Joytech Sharp Shooter was the talk of the town.
Unlike the Wii Light Gun, the Sharp Shooter's main trigger is the "Z" button on the Nunchuk rather than the "B" button on the Wii Remote. The Wii Remote is placed on top of the barrel while the Nunchuk is used as the handle/grip.
To insert the Wii Remote into the barrel, there is a locking mechanism with a spring on it, that holds the handle and barrel closed. Pulling back the locking mechanism will allow the barrel to fold down. This will allow you to insert the Wii Remote as well as connect the Nunchuk to the bottom of the Wii Remote. The bottom of the barrel has an opening for easy access to the "B" button. The barrel also allows easy access to any of the buttons on the Wii Remote.
Once the Wii Remote is in place, you'll have to pull the locking mechanism back to gain access to connecting the Nunchuk to the Wii Remote. On the side of the Sharp Shooter, there is a small opening on the side. This is where the cord of the Nunchuk is placed so that it is not in the way of the locking mechanism.
Placing the Nunchuk in place is fairly simple. Simply pull back on the locking mechanism and place the Nunchuk into the cradle. The locking mechanism covers the top of the Nunchuk slightly so that it does not fall out of its cradle. Accessing the "Z" or "C" button on the Nunchuk is accessible without a problem along with the joystick.
To connect everything together, simply move the barrel back up and use the locking mechanism to lock the handle and barrel together. It will require you to put some pressure to lock it in place. To dismantle, simply pull back on the locking mechanism.
Conclusion : Overall, the Joytech Sharp Shooter Gun is probably the best constructed light gun attachment on the market..for now. Depending on the game available for the Wii, it may require either the "B" button or "Z" button to be used as the trigger button even though the layout of the Sharp Shooter suggests that the "Z" button is the trigger. So regardless of which is used as a trigger button, the Sharp Shooter accommodates both possibilities nicely. What I dont like is the Nunchuk cord dangling from the side of the gun. This can get annoying at times during gameplay.
Images via comments ...by Published on February 2nd, 2011 12:12- Categories:
- Nintendo Wii News,
- DCEmu Reviews
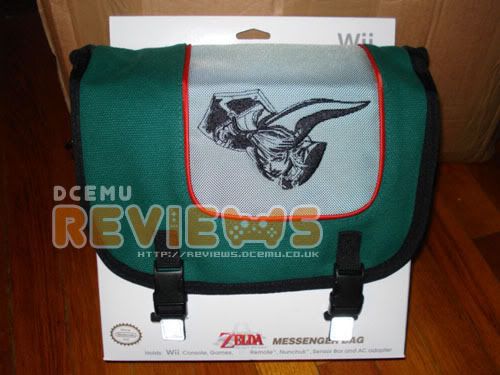
Legend of Zelda Wii Messenger Bag
Manufacturer: ALS Industries
Site:
Price: $54.95
Overview : The Legend of Zelda Wii Messenger Bag (Z180) is an official Nintendo licensed product. It can hold Wii Console, games, Wii remote, Nunchuk, Wii sensor bar and AC Adapter. Official licensed product.
Features :
- Main pocket holds Wii console
- Zippered paded inside pocket for Sensor bar
- Padded middle pocket holds AC adapter and controllers
- Front pocket holds games and additional controllers
- Comfortable carrying handle
- Convenient mesh side pockets
- Strong designer hardware
- Adjustable shoulder strap
Quality/Usability : The Nintendo Wii is the smallest console amongst the next-gen consoles (PlayStation 3 and Xbox 360). With the Nintendo Wii still hard to find in stores (Yes, even after a little more than a year of being released in the US, its still hard to find on store shelves), I had to bring my Wii to relatives house so we can all enjoy the family fun. Isnt that Nintendo's intentions?
As the name of the product/review states, the messenger bag has a Legend of Zelda theme to it. The flap has an a stitched image of Zelda and underneath is Zelda's shield made of hard rubber. The messenger bag has three compartments and two elastic mesh side pockets.
The two elastic mesh pockets can hold your cables or the other small accessories such as extra Wiimotes.
The flap has two clips to keep the flap closed and underneath the flap are two velcro strips that attaches to the bag. Also under the flap but above the main compartment is a small mesh pouch. This mesh pouch is for the sensor bar. Unfortunately, if you have a wireless sensor bar, it wont fit as they usually tend to be bigger and thicker. This is actually the first carry case or that I know of that has its own pocket for the sensor bar.
The main compartment holds the Nintendo Wii console. The compartment holds the Wii securely in place and has a lot of padding to give that extra protection. Inside the main compartment, is another compartment. This compartment allows you to hold two Wiimotes and AC adapter. There are even three elastic bands to hold them in place.
The front pocket lets you hold Nunchuks, Wii games and any other controllers or accessories you may need to carry such as classic controller, GameCube controllers, etc.
Conclusion : Overall, the Legend of Zelda Wii Messenger Bag is a well constructed bag. Even with all the pockets and compartments filled, the bag isnt too big compared to some carry cases on the market. Most cases on the market can only hold the system, cables, power supply and 1-2 controllers. This doesnt even include the sensor bar. While the Zelda bag can carry everything and then some. The images on ConsoleShop can be a little misleading as what I received (see image at top or attached) is not what is pictured on the site even though the images on the site is on the package itself. The image on the site is slightly different and the size of the bag looks like a regular normal messenger bag when the bag I received is smaller and almost the size of the Wii. The mesh pockets arent brown. They are black. The price isnt attractive at a very pricey $54.95 for a carry case. But if I had a choice of the Legend of Zelda Wii Messenger Bag or any of the 3rd party carry bags on the market, I'll choose the Zelda Messenger Bag as it offers more protection and it can store more.
DIGG THIS
Images via comments ...by Published on February 2nd, 2011 12:11- Categories:
- Nintendo Wii News,
- DCEmu Reviews
Wii Light Gun
Manufacturer: PEGA
Site: Buy from Goldenshop
Price: $19.00


Overview : Playing shooting game with this Wii Light Gun. You can feel the sense of authenticity, just aim at the target on screen and shoot it down. So Easy!
Features
- Convert the Wiimote to a high precision Wii light gun
- Easy to target while playing shooting games
- With exquisite design, using conveniently
- The Wiimote Controller is not included
- This is not an Official Products
Quality/Usability : Every gamer out there is hoping for Nintendo to release the Wii version of the Zapper that was released for the NES. Until that day comes, gamers will have to rely on 3rd party peripheral manufacturers to fill that void.
PEGA has released their light gun attachment for the Nintendo Wii. Its simply just a casing that lets you plug your Nintendo Wiimote and Nunchuk into it. It has an actual trigger. When you press on the trigger, there is a spring inside that will retract a trigger that will press the B button on the Wiimote. Where do you plug the Nunchuk controller? You plug it at the bottom of the light gun.
How well does it work? When the controllers are connected to the light gun attachment, it works pretty well. The Wii picks up every movement as if it wasnt in the attachment. Bad thing about it? When pull the trigger, you have to pull all the way in order for the trigger arm to press the B button. When pressing the button, your hand will jerk a little as you will need a bit of strength to pull the trigger. This will cause your aim to be inaccurate.
Conclusion : Overall, the Wii Light Gun is a great idea and a temporary solution until Nintendo releases their own (whenever that will be). The distance of the trigger arm to the B button is it bit far which means you'll have to pull the trigger even further. By that time, you've already been hit or will be missing your shots. It would have been nice if the trigger arm was closer to the B button which wont take long to pull the trigger. When placing the Wiimote into the attachment, you will need to remove the wrist strap. If you are using a controller glove, you'll have to remove that as well.
Images via comments. Additional images from Brando
DIGG THIS
by Published on February 2nd, 2011 12:11- Categories:
- Nintendo Wii News,
- DCEmu Reviews

XCM II-Case Chameleon
Manufacturer: XCM
Site: Buy from TotalConsole
Price: $54.99
Overview : Stand out from the crowd with the ultimate Wii case: the ii-case that includes LEDS shining in the dark, with our Chameleon technology to rotate between colors! The ii-case is not only a full replacement transparent Wii case, but it also includes a LED system to enlight your Wii. Very complete, it includes Air Flow cover and DVD Rom cover (in metal).
The Chameleon version includes a system of color rotation for the ultimate light effect. An extra button allows you to select a specific color (Red, Purple, Green, Yellow, Blue, Apple Green or Orange) and keep it static on screen.
Includes matching color stand and special Tri-wing screwdriver for installation.
Quality/Usability : After receiving XCM's I-Case Black Knight and reviewing it, we received Team Xtender's second full replacement case, II-Case Chameleon on our doorstep (courtesy of TotalConsole). This time, it houses LEDs to make it even more unique. Those who love to have "flashy" consoles and when I mean flashy, I mean the type that will blind you, would want to read this review.
This is XCM's third? Fourth? Fifth, full replacement casing for the Nintendo Wii? I dont know, but I lost count as they have released so many ranging from chrome, to red, to blue, to even pink! As mentioned above, we reviewed their Black Knight, which is an all black casing. They have been known for slick and unique faceplates, casings, controller mods, cables and other accessories.
The XCM II-Case Chameleon includes the console shell, doors, faceplate, buttons and even the rubber feets at the bottom of the Wii which makes up the whole exterior of the Wii. To match the clear crystal case, they also included a clear stand and tools to help you dismantle the Wii! Not a single piece was left out.
Like all of XCM's products, the quality of the case is excellent and solid. Feels like it came out from Nintendo's factory. The case is clear which allows you to see all the innards of the Wii. The Crystal Chameleon also comes with a metal DVD cover which houses the LEDs near the DVD drive.
I wont go much into detail regarding installation as you can find tutorials on how to dismantle or disassemble your Wii, here. The whole installation process took approximately 50 mins. This is not to say that is how long it will take you to assemble everything. I am a perfectionist and anal when it comes to things like this. For some who are pros or better at things like this can be a lot quicker while noobs, novices or perfectionists like me, may take longer. The whole process is just time consuming and tedious. It will require some patience. It took longer than the Black Knight casing was because the metal DVD cover and Air Flow (which also has LEDs) needed to be installed and wires needed to be connected in order to power the LEDs. To install the metal DVD cover and Air Flow, you can read the tutorial here. Even though I had already installed the Black Knight case on to my Wii, you would think that the installation time would be shorter. It all depends on your skills and perfectionism.
Once installed and the Nintendo Wii put back together, the Crystal Chameleon case is fairly bright. Luckily, you have the option of turning if off but also the option of either having the LEDs fade into different colors or stick with one color.
Click here to see a video of the II-Case Crystal Chameleon case in action.
Conclusion : Overall, the XCM II-Case Crystal Chameleon is unique and flashy product but a bit pricey. But thats the price you have to pay to be unique and different amongst Wii owners. Those looking to kick it up a notch with the look of their Nintendo Wii should definitely look into purchasing the II-Case Crystal Chameleon case. You would be the cool kid on the block (HAHA, that was so cheesy). Again, the time it took me to install the II-Case depends on the person, experience and perfectionism. With the new mods for the Nintendo Wii such as the PulseVU, LED mods for both console and controllers, the Chameleon case would be able to flag a plane (just kidding). Be sure to check out the other colors that XCM has to offer if you want to be even more wild and crazy with colors!
Here is a video of the Chameleon Case with PulseVU and a few other LED changes installed: (by M37R01D)
DIGG THIS
Images via comments ...by Published on February 2nd, 2011 12:11- Categories:
- Nintendo Wii News,
- DCEmu Reviews
Wii Blue Light Charge Station
Manufacturer: PEGA
Site: Buy from Goldenshop / Buy from DealExtreme
Price: $15.00
Overview : Charge two Wiimotes at the same time. Includes 2 1800mAh battery packs.
Features :- High quality 3rd party product.
- Comes with 2pcs of 1800mAh rechargeable batteries for the Wii remote controls - no need to take out the battery when charging.
- No need to add extra power supply - get the power from the USB port of the Wii console.
- 2pcs of Wii remote controls can be charged simultaneously.
- Light indicators to show the charging status.
All the battery packs that we have reviewed such as Penguin United Remote Charging Dock + Rechargeable Battery, Wii Remote Battery Charger & Stand or Wii Remote Charge 'N Play, all have the same type of look...plain. Nothing stands out. Nothing fancy. Well, PEGA went and took it to the next step, lights.
The Wii Blue Light Charge Station comes with a dock, USB cable and two battery packs. Both battery packs are 1800mAh's which is pretty much standard for the 3rd party batteries.
The battery are ordinary battery packs and looks similar to Wii 1800mAh Rechargeable Battery. Instead of the 1800mAh being printed, the PEGA version is stickered. Also on the battery pack is a sticker that informs you that before using the battery pack for the first time, you must charge the battery for over 12 hours, or else the battery life will be reduced. Honestly, whether you use it first or charge it, gradually the battery life will be reduced like any other battery. I personally use the battery first and let it die out completely before doing a full recharge. Like the Wii 1800mAh Rechargeable Battery, there is a hole on the battery pack for easy access to the SYNC button.
The dock is what makes the product stand out from the rest of the crowd. Did you purchase the sweet looking Wii Crystal Blue LED Cooler Stand and change the casing of your Nintendo Wii to the Team Xtender II-Case Chameleon? Well your lighted collection isnt complete without this. Thats because the dock lights up also! No, not those cheesy small GREEN LEDs that goes on and off to let you know if its fully charged and done. All around the bottom of the dock is a clear window. This lets the lights from the LED shine through. There are 4 LEDs on the bottom of the dock. To turn on and off the blue lights, there is a switch on the back of the dock. On the top of the dock near the Wiimotes, are two more LED lights, one for each dock. When the battery packs are charging, the light will turn RED...more like pink. When the battery pack is done charging, the light turns blue.
In order to charge the battery pack, you need to have it inside the Wiimote. Sorry, but you'll also have to remove the wrist strap or the contact on the dock wont touch the contacts on the battery pack. Like all other recharging docks, it wont work with silicon skin/glove on. So you'll have to take that off as well.
Charging time took approximately 2-3 hours like all other docks but I left it on there for 12+ hours as recommended even though it wasnt necessary. During game play, I was able to get about a 4.5 hours out of a full charge.
Conclusion : Overall, the Wii Blue Light Charge Station ups the ante in looks for rechargeable docks. The blue lights look great! The battery packs? Well, they're just battery packs. Nothing special. Nice to have an ON/OFF switch for the lights on the bottom of the dock but the lights to show you if the Wiimotes are charging is permanently on. There is no way to turn them off. Placing the Wiimotes on the dock can take some fiddling around so that the contacts on the dock and battery pack touch each other. Having to remove the wrist strap off the Wiimote can be annoying for some Wii'ers. The price of the Blue Light Charge Station of $15 is fairly reasonable considering it comes with two rechargeable batteries and the dock lights up!
Images via comments ...by Published on February 2nd, 2011 12:11- Categories:
- Nintendo Wii News,
- DCEmu Reviews
PEGA Wi Wireless Sensor Bar
Manufacturer: PEGA
Site: Buy from Brando
Price: $17.00


Overview : Complaining the Wii sensor bar cable too short? No Problem!
This Wii wireless sensor bar makes you have freedom to locate the bar. It is a easy solution for those Projector type users.
Features
- LED indicator and ON/OFF switch
- Easy to install
- ideal range 3-8 feet
- 2 x AA Batteries is required (NOT included)
Quality/Usability : PEGA has entered the wireless sensor bar market for the Nintendo Wii (is there anything they cant do?!).
The front of the wireless sensor bar are three LEDs. One on each side to interact with the Wiimote and one in the middle. The one in the middle is a green LED. This lets you know hen the wireless sensor bar is on. On the back of the wireless sensor bar is a ON/OFF switch. This lets you turn on and off the wireless sensor bar. On the bottom is a small compartment to insert your 2 AA batteries (not included).
Although the specified ideal range to use the wireless sensor bar is 3-8 feet, you can use it as far as 13 feet. The distance is a little shorter than all the other wireless sensor bars that we have reviewed. The average distance is usually 15 feet. So the PEGA wireless sensor bar falls a little short when compared to other wireless sensor bars on the market but the distance is ideally 5-10 feet, so anyone who uses this should be fine with the wireless sensor bar.
On 2 AA batteries, the wireless sensor bar lasts for about 15-20 hours before the batteries will need to be recharged or changed (depending on what type of battery you are using).
Conclusion : Overall, the PEGA Wii Wireless Sensor Bar works fairly well but falls short when compared to other wireless sensor bars on the market. The furthest distance before the sensor got a bit funky was at 13 feet. Battery life was fairly decent, lasting about 15-20 hours. The price of $17 seems a little high while the Nyko Wireless Sensor Bar retails for $19.99-21.95.
Images via commentsby Published on February 2nd, 2011 12:11- Categories:
- Nintendo Wii News,
- DCEmu Reviews
WiiFree Easy Connect Modchip
Manufacturer: WiiFree Easy Connect
Site:
Price: 12.00 €


Overview : WiiFree is an open source Wii modchip. It required you to load your own code onto a PIC12F629/675/683. In order to load the code, you would need to purchase a programmer as well as the PIC chip. Now there is an easier way to install and upgrade WiiFree.
This is a clean and very cheap solution, which makes the installation of PIC 12F629/675/683 in your Wii console extremely fast and easy; allowing the upgrade of the WiiFree code without any problem.
*Every PCB comes with a brand new PIC12F629 bundled.
Features
- Run GameCube originals
- Run Wii originals
- Run Wii back-ups
- Support for D2A and D2B!!
- Support for 12F629 and 12F683 chips (the installation for the 12F683 is the same as the 12F629)
Quality/Usability : I wont go into full detail as to review the WiiFree open source modchip (will review it later) but will review the WiiFree Easy Connect itself and its installation. As we first brought the news of WiiFree Easy Connect and the first images of Easy Connect in our hands, we now bring you the first review.
WiiFree Easy Connect comes included with a PIC12F683 and cables. When you first receive the Easy Connect the two boards are connected together. You will have to bend them in half to have two separate pieces. Dont worry, its already been sliced so that the break would be even. The board itself is not as thick when compared to other commercial modchips on the market such as the WiiKey, CycloWiz, etc.
On the bigger board, it contains the PIC12F683 chip which contains the WiiFree open source as well as the 8-pin socket to hold the PIC in place. As of this review, WiiFree 2.45 is the latest version available is preloaded onto the PIC so that all you have to do is just solder and install the Easy Connect and you're ready to go. This is great for those who dont have a JDM programmer (used to upgrade/flash PIC chips). The board also has two LEDs. This lets you know if the installation is successful or not. This board is to be placed on the outside of the Wii for easy access to the PIC incase you want to upgrade WiiFree when there are new releases.
The smaller board has the quicker solder points to be soldered onto the Wii mobo. The solder points are so small that you can only do quicker solder. Its very hard to do wire installs unless you're very skilled at doing so. Most people prefer wire installs as it is easier to remove when needed rather than quick soldering.
Other than the small soldering points, its fairly simple. On one end of each board is a small clamp like device that you pull out slightly, insert ribbon cable with blue sticker facing up (included) and close the clamp. This will hold the ribbon cable in place on the board. No soldering required.
Once the smaller board has been soldered onto the Wii and all cables have been connected, you can place the bigger board on the outside of the Wii case. You can route the cable through the side of the USB port or through the vent opening on the back of the Wii case. Usually, the 8-pin socket that holds the PIC12F629 are soldered onto the Wii case with wires to the Wii mobo by drilling 8 little holes and held in place with glue. With WiiFree Easy Connect, you wont have to drill any holes on to the Wii case. You may want to get double sided tape or something to hold the Easy Connect to the case. If not, you can just let it dangle freely.
Conclusion : Overall, the WiiFree Easy Connect is an excellent solution to those who do not want to damage their Wii case by drilling holes. It would have been nice if the points on the Easy Connect were bigger to allow wire installs rather than the quick solder method. Would have been also nice if maybe they had included double sided tape or some way to attach the Easy Connect to the Wii case. With the inclusion of the PIC12F629 and WiiFree already preloaded, this is great for those who do not have a JDM programmer or PIC12F629. Since it comes with a PIC12F926 and if you have a JDM programmer, you can install any open source modchip whether it be OpenWii, Chiip, Yaosm, WiiC, WiiREZ, Wiip! and many more.
Since the PIC chip is removable, you can purchase or request sample PIC chips online and load your preferred open source code to that PIC and swap PIC chips. That is if you still prefer to keep the WiiFree. Regarding the JDM Programmer that lets you put open source code on to the PIC chip, there are two ways of getting one. #1. Make your own by following these instructions. Or #2. You can purchase them online either on gaming sites or through eBay by typing in "jdm programmer" in the search field. You will need to have a RS232 cable (serial) handy in order to connect the JDM Programmer to your computer.
Please note that none of the "upgrade" products listed in this site are endorsed by Nintendo, Sony and/or Microsoft. DCEmu Reviews and DCEmu Network does not condone piracy. The primary functions of a "modchip" and/or "flashcart" are to allow you to play imported games and homebrew software that you legally own or simply just for experimenting with hardware. We in no way endorse piracy, and encourage all users to do the right thing and support the developers/manufacturers that support them. We do not take any responsibilities for any use outside of these parameters or where the use of such a device is illegal.
DIGG THIS
Images via commentsby Published on February 2nd, 2011 12:11- Categories:
- Nintendo Wii News,
- DCEmu Reviews
Airfoam Pocket Controller Case
Manufacturer: Dragon
Site:
Price: $14.95


Overview : A stylish, tough and practical carry bag to go challenge your friends on Wii with your own controllers! Available in 5 fashion colors, and easy to carry with its included carabiner or on your belt, it is the perfect companion for players on the go!
- Airfoam design to protect against shock and scratches
- Can hold one Wiimote and one Nunchuk
- Comes with carabiner and belt strap
Features:
- Prevent any shock and scratch
- Place with Wii remote controller and Nunchuk pad
- Come with carabiner for hanging or carrying on the belt
Quality/Usability : There has not been many cases out on the market that will protect the Wiimote and Nunchuk from dust and scratches. Dragon aims to help solve that problem.
The case is very big but at the same time, it gives ample amount of protection from its thickness. Placing the controllers into the case feels just right and snug. If you have a silicone case on your controllers, it will make it a bit more tighter.
Inside the case is a middle divider that separates your Wiimote and Nunchuk. I had to play around with how to place the controllers as well as how to place the wires and wrist strap. With the Wiimote in the case, it reaches near the top so you'll either have the strap on top or at the bottom of the case. With the Nunchuk, I placed the wires in first and then the Nunchuk itself. Since the case is somewhat of a tight fit, the joystick on the Nunchuk had to be moved from its default position (middle). This can also hold two Nunchuks or two Wiimotes...nothing more.
Conclusion : Overall, the Airfoam Pocket Controller Case protects the controllers very well. But the size may be a big turn off to some as they want it to be as portable as possible.
Images via comments- Search DCEmu
- Advert 3
 News Categories

- Links of Interest
 Sony Consoles News


- Nintendo Consoles News

- Sega Consoles News


- Apple & Android News
- Xbox Consoles News


- Open Source Consoles News
 DCEmu News Archive
- Advert
- Retro Consoles News


- PC News

- Latest DCEmu News


- DCEmu Network Sites
-
 Menu
Menu  Forum Stats
- What is the DCEmu Homebrew & Gaming Network
Catherine: Full Body’s English translation for the Vita