

 DCEmu Homebrew Emulation & Theme Park News
Nintendo Wii News
by Published on February 3rd, 2011 09:16- Categories:
- Nintendo Wii News

News via nmax
The Team Twiizers and roto claim the new exploit to hack the Nintendo Wii to version 4.3, found in the game LEGO Star Wars: The Complete Saga , leaked yesterday under the name Jabba Tha Haxx .
Prerequisiteshttp://hackmii.com/2011/02/return-of-the-jodi/ ...
1. SD card (not SHDC) formatted as FAT16 or FAT32
2. Some possibility to copy the savegame from the PC to the SD card (i.e. card reader)
3. Lego Star Wars (you have to boot it at least once before)
4. Some homebrew software to load, e.g. the HackMii Installer. Although this isn't necessary, it's highly recommended
Howto
1. (OPTIONAL) If you have an existing "Lego Star Wars" savegame. MOVE it to another SD CARD.
2. Copy the "private" directory from the Return of the Jodi download to the root of your SD card.
3. Take your homebrew and put it in the ROOT of your SD card as "boot.elf"
4. Put your SD card in your Wii and turn it on.
5. Go into Wii Options -> Data Management -> Save Data -> Wii.
6. Go to SD card and select the "Return of the Jodi" savegame that corresponds to your game region.
7. NOTE: Some people are having problems with the Wii not "seeing" the savegame on the SD card. If you are experiencing this, try setting the archive bit for the data.bin file. In Windows this can be either be done from the file's properties dialog (right click on it in Windows Explorer and check the box) or from the command line using "attrib +a". More info at #wiihelp on EFnet.
8. Copy the savegame to the Wii.
9. Boot Lego Star Wars.
10. Load the saved game you just copied to the Wii.by Published on February 3rd, 2011 01:50- Categories:
- Nintendo Wii News
News via http://www.nintendomax.com/viewtopic...f242e44f23a65e
Giantpune realized with the help of Team Twiizers a new exploit to hack the Nintendo Wii to version 4.3. The exploit for the game LEGO Star Wars: The Complete Saga and exploits a flaw in the backup of the game
http://gbatemp.net/t277240-jabba-the-haxx?&st=15 ...by Published on February 2nd, 2011 15:51- Categories:
- Nintendo Wii News
"This partnership helps offer a point of difference to the retailer"
UK publisher Funbox Media has teamed up with accessories firm Imp Gaming to produce Combo Packs for Wii.
Each product combines one of Funbox’s Wii titles with an appropriate Imp peripheral, such as steering wheels and fishing rod controllers. Titles in the deal include Chicken Blaster, Speed, Wild West Shootout and Reel Fishing: Angler’s Dream.
Imp has also told MCV it is working on similar bundles for DS, Xbox 360 and PS3.
“This partnership helps offer a point of difference to the retailer, but more importantly to the consumer, who is looking for extra value in these austere times,” said Funbox Media’s sales manager Mark Clemens.
http://www.mcvuk.com/news/42837/Funb...or-Wii-bundles ...by Published on February 2nd, 2011 12:36- Categories:
- Nintendo Wii News,
- DCEmu Reviews
Loud Speaker Dock
Manufacturer: PantherLord
Site: Buy from Brando
Price: $17.00
Overview : Do you feel the sound from your NDS Lite is too Quiet? You always can't listen very clear. This Speaker Dock can help you.
This speaker dock comes with 2 loud speakers which can improve the sound volume and quality, and it include a NDS Lite Li-ion, that can be charged with your NDS Lite AC adapter.
Features :
- Specify design to NDS Lite
- Improve your NDS Lite sound quality
- Included NDS Lite Li-ion 3.7V 1000mAh battery
- It can be charged with your NDS Lite adapter * The AC adapter is not included
- Available in white, enamel navy, light blue, pink and black
Quality/Usability : When I bought the original Nintendo DS, I thought it couldnt get any better than that with the dual screen and great sound. Then Nintendo goes and releases a Nintendo DS Lite with a better brighter screen but theres a problem, the sound didnt sound so great. It was lower even at full volume. The original DS trumped the DS Lite in sound and I was disappointed.
The Loud Speaker Dock runs on a rechargeable battery (included). It goes on the underside, between the two speakers. On the underside, there is also a plug that connects to the headphone jack of the DS Lite. When the plug is not in use, it is hidden in a groove next to one of the speakers.
The front of the dock has a switch. If the switch is on the left, it is the speaker. If the switch is on the right, it is OFF. If an AC adapter is plugged in while the switch is on the right, it will charge the battery. To the right of the dock are two LEDs (power and charge).
There is nothing to clip the DS to the dock. It is held in place by the tightness of the dock when the DS is placed. When the DS is placed onto the dock, accessing SLOT-2, volume switch and headphone jack can be reached easily. Accessing SLOT-1 is also easily accessible as well. There is an opening on the right side of the dock for the power switch. Unfortunately, in order to get access to the stylus, you will have to remove and DS from the dock.
The volume on the dock is very very loud. I was impressed by the loudness of the dock. The sound is clear even at the highest level. Adjusting the volume is done on the DS. There is no volume adjuster on the dock. The dock lasted a good 2-3 hours with on and off play.
Conclusion : Overall, the Loud Speaker Dock is a pretty good alternative for those who want a louder DS Lite. With the added thickness, it feels good in the hands. It would of been nice if it was able to charge your DS as well. Having to gain access or putting the stylus away can be a pain in the butt sometimes. Battery life is decent as well.
Images via comments ...by Published on February 2nd, 2011 12:22- Categories:
- Nintendo Wii News,
- DCEmu Reviews
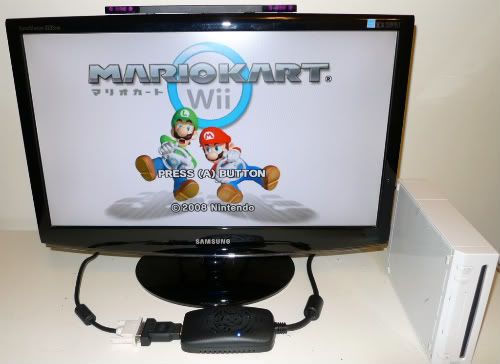
Wii LAN Network Adapter
Review by: cowdisease
Provided by: DCEmu Reviews
Manufacturer: N/A
Site: Buy from GameInfinity
Price: $19.95
Overview : You’ve got a Nintendo Wii. You have a broadband internet connection on your PC. You’ve heard about all the fun things you can do online with your console. Yet when it comes to connecting your Wii to the net, you don’t know where to start. With our amazing new LAN Adapter for the Nintendo Wii, you can create a wired high-speed internet connection for your console. Just plug the Adapter into your Wii's USB port, and then connect it to your PC’s DSL or Cable modem or your router using a network cable. It’s as simple as that! It's USB 2.0, taking advantage of the latest, fastest USB protocols.
Because Wii LAN Adapter uses a cable connection, it always offers high-speed, reliable data transfer speeds. It’s ideal for places where wireless connectivity isn't possible, perhaps because of thick walls or interference from other products, and it's faster than any WiFi connection. At last, you can enjoy uninterrupted online gaming!
Features:
- Creates a high-speed LAN Internet connection for your Nintendo Wii
- No wireless network required
- Connects to your existing PC connection or DSL modem
- USB 2.0 connection supports the Wii at full speed
Quality/Usability : I applauded Nintendo when they announced that their newest console, the Wii, would come equipped with wireless networking capabilities directly out of the box. “Hooray!” I thought, “I won’t have to pay an obscene amount of money to get an overpriced wireless adapter to connect my Wii to my stunning wireless network!” Instead, Nintendo did it backwards, leaving out the usual wired Ethernet port, so if you are one of the many people who have not yet set up their home with a wireless network (or if you are like me and don’t like dealing with the hassle of wireless network security and dropped connections) then you have to buy this regularly priced wired adapter.
It will cost you $24.99 plus shipping and handling to rectify this omission if you buy through Nintendo’s online store, a price that is comparable to other PC-only USB LAN adapters on the market. The package is as bare-bones as it can be, containing simply the one-piece adapter, a single folded instruction sheet, and a small CD containing PC drivers.
Hooking your Wii up is as simple as the pictures on the back of the box suggest. Simply plug the USB end of the adapter into one of the two slots in the rear of your Wii, plug your Ethernet cable into the adapter, and turn your Wii on. The only remaining step is to go into your Wii’s settings and change the connection settings to “wired” from the default “wireless” option. The one-page instruction sheet has clear, illustrated instructions that will walk you through this simple process, and after a short automated test your Wii will be connected to the internet. The length of the entire process from opening the box to being connected depends mostly on how good you are at opening boxes.
The USB cable on the adapter is about five inches long, just long enough to rest flat on any surface if you have the Wii oriented vertically. The body is about an inch thick and three inches long, so it is not as compact as some of the other adapters of this type on the market, so while it can be used for your laptop it is not ideally suited for portability. It is the same color and shape as the Wii’s power brick so it is aesthetically consistent with the rest of the Wii gear. When plugged in two unlabeled, red LED’s indicate that it is functioning.
The PC setup is also fairly simple, as you can plug and go. However if your computer does not automatically install your adapter properly you will have to deal with the driver disc. When the disc is inserted it simply opens an explorer window that shows the various files containing the different drivers. There are no auto-prompts here, but once you select the proper drivers the install is quick and automatic. The disc supports a wide variety of operating systems: Linux, Windows Vista and XP in 32 and 64 bit, CE, ME, 98, and Mac OSX 10, and works flawlessly.
Conclusion : Overall, if you need or want to wire your Wii to the internet the adapter is reasonably priced, quick and easy to use, even if it is a little bulky. If you want to get over your resentment at Nintendo leaving out a basic component that will cost you thirty dollars, go get yourself some ice cream.
Images via comments ...by Published on February 2nd, 2011 12:22- Categories:
- Nintendo Wii News,
- DCEmu Reviews
VDIGI VD-W3 Wii HDMI Upscaler
Manufacturer: VDIGI Electronics
Site: Buy from VDIGI Electronics
Price: USD$59.00 (WAS $75)
Overview : This is the world first dedicated Wii HDMI Upscaler, it can support connection though HDMI or DVI, and enjoy resolution up to 1080p or monitor resolution 1680x1050.
Features :
Powerful Video Signal conversion
- Crystal shape image, Outstanding picture quality.
- Full HD (1080p) output.
- True 10-Bits high definition video scaler engine.
- AV grade scaler engine.
User Friendly
- No external power required.
- Easy to setup.
- LED status indication.
Wide Range Video support
- Support TV (HDMI) and PC Monitor (DVI).
- HDMI-Audio and Analog audio out.
- Various HDTV video out.
- Native resolution for LCD monitor.
Specs :
- Input: Wii AV Connector x 1, USB Type A Plug x 1.
- Output: HDMI x1 , 3.5mm Stereo Audio Jack.
- Video lag time: 8 ms
- Video In Supported: EDTV(480i/576i), SDTV(480p/576p)
- Video Out Supported : 480p, 720p, 1080i, 1080p, 1280x1024, 1440x900, 1680x1050 (at refresh rate 59.94Hz)
- Audio Out: HDMI audio, Analog audio.
- Bi-Color LED: Blue and Red.
- Operating Temperature: 5°C to 60°C (41°F to 140°F)
- Dimensions (approximate): 12cm (L) x 7cm (W) x 2.5cm (H)
- Mass (approximate): ~180g
Quality/Usability : This review was tested on a 32" Samsung 720p HDTV (HDMI) and a 24" Dell Widescreen 1080p Monitor (DVI).
Let me start off by saying that the VD-W3 is a upscaler. Those expecting the VD-W3 to render images to high quality, this is not the product. VD-W3 will upscale the Wii's 480p signal and can independently scale SD images horizontally and vertically to achieve a quality picture for video display up to 1080p resolutions. The VD-W3 provides an HDMI connection, which is an alternatives to AV or component connections. This will also allow you to display your Wii on a monitor using DVI with audio output.
Upscalers are not new...at least not on the market. They were usually primarily used for DVD players but this is the FIRST solely dedicated for the Nintendo Wii. Upscalers basically output smoother and cleaner images on your display.
Connecting the VD-W3 is not complicated at all. The VD-W3 simply replaces the standard AV/Component plug and has a USB cord attached to it. This USB cord is what will power the VD-W3. No extra socket or power cord needed. This is great because I have daisy chained surge protectors in order to have enough sockets. On the other end of the VD-W3 is a port to insert your HDMI cable. If you do not have a HDMI TV or monitor, you will need to use a HDMI-to-DVI adapter and use a DVI cable. Do note that using a DVI cable does not transmit sound, so you will need to insert a 3.5mm cable from an external speaker.
The bottom of the VD-W3 contains a bunch of dip-switches and a RESET button. Different combinations of the dip-switches will change resolution (480p, 720p, 1080i, 1080p and screen 1280x1024, 1440x990 and 1680x1050) as well as adjusting image (NORMAL or ENHANCED) and choosing between HDMI or DVI setup. There is an option for MODE 1 and MODE 2. There was no mention of this in the paper menu that was included but was told by VDIGI representative that this is for zooming in and out. If you have a black border, this would zoom in which will remove the black border. I did not have any black borders, so I was unable to confirm. If you have made a change in the dip-switches, the screen should automatically refresh within a couple of seconds. If it does not, you can press the RESET button and it will refresh the screen.
Comparing Component output and VD-W3's, I noticed that with the component cable, the display was brighter. With the VD-W3, the display was dimmer. As stated, this will upscale the Wii's 480p signal. There was some slight improvements that was noticeable but nothing jaw-dropping. Certain areas you would see that jaggies present in component was slightly improved and cleaner looking on the VD-W3. In some areas, jaggies was still noticeable but not as bad. DO NOT expect this to be a complete Wii HD.
With the less than a handful of GameCube games that are left in my collection, the VD-W3 had a little trouble with menus, in-game loading and intros. Images either froze or were slightly distorted. This can be resolved by playing around with the dip-switches on the bottom of the VD-W3. However, this can get annoying and bothersome.
The following images are from VDIGI using a HDMI capture card. VDIGI used AverMedia Capture HD capture card, directly captured from the VD-W3 HDMI output, this provide the best pictures on how it should be look like. For this capture card, it only allows them to capture up to 1080i HDMI/DVI output, so they cannot capture 1080p picture for your reference. This will provide a much more accurate view rather than taking a picture of a screen with a camera. Left hand side is 480p and Right hand side is 1080i, Click for the below pictures to display the bigger image (~500KB to 1MB in each file size, longer download time may needed)


Conclusion : Overall, the VDIGI VD-W3 Wii HDMI Upscaler is a nice product but had some flaws. The brightness of output is dimmer than that of my component cable and the improvement is visible but nothing drastic. Within a week of VD-W3's release, VDIGI has read a lot of comments after our newspost was posted and most of the comments were about the price. After serious thoughts about the comments from potential buyers and for the Wii market need, VDIGI has dropped the price from $75 to $59! VDIGI's VD-W3 is the first Wii HDMI dedicated upscaler on the market and there is no comparable product to compare price. It's difficult to set a starting price but VDIGI used the upscaler price standard to define the VD-W3 as the same grade as most of the common AV upscalers.
I do agree that the $75 price tag was a bit steep but I am glad (as well as many others) that VDIGI lowered the price to something more affordable.
If you dont have additional HDMI cables, you may want to purchase VDIGI's 1.5m/5ft HDMI cable (Male to Male 1.3b 28AWG with Ferrite Cores) for an additional $8. If you purchased it separately, it would be $16.
If you are using a DVI cable for your monitor, VDIGI Electronics sells a Female DVI to Male HDMI Converter for an additional $5 with purchase of VD-W3 or $10 by itself. Purchasing both the 1.5m/5ft HDMI cable and converter with VD-W3, its $12.00. Its not a bad price for the combo but its either one or the other. You cant use both.
VDIGI is open to comments, suggestions and will do suitable adjustment to respond to feedbacks.
Images via commentsby Published on February 2nd, 2011 12:21- Categories:
- Nintendo Wii News,
- DCEmu Reviews

D2CKey Wii Modchip (D2C only)
Manufacturer: D2CKey (aka WiiKey)
Site: Buy from OzModChips
Price: $60.00 ($64.90 AUD)
Overview : D2CKey is the worlds first Wii modchip that is compatible with D2C consoles. D2C is the name of the chipset that the Wii modchips need to exploit in order to work. Before D2C it was a lot easier to mod a console as there was a massive security flaw left open by 'the Big N'. They have now closed this flaw, and for 2 months, people with D2C console had to sit there with their thumbs in their mouths. That is until the D2CKey team (a spinoff of WiiKey) figured it out. If you know WiiKey, you know that they are perfectionists, and don't bring out hardware that isn't perfect.
Many people think it is a curse to get a D2C console, but with the D2CKey, you actually might be the lucky one. The modchip features an Actel chip, which is known for its reliable and stealth features.
Access control LEDs
- LED 1: disc access indicator.
- LED 2: data patching indicator
- Flashes smoothly during disc insertion and detection
- Lit when backup is detected (after disclogin)
- Off when original is detected
DVD media compatibility
- DVD+-R
- DVD+-RW
- Dual-layer DVD (movies and GCOS)
Game disc support
- Direct boot of Wii original and backup games from the same region
- Direct boot of Gamecube original and backup games from the same region
- Direct boot of different NTSC region Wii and GC games on USA and JAP consoles
- Partial region free support on Wii and GC original and backup games with different videomode (ie PAL<->USA, JAPAN)
- Improved readsettings for recordable media
- Supports running GC games at Wii diskspeed
- GC Audiostreaming Fix
- Supports full-size DVD and DVD9 discs for GC homebrew
- Supports GC multigame discs
- Supports Wii and GC multidisc games
True stealth mode
- Does not modify RAM, making it virtually undetectable for the Wii
- Full command set emulation
Quality/Usability : For those who purchased a Nintendo Wii with a D2C chipset have been sitting at twiddling their thumbs waiting for a way to play homebrew and other games on their Nintendo Wii. Nintendo has revised the Wii to prevent modchips whether it be revising the motherboard, new chipset or cutting legs. But like all hackers/modders, they are reluctant to give up.
The D2CKey is the worlds first D2C modchip for the Nintendo Wii and the first to be able to bypass Super Mario Galaxy's encryption that prevented current modchips to not be able to play the game (WiiKey, CycloWiz and others have released upgraded firmwares to be able to play Super Mario Galaxy). D2CKey is brought to you by the same team who released the well known WiiKey.
D2CKey only and I mean only works on D2C Wii's. If you have a DMS, D2A or D2B, use the WiiKey. The WiiKey will not work on D2C Wii's, that is why there are two different modchips. If you dont know what chipset you have or if it has the cutlegs, you can find out by entering your Wii serial number into the WiiTracker database and it would give you an estimation of what is inside your console. You can also help out by adding your serial number along with origin, whether or not pins are cut, missing WiiKey solder pad #3, and if you're a modder/hobbyist or installer/repairer. This will help expand the database for those searching.
The D2CKey is built on a high quality PCB board with a Actel chip that powers it.
Installation : I wont go into detail on installation but let me start off by stating that the installation is NOT for the novice and should not be performed if you are a newbie or have little experience in soldering. I have no soldering skills so I had a friend who is experienced perform the installation on a recently purchased Wii. Reason for this is because installation requires 31 wires to be soldered. You can find installation guides at D2CKey's Resource page.
To enter region free compatibility, you will need to close the jumper(s) JP1 and/or JP2 on the D2CKey to match the region of your Wii. If you do not close JP1 or JP2, there will be no region override. Closing JP2 will patch PAL. Closing JP1 will patch USA (NTSC) and if both JP1 and JP2 are closed, this will patch Japan (NTSC).
Once installation is completed, whats different about the D2Ckey from the rest of the other modchips is that there is no need to set up, reflash, upgrade, or fiddle around. D2Ckey automatically detects what kind of disc is inserted, and configures the drive accordingly.
There are two LEDs on the D2CKey. This will inform you when discs are being read and detected. Of course, this is only visible when you still have the Wii disassembled. Once you close up your Nintendo Wii, you wont be able to see it unless you have the chip hanging on the outside.
Wii/GameCube Compatibility : All original Wii games booted up and flawlessly. Testing backups of the original games also resulted in a flawless boot up. Testing GameCube games posted the same result. But I noticed if you're switching from a GameCube game to a Nintendo ...by Published on February 2nd, 2011 12:21- Categories:
- Nintendo Wii News,
- DCEmu Reviews
Wii Dust Prevent Cover
Manufacturer: PEGA
Site: Buy from Brando
Price: $7.00
Overview : Prevent dust gets into the Wii console.
Features :
- Prevent dust gets into the Wii Console
- Extend your Wii Life.
Quality/Usability : Purpose of this product is well, you know...prevent dust. The Wii Dust Prevent Cover comes with two covers. One for the bottom of you Nintendo Wii and one for the back of your Nintendo Wii. The covers are made of plastic but the filter themselves are similar to that you find in your air conditioner.
The covers clip onto the Nintendo Wii in order to stay on. The covers don't get in the way of any cords or the base stand for the Nintendo Wii. With the covers on, there is still enough air flow to keep the Nintendo Wii cool but at the same time, prevent any dust from entering and damaging your precious Wii.
Since the covers are made of plastic and so are the clips that clip to the inside of the Nintendo Wii. Excessive removal of the dust covers may weaken the clips thus resulting the clips to fall inside the Wii.
Conclusion : Overall, the Dust Prevent Cover does what its suppose to do. But the clips that clip onto the Wii are a little iffy. They seem fragile. If you remove them too much or happen to add too much force to them, they might snap off and fall into the Wii, which isnt a good thing. Besides that, it allows enough air flow and at the same time, prevent dust from entering.
Images via comments ...by Published on February 2nd, 2011 12:21- Categories:
- Nintendo Wii News,
- DCEmu Reviews
VDIGI VD-W2 Wii VGA Cable
Manufacturer: VDIGI
Site: Buy from VDIGI
Price: $39.90
Overview : Connect your Wii units to a CRT or LCD monitor in the form of a VGA cable. The cable is compatible with Wii units in all regions and is capable of producing high quality VGA output.
Features :
- Easy to setup and use
- Compatible with Japan, U.S. and UK version console Wii, backward compatible with Gamecube 480p supported games
- Provide high quality VGA output
- Clear crystal image quality
- No external power needed
- Support wide range of CRT/LCD monitors
Quality/Usability : Not everyone owns a HDTV (yet) or have a spare TV to use while the family is using the TV to watch their favorite show. But everyone does have a computer monitor whether it be a CRT or LCD or probably spares. If not, prices are fairly cheap for those looking to use CRT/LCD monitors for gaming. The quality of the cable is very durable with the cable being 6.5ft (2M), with maximum output resolution 640x480 @ 60fps with output signals of RGBHV and RGBs. The cable has the AV out plug that plugs into the Wii, VGA plug that connects to monitor and RCA plugs (red and white for audio right and left and green component cable).
To set your WIi to 480p, there are two ways. If you have component cable hooked up to your Wii already, then you're set. If not, you'll need to connect the AV out plug to the back of the Wii. Once connected, insert your green component into the the TV. Although this is for component, you can plug into the video plug on standard TVs. Turn on the Wii and a blue power indicator will light up on the VD-W2 but the display will be in black and white. From here, change the settings on the Wii (Wii icon > Wii settings > Screen > TV Resolution > select EDTV or HDTV > Confirm). If you're using a standard TV, your screen will go blank as it can not support HDTV signal.
You can either leave the console on or off but you can turn it off to be safe. Disconnect the cables that is connected to the TV and plug the VGA connector to your monitor. Once connected and Wii turned back on, the Wii dashboard will be displayed. For audio, connect the RCA plugs (audio L/R) to your audio equipment. If you dont, you can connect the the included 3.5mm headphone jack converter and connect to any PC speakers for audio.
On the back of the VGA connector are small dip switches. I didnt have to touch it, but I assume if you are having problems with your display you would toggle with the switches.
MODE/DIP / RGBS (Comp) / RGBHV (Default) / RGBHV (1) / RGBHV (2)
1______________ON__________OFF__________OFF______O FF
2______________OFF__________ON__________ON_______O N
3______________OFF__________OFF_________ON_______O FF
4______________OFF__________OFF_________OFF______O N
All the games I tried whether it be Wii or GameCube games, worked perfectly and looked great with bright vivid colors. I did notice that Zelda: Twilight Princess did show scanlines but I assume it was the game as some other Nintendo developed games such as Mario Party 8 did the same thing but some other games developed by other companies didnt.
Conclusion : Overall, the VDigi VD-W2 Wii VGA Cable worked as it should. The colors were bright and vivid and pictures being clear and crisp. The ability to change the settings on the Wii without the use of a HDTV comes in very handy. The manual was photocopied and black and white but so as long it showed us how to connect and set things up, who cares? The scanlines seems to be normal as it is game related to only Nintendo developed games.
Images via comments ...by Published on February 2nd, 2011 12:21- Categories:
- Nintendo Wii News,
- DCEmu Reviews

Wii Double Charger & Nunchuk Stand
Manufacturer: Panther Lord
Site: Buy from Goldenshop
Price: $19.00
Overview : Charges two Wiimotes at the same time as well as hold one Nunchuk.
Features:
- High quality 3rd party product.
- Comes with 2pcs of 1800mAh rechargeable batteries for the Wii remote controls - no need to take out the battery when charging.
- No need to add extra power supply - get the power from the USB port of the Wii console.
- 2pcs of Wii remote controls can be charged simultaneously.
- Extra space for storing the Nunchuk.
- Comes with a extra USB socket for other device.
- Light indicators to show the charging status.
- No need to take away the hand straps when charging.
Quality/Usability : Like majority, if not all of the Wiimote charging stations, it draws its power from a USB port whether it be from the Nintendo Wii or from your computer.
The Wii Double Charger & Nunchuk Stand gets its power from the USB port and includes two (2) 1800mAh rechargeable batteries. Each battery has an opening to access the SYNC button easily.
The USB cord is attached to the charging station. On the left of the dock is a holder for one (1) Nunchuk and to the right of it are two docks for two Wiimotes. In between the Wiimote docks are two LEDs. This will tell you when the Wiimotes are charging. When the LED lights is green, the Wiimotes are done charging. When the LED lights are red, then the Wiimotes are charging.
Whats makes this different charging station different from the rest is that you do not have to take the wrist strap off in order to charge. You can actually just leave it on and charge. But you still have to take off the silicone case on your Wiimote if you have one on.
Charging took about 2 hours but the batteries lasted as long as it took to charge. The batteries lasted about 2.5-4 hours.
Conclusion : Overall, the Wii Double Charger & Nunchuk Stand isnt any different then the current charging stations out on the market. But the ability to charge without having to remove the wrist strap is a plus. The lack of play time kind of hurts the Double Charger Station.
Images via comments ...- Search DCEmu
- Advert 3
 News Categories


- Links of Interest
 Sony Consoles News


- Nintendo Consoles News

- Sega Consoles News


- Apple & Android News
- Xbox Consoles News


- Open Source Consoles News
 DCEmu News Archive
- Advert
- Retro Consoles News


- PC News

- Latest DCEmu News


- DCEmu Network Sites
-
 Menu
Menu  Forum Stats
- What is the DCEmu Homebrew & Gaming Network
Catherine: Full Body’s English translation for the Vita